hexo博客搭建
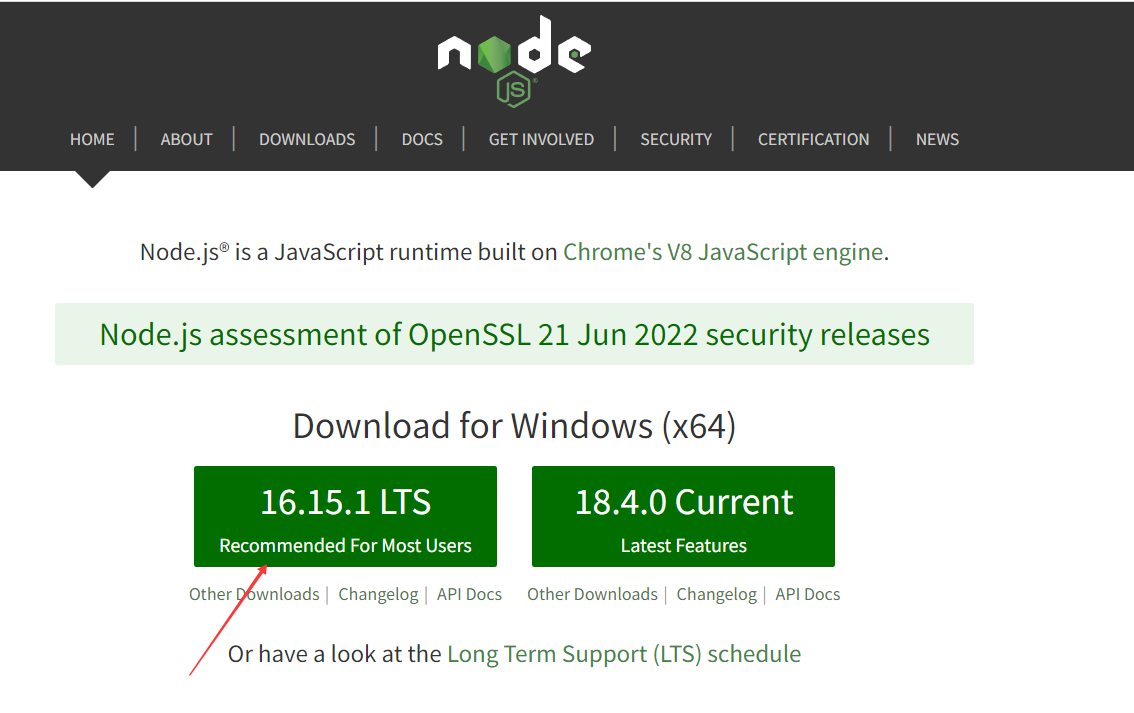
安装node.js
官网下载地址:https://nodejs.org/en/
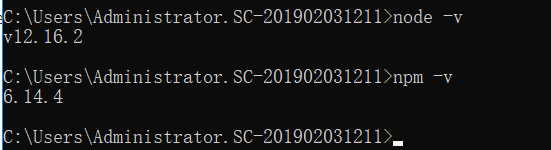
win+r 输入 cmd进入命令行,查看node版本
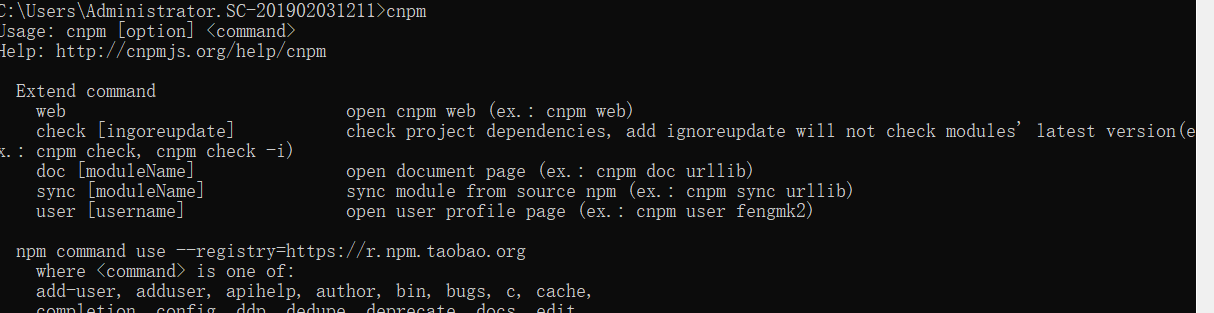
安装cnpm,使用国内镜像淘宝
1
| npm install -g cnpm --registry=https://registry.npm.taobao.org
|
安装hexo-cli
1
| cnpm install -g hexo-cli
|
验证是否安装成功

搭建博客
创建blog文件夹(也可直接右键新建文件夹),并进入这个目录
初始化博客

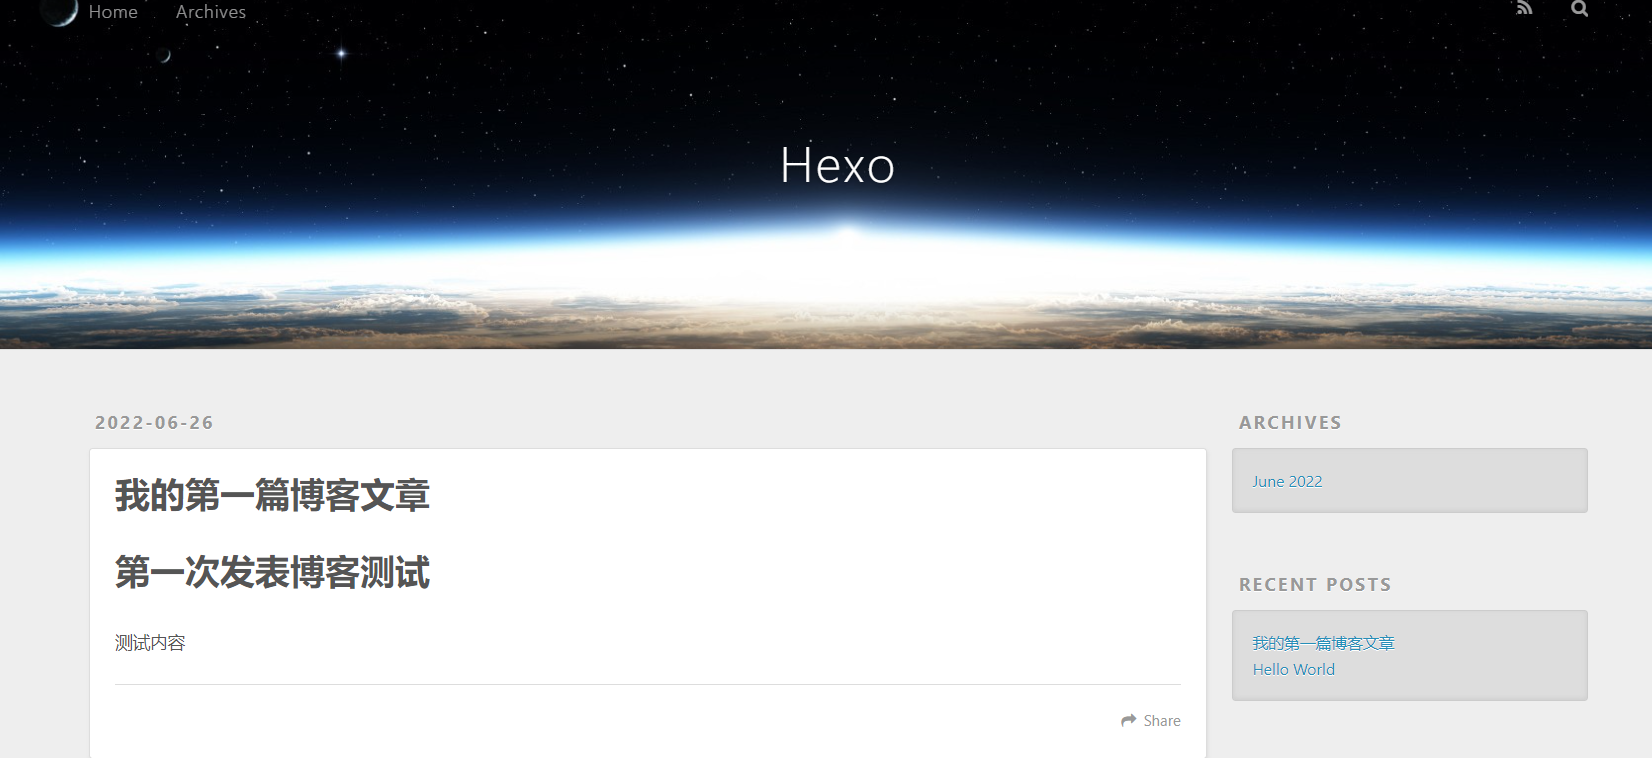
启动博客(hexo start)

访问地址:http://localhost:4000/
发表文章
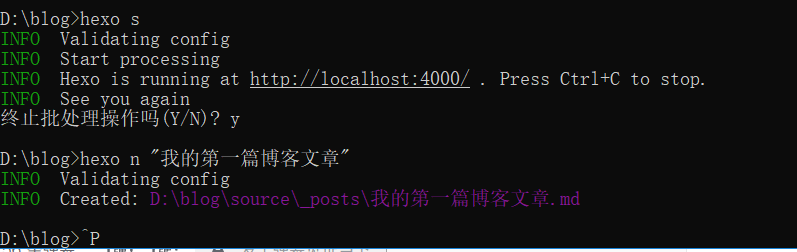
对source_posts\我的第一篇博客文章.md进行修改
清理
生成文章(hex generate)
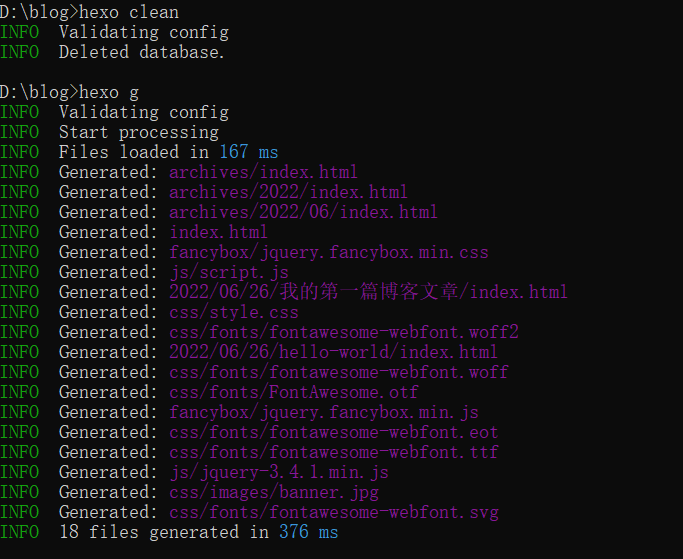
重新开启服务器,输入网址就可以看到发表的文章
博客部署到github
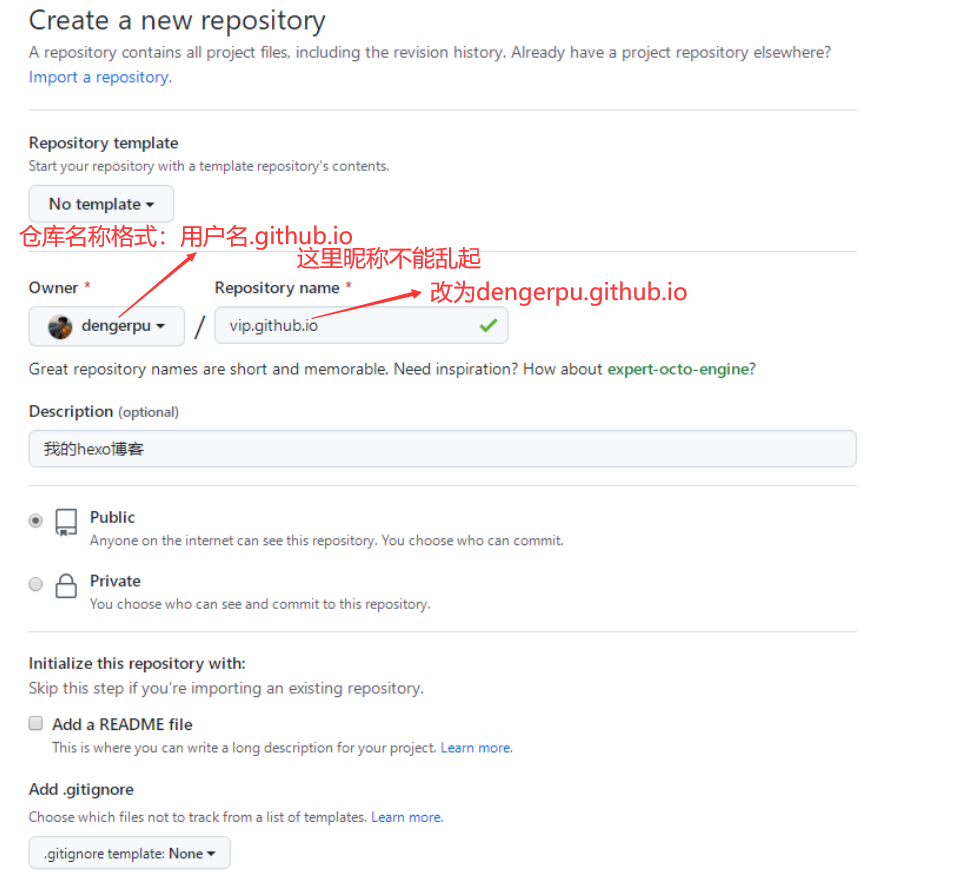
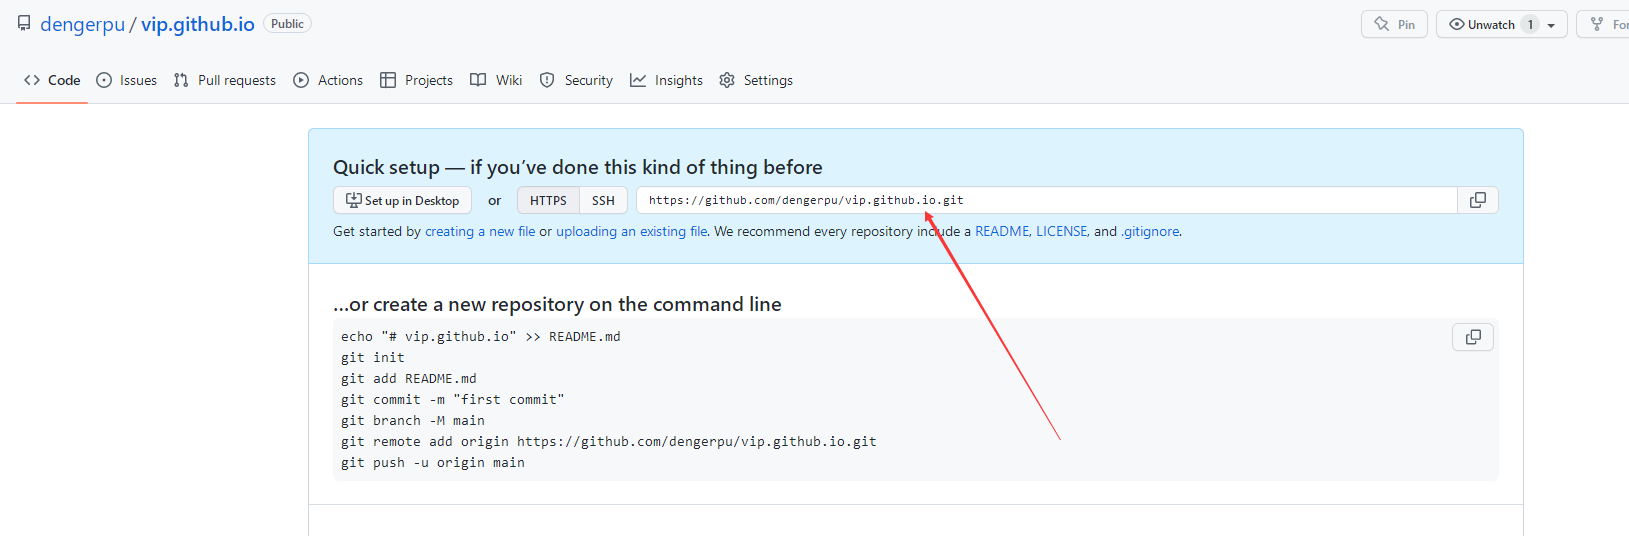
登陆github创建一个新仓库
注意:仓库名字:域名.github.io
2.创建成之后,安装hexo-deployer-git
1
| cnpm install --save hexo-deployer-git
|

3.在blog文件夹下修改_config.yml
修改_config.yml文件末尾的内容
repo里面填写github仓库地址
branch 填写分支
注意:这个仓库地址不可用,不能随便起域名 vip.github.io不行。要用自己的github用户名
用户名.giuthub.io
1
2
3
4
| deploy:
type: 'git'
repo: 'https://github.com/dengerpu/dengerpu.github.io.git'
branch: 'master'
|
4.部署到远端
5.访问
地址:https://vip.github.io
更改后的地址:https://dengerpu.github.io
最后发现vip域名被占用了,就换了个域名重新部署到远端(更改下仓库名,和_config.yml里面的配置,再次部署到远端即可 hexo d)
更改博客主题
地址:https://github.com/litten/hexo-theme-yilia
下载主题
1
| git clone https://github.com/litten/hexo-theme-yilia.git themes/yilia
|
修改_config.yml这个文件

重新清理,生成
重新开启博客服务器
推到远端
博客常用命令
Create a new post(发表文章)
More info: Writing
Run server(运行服务器)
More info: Server
Generate static files(发送到服务器)
More info: Generating
Deploy to remote sites(部署到远程站点)
更换Hexo Fluid主题
参考网址:https://hexo.fluid-dev.com/docs/start/
Hexo 5.0.0 版本以上,推荐通过 npm 直接安装,进入博客目录执行命令:
1
| npm install --save hexo-theme-fluid
|
然后在博客目录下创建 _config.fluid.yml,将主题的 _config.yml 内容复制过去
地址:https://github.com/fluid-dev/hexo-theme-fluid/blob/master/_config.yml
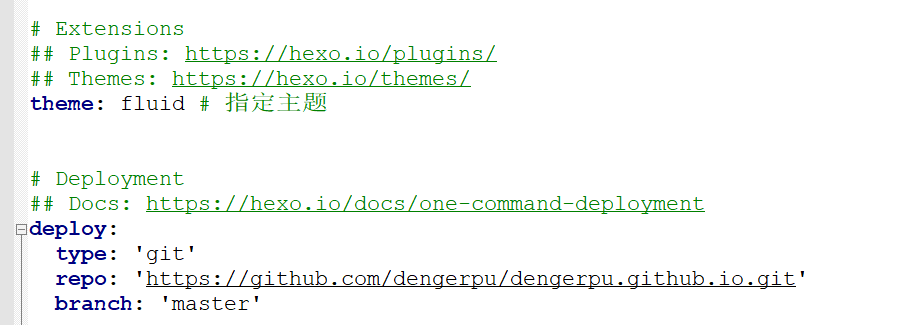
如下修改 Hexo 博客目录中的 _config.yml:
1
2
3
| theme: fluid
language: zh-CN
|
乱码解决方案:
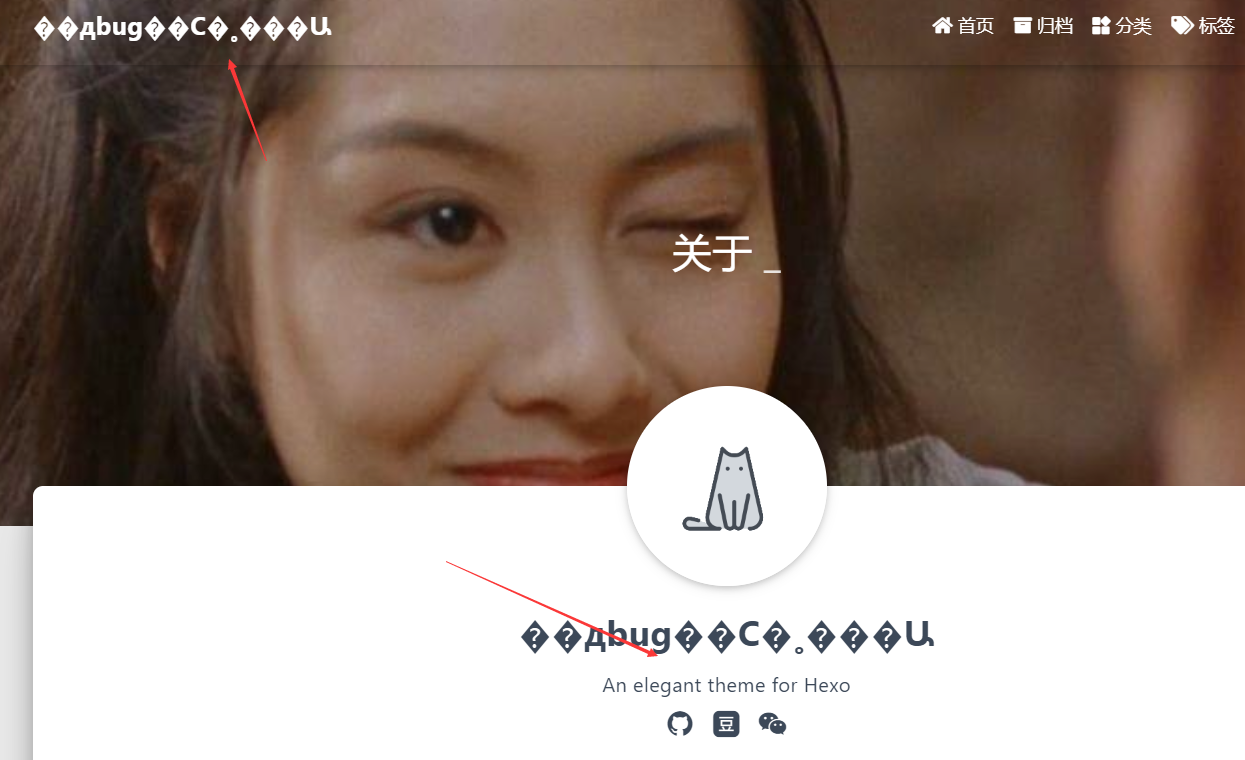
_config.fluid.yml文件通过vscode打开,设置使用utf-8编码,不过其他注释会乱码。我们再复制之前的覆盖掉这个就可以了。
修改博客文章模板
通过hexo new “文章名称”命令新建博客文章时,默认使用的模板是post.md,该文件在站点根目录的scaffolds文件夹中,修改hexo新建博客的模板一共有两种方法:
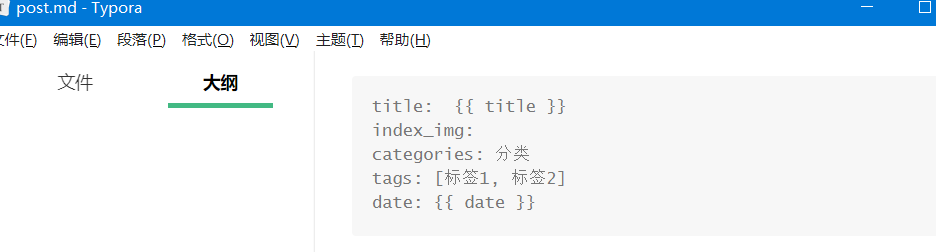
①直接修改post.md (推荐)
1
2
3
4
5
6
7
| ---
title: {{ title }}
index_img:
categories: 分类
tags: [标签1, 标签2]
date: {{ date }}
---
|
②新建自己的模板。
新建一个名为blog.md的模板(名称可以根据自己的需求随便取,但是不可以与当前的文件夹中的文件重名,也不可以命名为page.md
因为hexo new page “名称”命令是新建一个页面)
如果要新建博客,通过``hexo new blog “文章名称”`命令新建,该命令中的blog字段说明使用的是名为blog.md的模板
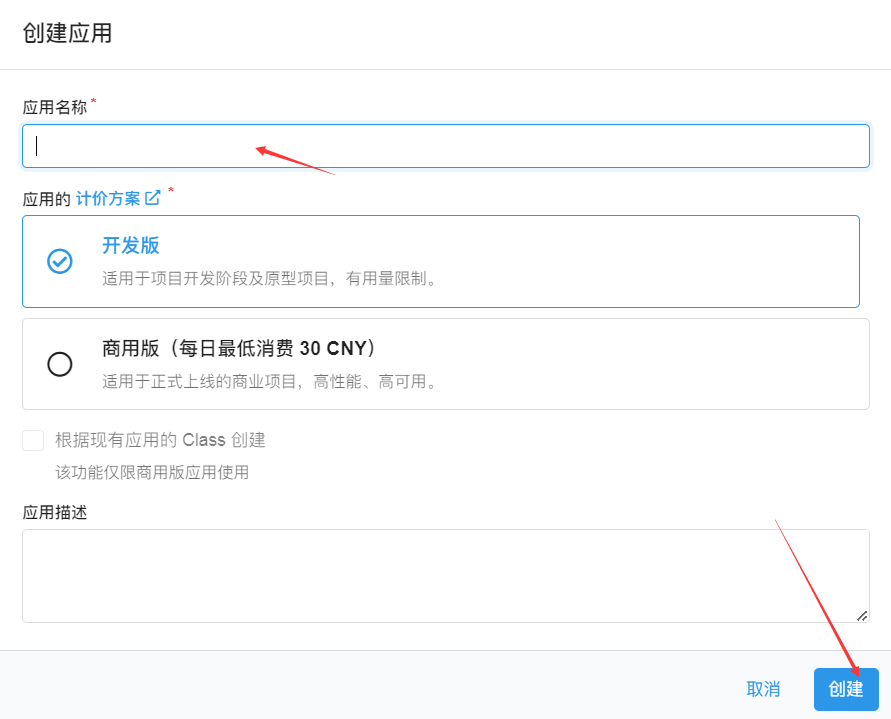
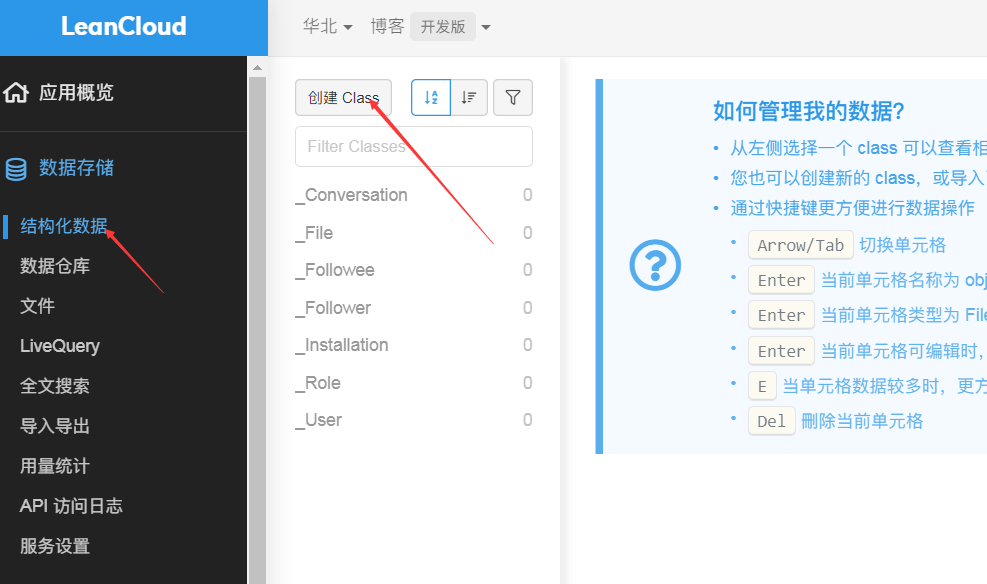
展示访问量
https://console.leancloud.cn/apps
先创建应用
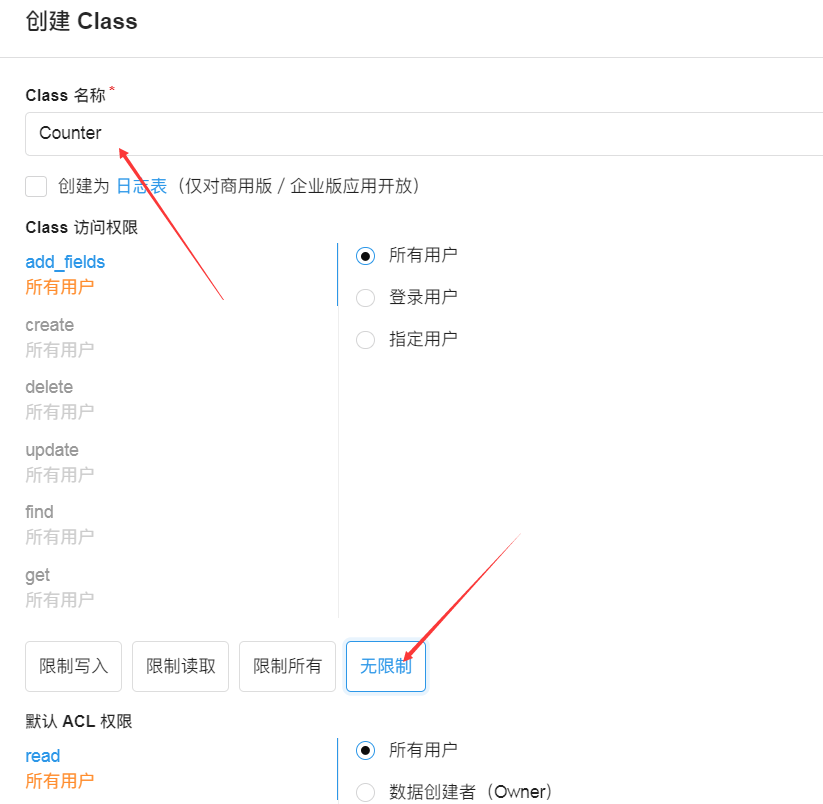
创建Class
创建的名称必须是Counter,且要配置无限制,这样才会更新浏览次数,不然接口403,不会更新数据。
配置themes/fluid/_config.yml文件
1
2
3
4
5
6
| web_analytics:
enable: true
leancloud:
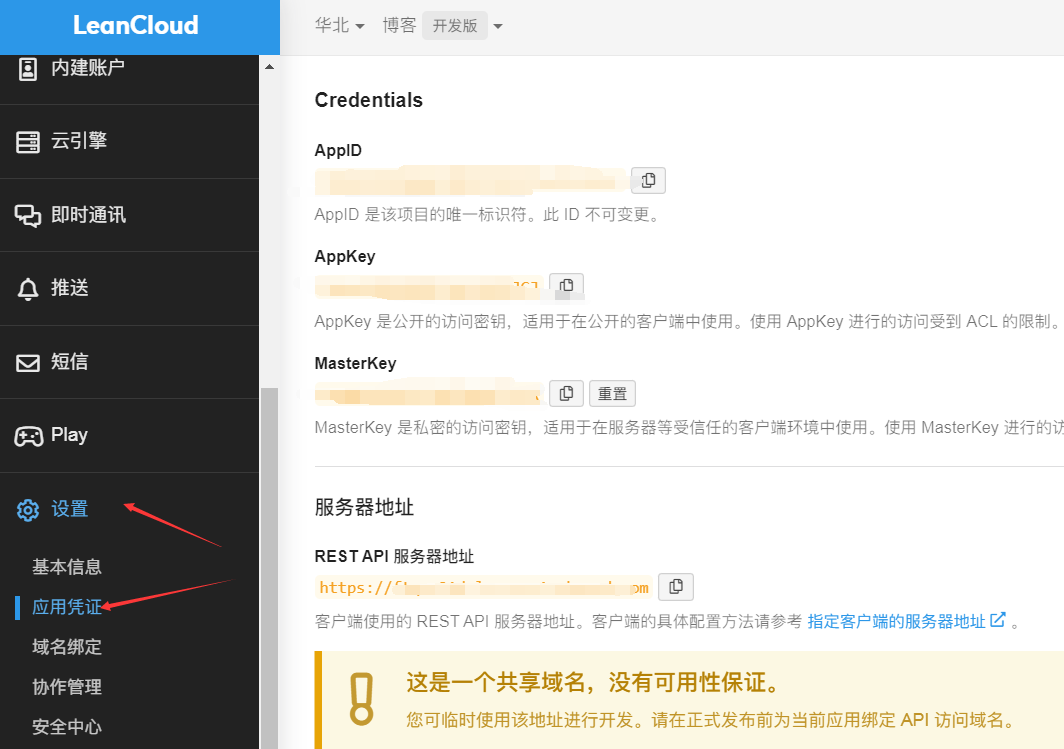
app_id: 获取的appid
app_key: 获取的appkey
server_url: https://ftqzr21d.lc-cn-n1-shared.com
|
1
2
3
4
5
| statistics:
enable: true
source: "leancloud"
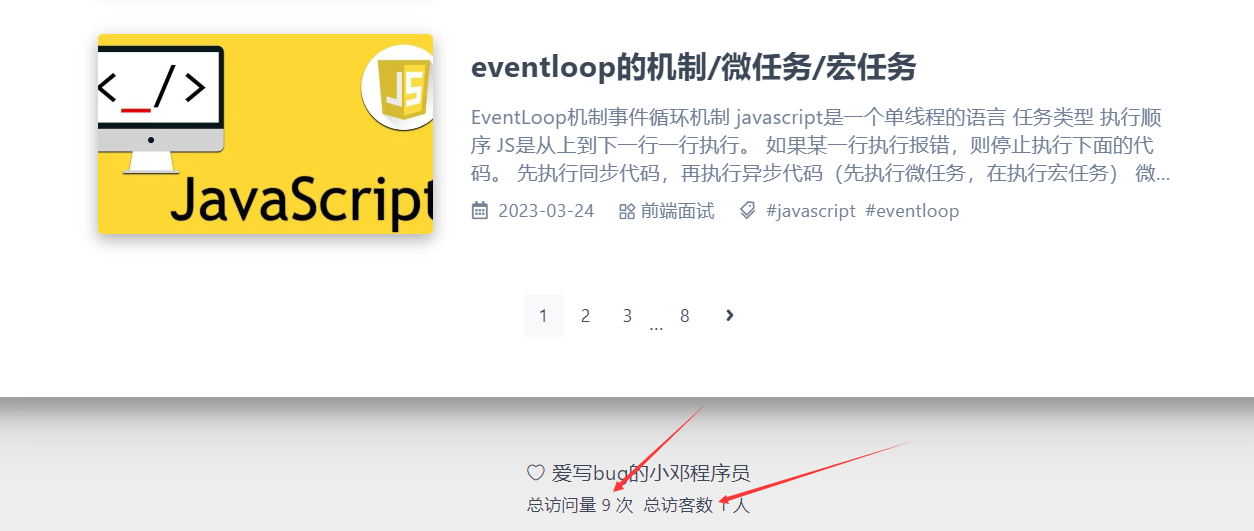
pv_format: "总访问量 {} 次"
uv_format: "总访客数 {} 人"
|
1
2
3
4
5
6
7
8
9
|
views:
enable: true
source: "leancloud"
format: "{} 次"
|

配置网站运行时间
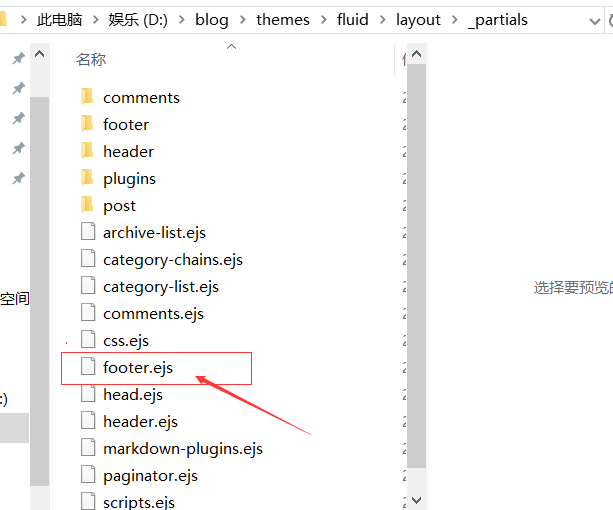
themes\fluid\layout_partials\footer.ejs
1
2
3
4
5
6
7
8
9
10
11
12
13
14
15
16
17
18
19
20
21
22
23
24
25
26
27
28
29
30
31
32
33
34
35
36
37
38
39
40
41
42
43
44
45
46
47
48
49
50
51
52
53
54
| <footer class="text-center mt-5 py-3">
<% if (theme.footer.content) { %>
<div class="footer-content">
<%- theme.footer.content %>
</div>
<% } %>
<!-- 添加网站运行时间 -->
<div class="footer-content">
<div>
<span id="timeDate">载入天数...</span>
<span id="times">载入时分秒...</span>
<script>
var now = new Date();
function createtime(){
var grt= new Date("06/18/2022 00:00:00");
now.setTime(now.getTime()+250);
days = (now - grt ) / 1000 / 60 / 60 / 24;
dnum = Math.floor(days);
hours = (now - grt ) / 1000 / 60 / 60 - (24 * dnum);
hnum = Math.floor(hours);
if(String(hnum).length ==1 ){
hnum = "0" + hnum;
}
minutes = (now - grt ) / 1000 /60 - (24 * 60 * dnum) - (60 * hnum);
mnum = Math.floor(minutes);
if(String(mnum).length ==1 ){
mnum = "0" + mnum;
}
seconds = (now - grt ) / 1000 - (24 * 60 * 60 * dnum) - (60 * 60 * hnum) - (60 * mnum);
snum = Math.round(seconds);
if(String(snum).length ==1 ){
snum = "0" + snum;
}
document.getElementById("timeDate").innerHTML = "本网站已运行🚀 "+dnum+" 天";
document.getElementById("times").innerHTML = hnum + " 小时 " + mnum + " 分 " + snum + " 秒";
}
setInterval("createtime()",250);
</script>
</div>
</div>
<!-- 统计访问量信息 -->
<% if (theme.footer.statistics.enable) { %>
<%- partial('_partials/footer/statistics.ejs') %>
<% } %>
<% if(theme.footer.beian.enable) { %>
<!-- 备案信息 ICP for China -->
<%- partial('_partials/footer/beian.ejs') %>
<% } %>
<% if(theme.web_analytics.cnzz) { %>
<!-- cnzz Analytics Icon -->
<span id="cnzz_stat_icon_<%= theme.web_analytics.cnzz %>" style="display: none"></span>
<% } %>
</footer>
|
Github贡献图
安装插件
1
| npm install hexo-filter-gitcalendar --save
|
添加配置信息,以下为写法示例,在站点配置文件_config.yml或者主题配置文件如_config.butterfly.yml中添加
1
2
3
4
5
6
7
8
9
10
11
12
13
14
15
16
17
18
19
20
21
22
23
24
25
26
27
28
29
30
31
32
33
34
35
36
37
38
|
gitcalendar:
enable: true
priority: 5
enable_page: /
layout:
type: id
name: recent-posts
index: 0
user: dengerpu
apiurl: 'https://github.dengerpu.cn'
minheight:
pc: 280px
mibile: 0px
color: "['#e4dfd7', '#f9f4dc', '#f7e8aa', '#f7e8aa', '#f8df72', '#fcd217', '#fcc515', '#f28e16', '#fb8b05', '#d85916', '#f43e06']"
container: .recent-post-item(style='width:100%;height:auto;padding:10px;')
gitcalendar_css: https://cdn.cbd.int/hexo-filter-gitcalendar/lib/gitcalendar.css
gitcalendar_js: https://cdn.cbd.int/hexo-filter-gitcalendar/lib/gitcalendar.js
|
1
2
3
4
5
6
7
8
9
10
11
12
13
14
15
16
17
18
|
githubcalendar:
enable: true
priority: 0
enable_page: /
user: tsuiwade
layout:
type: class
name: container
index: 1
githubcalendar_html: '<div id="github-calendar" style="width:100%;height:auto;padding:10px;margin-bottom:20px"><div id="github_loading" style="width:10%;height:100%;margin:0 auto;display: block"><svg xmlns="http://www.w3.org/2000/svg" xmlns:xlink="http://www.w3.org/1999/xlink" viewBox="0 0 50 50" style="enable-background:new 0 0 50 50" xml:space="preserve"><path fill="#d0d0d0" d="M25.251,6.461c-10.318,0-18.683,8.365-18.683,18.683h4.068c0-8.071,6.543-14.615,14.615-14.615V6.461z" transform="rotate(275.098 25 25)"><animateTransform attributeType="xml" attributeName="transform" type="rotate" from="0 25 25" to="360 25 25" dur="0.6s" repeatCount="indefinite"></animateTransform></path></svg></div><div id="github_container"></div></div>'
pc_minheight: 200px
mobile_minheight: 0px
color: "['#ebedf0', '#f1f8ff', '#dbedff', '#c8e1ff', '#79b8ff', '#2188ff', '#0366d6', '#005cc5', '#044289', '#032f62', '#05264c']"
api: https://python-github-calendar-api.vercel.app/api
calendar_js: https://cdn.jsdelivr.net/gh/Zfour/hexo-github-calendar@1.21/hexo_githubcalendar.js
plus_style: "#github_container > .position-relative > .border{border:0!important}#github-calendar{position: relative;margin-top: -2rem;background-color: var(--board-bg-color);transition: background-color 0.2s ease-in-out;border-radius: 0.5rem;z-index: 3;-webkit-box-shadow: 0 12px 15px 0 rgb(0 0 0 / 24%), 0 17px 50px 0 rgb(0 0 0 / 19%);box-shadow: 0 12px 15px 0 rgb(0 0 0 / 24%), 0 17px 50px 0 rgb(0 0 0 / 19%);}"
|
参考:https://github.com/Zfour/hexo-github-calendar/issues
Butterfly主题
参考教程:https://butterfly.js.org/posts/21cfbf15/