1.设计模式七大原则 编写软件过程中,程序员面临着来自耦合性,内聚性以及可维护性,可扩展性,重用性,灵活性 等多方面的挑战,设计模式是为了让程序(软件),具有更好
代码重用性(即:相同功能的代码,不用多次编写)
可读性(即:编程规范性,便于其他程序员的阅读和理解)
可扩展性(即:当需要增加新的功能时,非常的方便,称为可维护)
可靠性(即:当我们增加新的功能后,对原来的功能没有影响)
使程序呈现高内聚,低耦合的特性
设计模式七大原则 设计模式原则,其实就是程序员在编程时,应当遵守的原则,也是各种设计模式的基础(即:设计模式为什么这样设计的依据)
设计模式常用的七大原则有:
单一职责原则
接口隔离原则
依赖倒转(倒置)原则
里氏替换原则
开闭原则
迪米特法则
合成复用原则
单一职责原则 对类来说的,即一个类应该只负责一项职责。如类A负责两个不同职责:职责1,职责2。当职责1需求变更而改变A时,可能造成职责⒉执行错误,所以需要将类A的粒度分解为A1,A2
代码演示:
1
2
3
4
5
6
7
8
9
10
11
12
13
14
15
16
17
18
19
20
21
22
23
24
25
26
27
28
29
30
31
32
33
34
35
36
37
38
39
40
41
42
43
44
45
46
47
48
49
50
51
52
53
54
55
56
57
58
59
60
61
62
63
64
65
66
67
68
69
70
71
72
73
74
75
package principle;public class SingleResponsibility {public static void main (String[] args) {Vehicle vehicle = new Vehicle ();"汽车" );"轮船" );"飞机" );RoadVehicle roadVehicle = new RoadVehicle ();"汽车" );AirVehicle airVehicle = new AirVehicle ();"飞机" );WatterVehicle watterVehicle = new WatterVehicle ();"轮船" );Vehicle2 vehicle2 = new Vehicle2 ();"飞机" );"公路" );"轮船" );class Vehicle {public void run (String vehicle) {"在公路上运行..." );class RoadVehicle {public void run (String vehicle) {"在公路上运行..." );class AirVehicle {public void run (String vehicle) {"在天空上运行..." );class WatterVehicle {public void run (String vehicle) {"在水上运行..." );class Vehicle2 {public void runRoad (String vehicle) {"在公路上运行..." );public void runAir (String vehicle) {"在天空上运行..." );public void runWatter (String vehicle) {"在水上运行..." );
单一职责原则注意事项和细节:
降低类的复杂度,一个类只负责一项职责。
提高类的可读性,可维护性
降低变更引起的风险
通常情况下,我们应当遵守单一职责原则,只有逻辑足够简单,才可以在代码级违反单一职责原则;只有类中
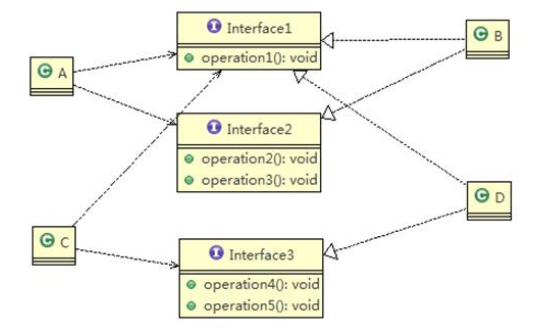
接口隔离原则 客户端不应该依赖它不需要的接口,即一个类对另一个类的依赖应该建立在最小的接口上。
类A通过接口Interfacel依赖类B,类C通过接口Interface1依赖类D,如果接口Interfacel对于类A和类C
传统方式实现:
1
2
3
4
5
6
7
8
9
10
11
12
13
14
15
16
17
18
19
20
21
22
23
24
25
26
27
28
29
30
31
32
33
34
35
36
37
38
39
40
41
42
43
44
45
46
47
48
49
50
51
52
53
54
55
56
57
58
59
60
61
62
63
64
65
66
67
68
69
70
71
72
73
74
75
76
77
78
79
80
81
82
83
84
85
86
87
88
89
90
91
92
93
94
95
96
97
98
99
100
101
102
103
104
105
106
package principle;public class InterfaceSegregation {public static void main (String[] args) {A a = new A ();new B ());new B ());new B ());C c = new C ();new D ());new D ());new D ());interface Interface1 {void operation1 () ;void operation2 () ;void operation3 () ;void operation4 () ;void operation5 () ;class B implements Interface1 {@Override public void operation1 () {"B 实现了 operation1" );@Override public void operation2 () {"B 实现了 operation2" );@Override public void operation3 () {"B 实现了 operation3" );@Override public void operation4 () {"B 实现了 operation4" );@Override public void operation5 () {"B 实现了 operation5" );class D implements Interface1 {@Override public void operation1 () {"D 实现了 operation1" );@Override public void operation2 () {"D 实现了 operation2" );@Override public void operation3 () {"D 实现了 operation3" );@Override public void operation4 () {"D 实现了 operation4" );@Override public void operation5 () {"D 实现了 operation5" );class A { public void depend1 (Interface1 i) {public void depend2 (Interface1 i) {public void depend3 (Interface1 i) {class C { public void depend1 (Interface1 i) {public void depend4 (Interface1 i) {public void depend5 (Interface1 i) {
Il)类A通过接口 Interfacel依赖类B,类C通过接口 Interfacel依赖类D,如果接口Interfacel对于类A和类C
1
2
3
4
5
6
7
8
9
10
11
12
13
14
15
16
17
18
19
20
21
22
23
24
25
26
27
28
29
30
31
32
33
34
35
36
37
38
39
40
41
42
43
44
45
46
47
48
49
50
51
52
53
54
55
56
57
58
59
60
61
62
63
64
65
66
67
68
69
70
71
72
73
74
75
76
77
78
79
80
81
82
83
84
85
86
87
88
package principle;public class InterfaceSegregation {public static void main (String[] args) {newA newA = new newA ();new newB ());new newB ());new newB ());newC newC = new newC ();new newD ());new newD ());new newD ());interface InterfaceNew1 {void operation1 () ;interface InterfaceNew2 {void operation2 () ;void operation3 () ;interface InterfaceNew3 {void operation4 () ;void operation5 () ;class newB implements InterfaceNew1 , InterfaceNew2 {@Override public void operation1 () {"B实现了InterfaceNew1的operation1方法" );@Override public void operation2 () {"B实现了InterfaceNew2的operation2方法" );@Override public void operation3 () {"B实现了InterfaceNew2的operation3方法" );class newD implements InterfaceNew1 , InterfaceNew3 {@Override public void operation1 () {"D实现了InterfaceNew1的operation1方法" );@Override public void operation4 () {"D实现了InterfaceNew3的operation4方法" );@Override public void operation5 () {"D实现了InterfaceNew3的operation5方法" );class newA { public void depend1 (InterfaceNew1 i) {public void depend2 (InterfaceNew2 i) {public void depend3 (InterfaceNew2 i) {class newC { public void depend1 (InterfaceNew1 i) {public void depend4 (InterfaceNew3 i) {public void depend5 (InterfaceNew3 i) {
依赖倒转原则 依赖倒转原则(Dependence Inversion Principle)是指:
高层模块不应该依赖低层模块,二者都应该依赖其抽象
抽象不应该依赖细节,细节应该依赖抽象 依赖倒转(倒置)的中心思想是面向接口编程
依赖倒转原则是基于这样的设计理念:相对于细节的多变性,抽象的东西要稳定的多。以抽象为基础搭建的架
使用接口或抽象类 的目的是制定好规范 ,而不涉及任何具体的操作,把展现细节的任务交给他们的实现类 去完成。
// 传统方法出现的问题
1
2
3
4
5
6
7
8
9
10
11
12
13
14
15
16
17
18
19
20
21
22
23
24
25
26
27
package principle;public class DependencyInversion {public static void main (String[] args) {Person person = new Person ();new Email ());class Email {public String getInfo () {return "电子邮件信息:hello,world;" ;class Person {public void receive (Email email) {
// 改进,使用接口实现依赖倒转
1
2
3
4
5
6
7
8
9
10
11
12
13
14
15
16
17
18
19
20
21
22
23
24
25
26
27
28
29
30
31
32
33
34
35
36
37
38
package principle;public class DependencyInversion {public static void main (String[] args) {Person person = new Person ();new Email ());new WeiXin ());interface IReceiver {getInfo () ;class Email implements IReceiver {@Override public String getInfo () {return "电子邮件信息:hello,world;" ;class WeiXin implements IReceiver {@Override public String getInfo () {return "微信信息:hello,world;" ;class Person {public void receive (IReceiver iReceiver) {
依赖关系传递的三种方式 接口传递实现依赖 1 2 3 4 5 6 7 8 9 10 11 12 13 14 15 16 17 18 19 20 21 22 23 24 25 26 27 28 29 public class DependencyInversionMethod {public static void main (String[] args) {ChangHong changHong = new ChangHong ();OpenAndClose openAndClose = new OpenAndClose ();interface IOpenAndClose {public void open (ITV tv) ; interface ITV { public void play () ;class ChangHong implements ITV {@Override public void play () {"长虹电视机,打开" );class OpenAndClose implements IOpenAndClose {@Override public void open (ITV tv) {
构造方法依赖传递 1 2 3 4 5 6 7 8 9 10 11 12 13 14 15 16 17 18 19 20 21 22 23 24 25 26 27 28 29 30 31 32 33 34 35 36 37 public class DependencyInversionMethod {public static void main (String[] args) {ChangHong changHong = new ChangHong ();OpenAndClose openAndClose = new OpenAndClose (changHong);interface IOpenAndClose {public void open () ; interface ITV { public void play () ;class OpenAndClose implements IOpenAndClose {public ITV tv; public OpenAndClose (ITV tv) { this .tv = tv;@Override public void open () {this .tv.play();class ChangHong implements ITV {@Override public void play () {"长虹电视机,打开" );
通过setter方法传递 1 2 3 4 5 6 7 8 9 10 11 12 13 14 15 16 17 18 19 20 21 22 23 24 25 26 27 28 29 30 31 32 33 34 35 36 37 public class DependencyInversionMethod {public static void main (String[] args) {ChangHong changHong = new ChangHong ();OpenAndClose openAndClose = new OpenAndClose ();interface IOpenAndClose {public void open () ; public void setTv (ITV tv) ;interface ITV { public void play () ;class OpenAndClose implements IOpenAndClose {public ITV tv;@Override public void open () {this .tv.play();@Override public void setTv (ITV tv) {this .tv = tv;class ChangHong implements ITV {@Override public void play () {"长虹电视机,打开" );
依赖倒转原则的注意事项和细节
低层模块尽量都要有抽象类或接口,或者两者都有,程序稳定性更好.
变量的声明类型尽量是抽象类或接口 ,这样我们的变量引用和实际对象间,就存在一个缓冲层 ,利于程序扩展
继承时遵循里氏替换 原则
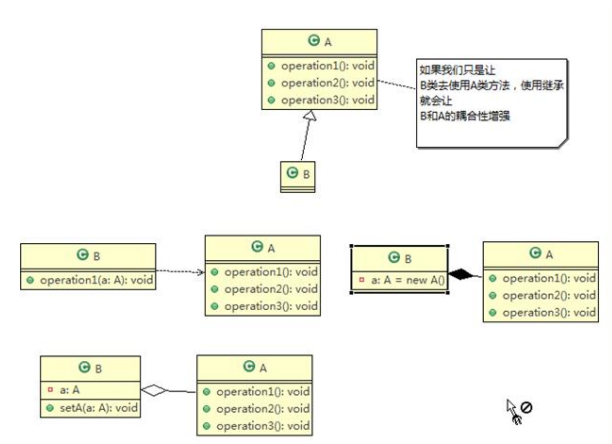
里氏替换原则 1)继承包含这样一层含义:父类中凡是已经实现好的方法,实际上是在设定规范和契约,虽然它不强制要求所有
2)继承在给程序设计带来便利的同时,也带来了弊端。比如使用继承会给程序带来侵入性,程序的可移植性降低,
在使用继承时,遵循里氏替换原则,在子类中尽量不要重写父类的方法 聚合,组合,依赖来解决问题。
// 原有存在的问题
1
2
3
4
5
6
7
8
9
10
11
12
13
14
15
16
17
18
19
20
21
22
23
24
25
26
27
28
29
public class RichterSubstitution {public static void main (String[] args) {AA a = new AA ();3 , 2 ));BB bb = new BB ();3 ,2 )); 3 ,2 ));class AA {public int func1 (int num1, int num2) {return num1 - num2;class BB extends AA {public int func1 (int a, int b) {return a+b;public int fun2 (int a, int b) {return func1(a,b) + 9 ;
解决方案
我们发现原来运行正常的相减功能发生了错误。原因就是类B无意中重写了父类的方法,造成原有功能出现错
2.通用的做法是:原来的父类和子类都继承一个更通俗的基类 ,原有的继承关系去掉,采用依赖,聚合,组合 等关系代替.
1 2 3 4 5 6 7 8 9 10 11 12 13 14 15 16 17 18 19 20 21 22 23 24 25 26 27 28 29 30 31 32 33 34 35 36 37 38 39 40 41 42 43 44 45 package principle;public class RichterSubstitution {public static void main (String[] args) {AA a = new AA ();3 , 2 ));BB bb = new BB ();3 ,2 )); 3 ,2 ));3 ,2 ));class Base {class AA extends Base {public int func1 (int num1, int num2) {return num1 - num2;class BB extends Base {private AA a = new AA ();public int func1 (int a, int b) {return a+b;public int fun2 (int a, int b) {return func1(a,b) + 9 ;public int fun3 (int a, int b) {return this .a.func1(a,b);
开闭原则
开闭原则(Open Closed Principle)是编程中最基础、最重要的设计原则
一个软件实体如类,模块和函数应该**对扩展开放(对提供方),对 修改关闭(对使用方)**。用抽象构建框架,用实
当软件需要变化时,尽量通过扩展软件实体的行为来实现变化,而不是通过修改已有的代码来实现变化。
// 传统方式
1 2 3 4 5 6 7 8 9 10 11 12 13 14 15 16 17 18 19 20 21 22 23 24 25 26 27 28 29 30 31 32 33 34 35 36 37 38 39 40 41 42 43 44 45 46 47 48 49 50 51 52 53 54 55 56 57 58 59 60 61 62 63 package principle;public class OpenClosePrinciple {public static void main (String[] args) {GraphicEditor graphicEditor = new GraphicEditor ();new Rectangle ());new Circle ());new Triangle ());class GraphicEditor {public void drawShape (Shape s) {if (s.m_type == 1 ) {else if (s.m_type == 2 ) {else if (s.m_type == 3 ) {public void drawRectangle (Shape r) {"绘制矩形" );public void drawCircle (Shape r) {"绘制圆形" );public void drawTriangle (Shape r) {"绘制三角形" );class Shape {int m_type;class Rectangle extends Shape {super .m_type = 1 ;class Circle extends Shape {super .m_type = 2 ;class Triangle extends Shape {super .m_type = 3 ;
优点是比较好理解,简单易操作。
缺点是违反了设计模式的ocp原则,即对扩展开放(提供方),对修改关闭(使用方)。即当我们给类增加新功能的时候,尽量不修改代码,或者尽可能少修改代码.
比如我们这时要新增加一个图形种类三角形,我们需要做如下修改,修改的地方较多
改进:
思路:把创建 Shape类做成抽象类 ,并提供一个抽象的draw方法 ,让子类去实现即可 ,这样我们有新的图形种类时,只需要让新的图形类继承Shape,并实现 draw方法即可,使用方的代码就不需要修→>满足了开闭原则
1 2 3 4 5 6 7 8 9 10 11 12 13 14 15 16 17 18 19 20 21 22 23 24 25 26 27 28 29 30 31 32 33 34 35 36 37 38 39 40 41 42 43 44 45 46 47 48 49 50 51 52 53 54 55 56 57 58 59 60 61 package principle;import javafx.scene.shape.Circle;public class OpenClosePrinciple {public static void main (String[] args) {GraphicEditor graphicEditor = new GraphicEditor ();new Rectangle ());new Circle1 ());new Triangle ());class GraphicEditor {public void drawShape (Shape s) {abstract class Shape {int m_type;public abstract void draw () ; class Rectangle extends Shape {super .m_type = 1 ;@Override public void draw () {"绘制矩形" );class Circle1 extends Shape {super .m_type = 2 ;@Override public void draw () {"绘制圆形" );class Triangle extends Shape {super .m_type = 3 ;@Override public void draw () {"绘制三角形" );
迪米特法则
一个对象应该对其他对象保持最少的了解
类与类关系越密切,耦合度越大
迪米特法则(Demeter Principle)又叫最少知道原则 ,即一个类对自己依赖的类知道的越少越好 。也就是说,对于被依赖的类不管多么复杂,都尽量将逻辑封装在类的内部。对外除了提供的public方法,不对外泄露任何信息
迪米特法则还有个更简单的定义:只与直接的朋友通信
直接的朋友 :每个对象都会其他对象有耦合关系 ,只要两个对象之间有耦合关系,我们就说这两个对象之间成员变量,方法参数,方法返回值中的类为直接的朋友 ,而出现在局部变量中的类不是直接的朋友。也就是说,陌生的类最好不要以局部变量的形式出现在类的内部。
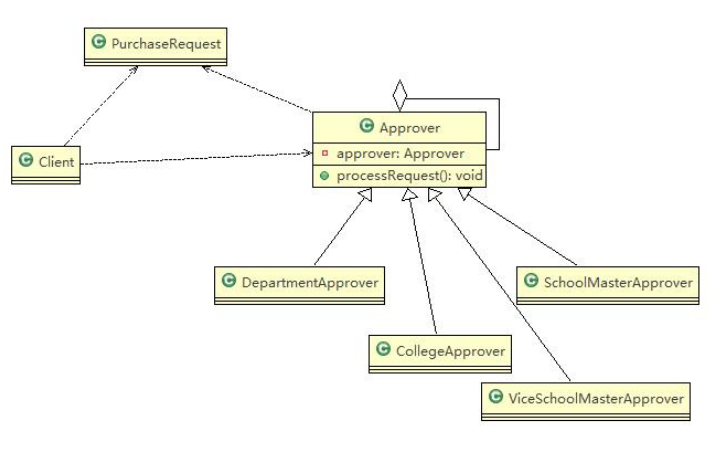
有一个学校,下属有各个学院和总部,现要求打印出学校总部员工ID和学院员工的id
1 2 3 4 5 6 7 8 9 10 11 12 13 14 15 16 17 18 19 20 21 22 23 24 25 26 27 28 29 30 31 32 33 34 35 36 37 38 39 40 41 42 43 44 45 46 47 48 49 50 51 52 53 54 55 56 57 58 59 60 61 62 63 64 65 66 67 68 69 70 71 72 73 74 75 76 77 78 79 80 81 82 83 84 85 86 87 88 89 90 91 92 93 94 95 96 97 98 99 100 101 102 103 104 105 106 package principle;import java.util.ArrayList;import java.util.List;public class DemeterPrinciple {public static void main (String[] args) {SchoolManager schoolManager = new SchoolManager ();new CollegeManager ());class Employee {private String id;public void setId (String id) {this .id = id;public String getId () {return id;class CollegeEmployee {private String id;public void setId (String id) {this .id = id;public String getId () {return id;class CollegeManager {public List<CollegeEmployee> getAllEmployee () {new ArrayList <CollegeEmployee>();for (int i = 0 ; i < 10 ; i++) {CollegeEmployee emp = new CollegeEmployee ();"学院员工 id=" + i);return list;public void printEmployee () {this .getAllEmployee();"------------学院员工------------" );for (CollegeEmployee e : list1){class SchoolManager {public List<Employee> getAllEmployee () {new ArrayList <Employee>();for (int i=0 ; i<5 ; i++){new Employee ();"学校总部员工 id=" + i);list.add(emp);return list;void printAllEmployee (CollegeManager sub) {this .getAllEmployee();" ------------学校总部员工------------" );for (Employee e : list2){
迪米特法则的核心是降低类之间的耦合
但是注意:由于每个类都减少了不必要的依赖,因此迪米特法则只是要求降低类间(对象间)耦合关系,并不是要求完全没有依赖关系
合成复用原则 原则是尽量使用合成/聚合的方式,而不是使用继承
设计原则核心思想
找出应用中可能需要变化之处,把它们独立出来,不要和那些不需要变化的代码混在一起。
针对接口编程,而不是针对实现编程。
为了交互对象之间的松耦合设计而努力
UML类图
UML——Unified modeling language UML(统一建模语言),是一种用于软件系统分析和设计的语言工具,它用
UML本身是一套符号的规定,就像数学符号和化学符号一样,这些符号用于描述软件模型中的各个元素和他
UML图
用例图(use case)
静态结构图:类图 、对象图、包图、组件图、部署图
动态行为图:交互图(时序图与协作图)、状态图、活动图
类图是描述类与类之间关系的
UML类图
用于描述系统中的类(对象)本身的组成和类(对象)之间的各种静态关系。
类之间的关系**:依赖、泛化(继承)、实现、关联、聚合与组合。**
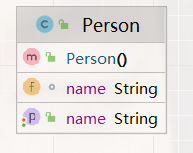
1 2 3 4 5 6 7 8 9 10 11 12 public class Person {int id;public String getName () {return name;public void setName (String name) {this .name = name;
类图—依赖关系(Dependence) 只要是在类中用到了对方,那么他们之间就存在依赖关系 。如果没有对方,连编绎都通过不了。
1 2 3 4 5 6 7 8 9 10 11 12 13 14 15 16 17 18 19 20 21 package UML.dependency;import UML.Person;public class PersonServiceBean {private PersonDao personDao;public void save (Person person) {}public IDCard getIDCard (Integer personid) {return null ;public void modify () {Department department = new Department ();
类中用到了对方
如果是类的成员属性
如果是方法的返回类型
是方法接收的参数类型
方法中使用到
类图—泛化关系(generalization) 泛化关系实际上就是继承关系 ,他是依赖关系的特例
1 2 3 4 public abstract class DaoSupport {public void save (Object entity) {}public void delete (Object id) {}
1 2 3 4 5 6 7 8 public class PersonServiceBean extends DaoSupport {public void save (Object entity) {"save" );public void delete (Object id) {"delete" );
泛化关系实际上就是继承关系
如果A类继承了B类,我们就说A和B存在泛化关系
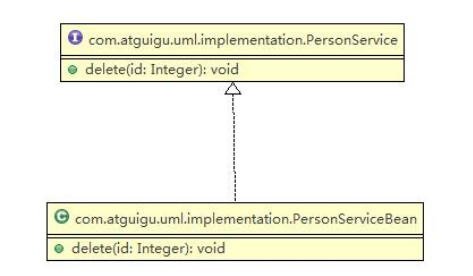
类图—实现关系(Implementation) 实现关系实际上就是A类实现B接口,他是依赖关系的特例
1 2 3 public interface PersonService {public void delete (int id) ;
1 2 3 4 5 6 public class PersonServiceImpl implements PersonService {@Override public void delete (int id) {"删除" );
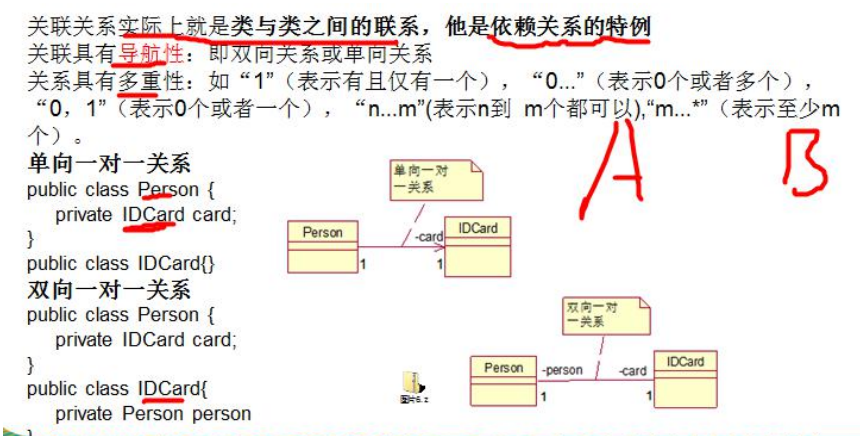
类图—关联关系(Association)
类图—聚合关系(Aggregation) 聚合关系(Aggregation)表示的是整体和部分的关系,整体与部分可以分开。聚合关系是关联关系的特例,所以他具有关联的导航性与多重性。
如:一台电脑由键盘(keyboard)、显示器(monitor),鼠标等组成;组成电脑的各个配件是可以从电脑上分离出来的,使用带空心菱形的实线来表示:
整体和部分是分开的,聚合关系
类图─组合关系(Composition) 组合关系:也是整体与部分的关系,但是整体与部分不可以分开 。
1 2 3 4 public class Computer {Mouse mouse = new Mouse (); Monitor monitor = new Monitor ();
1 2 3 4 public class Person {private IDCard card; private Head head = new Head ();
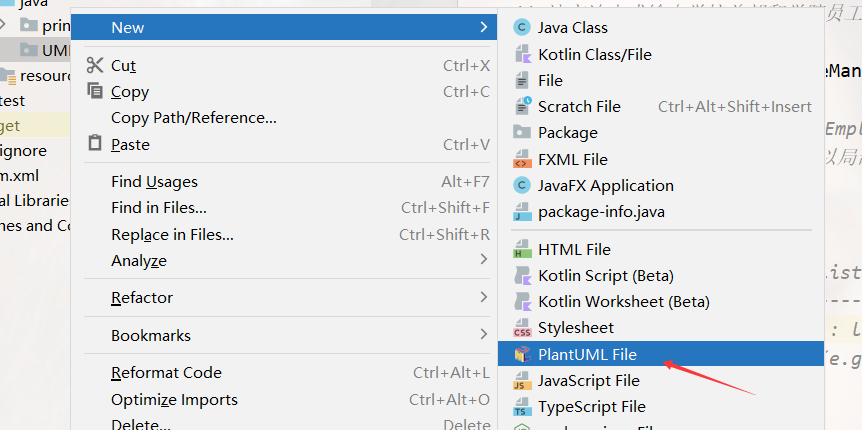
如何使用IDEA画UML图 安装步骤为:File -> Settings -> Plugins 搜索 PlantUML ,找到 PlantUML integration 并安装。
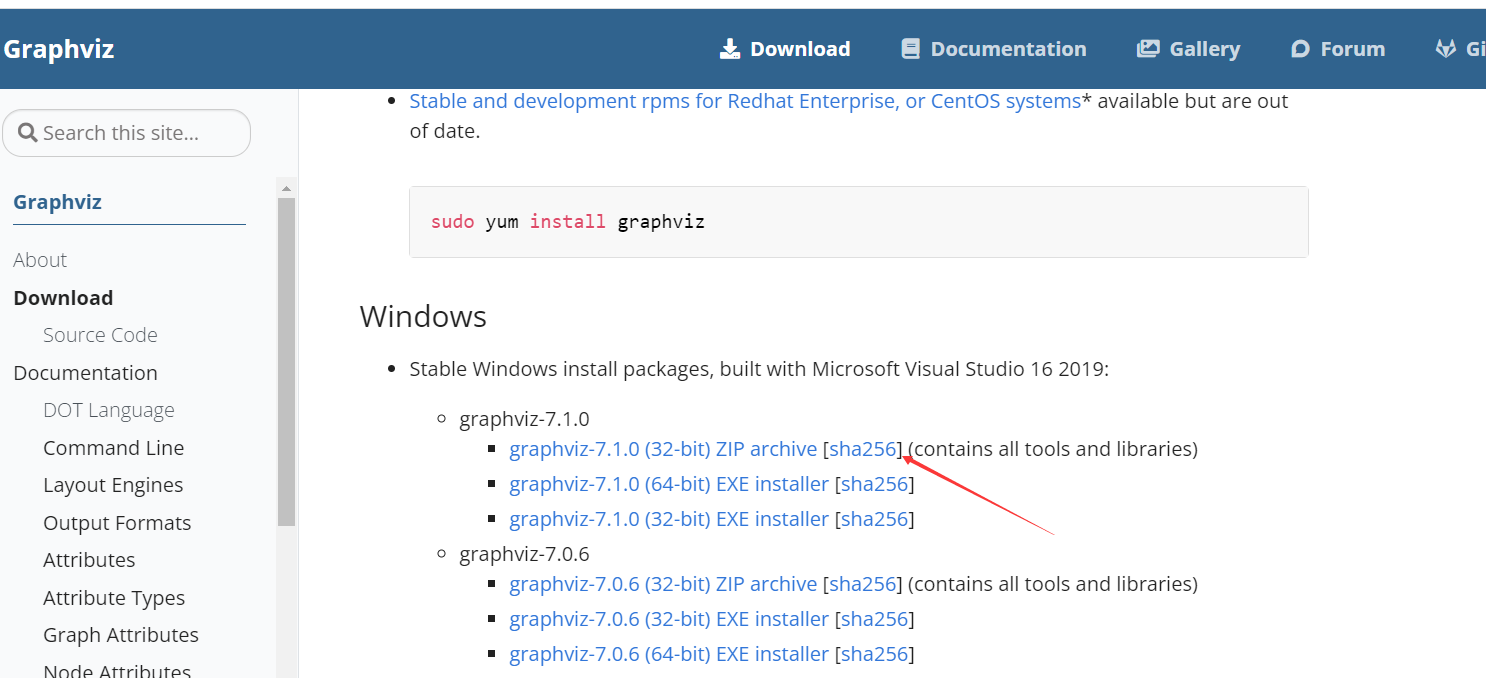
安装Graphviz IDEA 安装 PlantUML 插件之后发现光有插件还不能渲染类图,还需要 Graphviz 的支持。
Graphviz安装 安装包下载地址:https://graphviz.org/download/。下载完成之后解压
配置环境变量
配置完成之后打开 cmd 输入:dot -version ,如果版本号打印成功,说明环境配置完成。
成功之后重新启动 IDEA 即可创建 PlantUML File 了。
不好用
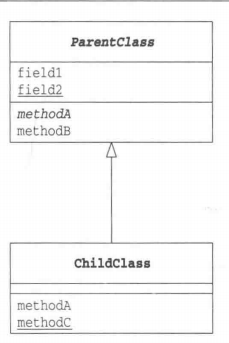
总结 继承(extends)
箭头子类指向父类
abstract 抽象类,abstract 抽象方法,斜体方式实现
static静态字段, static静态方法, 带有下划线
接口与实现(implements)(泛化generalization)
空心箭头
箭头从实现类指向接口
聚合
可见性(访问控制)
“+”表示public方法和字段,可以从类外部访问这些方法和字段。
“-”表示 private方法和字段,无法从类外部访问这些方法和字段。
“#”表示protect方法和字段,能够访问这些方法和字段的只能是该类自身、该类的子类以及同一包中的类。
“~”表示只有同一包中的类才能访问的方法和字段。
类的关联
时序图 设计模式概述
设计模式是程序员在面对同类软件工程设计问题所总结出来的有用的经验,模式不是代码,而是某类问题的通用解决方案 ,设计模式〈Design pattern)代表了最佳的实践。这些解决方案是众多软件开发人员经过相当长的一段时间的试验和错误总结出来的。
设计模式的本质提高软件的维护性,通用性和扩展性,并降低软件的复杂度。
设计模式类型
创建型模式:单例模式、抽象工厂模式、原型模式、建造者模式、工厂模式。
结构型模式:适配器模式、桥接模式、装饰模式、组合模式、外观模式、享元模式、代理模式。
行为型模式:模版方法模式、命令模式、访问者模式、迭代器模式、观察者模式、中介者模式、
创建型模式 单例模式(⭐⭐⭐⭐) 所谓类的单例设计模式,就是**采取一定的方法保证在整个的软件系统中,对某个类只能存在一个对象实例,**并且该类只提供一个取得其对象实例的方法(静态方法)。
比如Hibernate的SessionFactory,它充当数据存储源的代理,并负责创建Session对象。SessionFactory并不是轻量级的,一般情况下,一个项目通常只需要一个SessionFactory就够,这是就会使用到单例模式.
单例设计模式八种方式
饿汉式(静态常量) 饿汉式(静态代码块) 懒汉式(线程不安全)
懒汉式(线程安全,同步方法)
懒汉式(线程安全,同步代码块)
双重检查 静态内部类 枚举
饿汉式(静态常量)
步骤如下:
构造器私有化(防止new )
类的内部创建对象
向外暴露一个静态的公共方法。getInstance
代码实现
1 2 3 4 5 6 7 8 9 10 11 12 13 14 15 16 17 18 19 20 21 22 23 24 25 26 27 28 29 public class SingletonTest01 {public static void main (String[] args) {Singleton instance = Singleton.getInstance();Singleton instance1 = Singleton.getInstance();"instance:" + instance.hashCode());"instance1:" + instance1.hashCode());class Singleton {private Singleton () {private final static Singleton singleton = new Singleton ();public static Singleton getInstance () {return singleton;
优缺点:
优点:这种写法比较简单,就是在类装载的时候就完成实例化。避免了线程同步问题。
缺点:在类装载的时候就完成实例化,没有达到Lazy Loading 的效果。如果从始至终从未使用过这个实例,则会造成内存的浪费
这种方式基于classloder机制避免了多线程的同步问题,不过,instance在类装载时就实例化,在单例模式中大多数都是调用getlnstance方法,但是导致类装载的原因有很多种,因此不能确定有其他的方式(或者其他的静态方法)导致类装载,这时候初始化instance就没有达到lazy loading 的效果
结论:这种单例模式可用,可能造成内存浪费
饿汉式(静态代码块) 1 2 3 4 5 6 7 8 9 10 11 12 13 14 15 16 17 18 19 20 21 22 23 24 25 26 27 28 29 30 31 32 33 34 35 36 37 38 39 40 41 package SingletonPattern;public class SingletonTest02 {public static void main (String[] args) {Singleton2 instance = Singleton2.getInstance();Singleton2 instance1 = Singleton2.getInstance();"instance:" + instance.hashCode());"instance1:" + instance1.hashCode());class Singleton2 {private Singleton2 () {private final static Singleton2 singleton;static {new Singleton2 ();public static Singleton2 getInstance () {return singleton;
这种方式和上面的方式其实类似,只不过将类实例化的过程放在了静态代码块中,也是在类装载的时候,就执行静态代码块中的代码,初始化类的实例。优缺点和上面是一样的。
结论:这种单例模式可用,但是可能造成内存浪费
懒汉式(线程不安全)(不推荐) 1 2 3 4 5 6 7 8 9 10 11 12 13 14 15 16 17 18 19 20 21 22 23 public class SingletonTest03 {public static void main (String[] args) {Singleton3 instance = Singleton3.getInstance();Singleton3 instance1 = Singleton3.getInstance();"instance:" + instance.hashCode());"instance1:" + instance1.hashCode());class Singleton3 {private Singleton3 () {}private static Singleton3 instance;public static Singleton3 getInstance () {if (instance == null ) {new Singleton3 ();return instance;
起到了Lazy Loading 的效果,但是只能在单线程下使用。
如果在多线程下,一个线程进入了if(singleton ==null)判断语句块,还未来得及往下执行,另一个线程也通过
结论:在实际开发中,不要使用这种方式.
懒汉式(线程安全,同步方法)(不推荐) 1 2 3 4 5 6 7 8 9 10 11 12 13 14 15 16 17 18 19 20 21 22 23 24 public class SingletonTest04 {public static void main (String[] args) {Singleton4 instance = Singleton4.getInstance();Singleton4 instance1 = Singleton4.getInstance();"instance:" + instance.hashCode());"instance1:" + instance1.hashCode());class Singleton4 {private Singleton4 () {}private static Singleton4 instance;public static synchronized Singleton4 getInstance () {if (instance == null ) {new Singleton4 ();return instance;
解决了线程安全问题
效率太低了,每个线程在想获得类的实例时候,执行getInstance()方法都要进行同步。而其实这个方法只执行一次实例化代码就够了,后面的想获得该类实例,直接return就行了。方法进行同步效率太低
结论:在实际开发中,不推荐使用这种方式
懒汉式(线程安全,同步代码块,不推荐)
这种方式,本意是想对第四种实现方式的改进,因为前面同步方法效率太低,改为同步产生实例化的的代码块
但是这种同步并不能起到线程同步的作用 。跟第3种实现方式遇到的情形一致,假如一个线程进入了if (singleton == null)判断语句块,还未来得及往下执行,另一个线程也通过了这个判断语句,这时便会产生多个实例结论:在实际开发中,不能使用这种方式
双重检查(推荐) 1 2 3 4 5 6 7 8 9 10 11 12 13 14 15 16 17 class Singleton6 {private Singleton6 () {}private static Singleton6 instance;public static synchronized Singleton6 getInstance () {if (instance == null ) {synchronized (Singleton6.class) {new Singleton6 ();return instance;
Double-Check概念是多线程开发中常使用到的,如代码中所示,我们进行了两次 if (singleton == null)检查,这
这样,实例化代码只用执行一次,后面再次访问时,判断 if (singleton ==null),直接return实例化对象,也避
线程安全;延迟加载;效率较高 结论:在实际开发中,推荐使用这种单例设计模式
静态内部类(推荐) 1 2 3 4 5 6 7 8 9 10 11 12 13 class Singleton7 {private Singleton7 () {}private static class SingletonClass {private static final Singleton7 instance = new Singleton7 ();public static synchronized Singleton7 getInstance () {return SingletonClass.instance;
这种方式采用了类装载的机制来保证初始化实例时只有一个线程。
静态内部类方式在Singleton类被装载时并不会立即实例化,而是在需要实例化时,调用getInstance方法,才
类的静态属性只会在第一次加载类的时候初始化,所以在这里,JVM帮助我们保证了线程的安全性,在类进行初始化时,别的线程是无法进入的。
优点:避免了线程不安全 ,利用静态内部类特点实现延迟加载,效率高
结论:推荐使用.
枚举(推荐) 1 2 3 4 5 6 7 8 9 10 11 12 13 14 15 16 17 18 19 20 21 22 23 24 25 26 27 28 29 package SingletonPattern;import com.sun.org.apache.bcel.internal.generic.INSTANCEOF;import java.util.EnumMap;public class SingletonTest08 {public static void main (String[] args) {Singleton8 instance = Singleton8.INSTANCE;Singleton8 instance1 = Singleton8.INSTANCE;"instance:" + instance.hashCode());"instance1:" + instance1.hashCode());enum Singleton8 {public void sayok () {"ok" );
这借助JDK1.5中添加的枚举来实现单例模式。不仅能避免多线程同步问题,而且还能防止反序列化重新创建
这种方式是 Effective Java作者Josh Bloch提倡的方式
结论:推荐使用
单例模式在JDK应用的源码分析
饿汉式(静态常量)
总结
单例模式保证了系统内存中该类只存在一个对象,节省了系统资源,对于一些需要频繁创建销毁的对象,使用单例模式可以提高系统性能
当想实例化一个单例类的时候,必须要记住使用相应的获取对象的方法,而不是使用new
单例模式使用的场景 :需要频繁的进行创建和销毁的对象 、创建对象时耗时过多或耗费资源过多(即:重量级对象 ),但又经常用到的对象、工具类对象 、频繁访问数据库或文件的对象(比如数据源、session 工厂等)
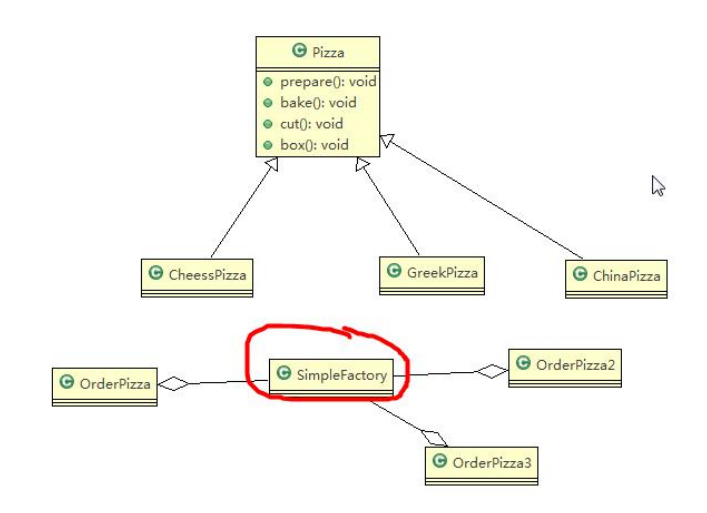
工厂模式 简单工厂模式(⭐⭐⭐)
1 2 3 4 5 6 7 8 public class PizzaStore {public static void main (String[] args) {new OrderPizza (new SimpleFactory ());
1 2 3 4 5 6 7 8 9 10 11 12 13 14 15 16 17 18 19 20 21 22 public class SimpleFactory {public Pizza createPizza (String orderType) {Pizza pizza = null ;"简单工厂模式" );if (orderType.equals("greek" )) {new GreekPizza ();"希腊披萨" );else if (orderType.equals("cheese" )) {new CheesePizza ();" 奶酪披萨 " );else if (orderType.equals("pepper" )) {new PepperPizza ();"胡椒披萨" );return pizza;
1 2 3 4 5 6 7 8 9 10 11 12 13 14 15 16 17 18 19 20 21 22 23 24 25 26 27 28 29 30 31 32 33 34 35 36 37 38 39 40 41 42 43 44 45 public class OrderPizza {Pizza pizza = null ;public OrderPizza (SimpleFactory simpleFactory) {public void setFactory (SimpleFactory simpleFactory) {String orderType = "" ; this .simpleFactory = simpleFactory; do {this .simpleFactory.createPizza(orderType);if (pizza != null ) { else {" 订购披萨失败 " );break ;while (true );private String getType () {try {BufferedReader strin = new BufferedReader (new InputStreamReader (System.in));"input pizza 种类:" );String str = strin.readLine();return str;catch (IOException e) {return "" ;
工厂模式在JDK-Calendar应用的源码分析 1 2 3 4 5 6 7 8 9 10 11 12 public class factory {public static void main (String[] args) {Calendar calendar = Calendar.getInstance();"年:" +calendar.get(Calendar.YEAR));"月:" +(calendar.get(Calendar.MONTH)+ 1 ));"日:" +calendar.get(Calendar.DAY_OF_MONTH));"时:" +calendar.get(Calendar.HOUR_OF_DAY));"分:" +calendar.get(Calendar.MINUTE));"秒:" +calendar.get(Calendar.SECOND));
1 2 3 4 public static Calendar getInstance () return createCalendar(TimeZone.getDefault(), Locale.getDefault(Locale.Category.FORMAT));
1 2 3 4 5 6 7 8 9 10 11 12 13 14 15 16 17 18 19 20 21 22 23 24 25 26 27 28 29 30 31 32 33 34 35 36 37 38 39 40 41 42 43 44 45 46 47 48 49 50 private static Calendar createCalendar (TimeZone zone, Locale aLocale) CalendarProvider provider = if (provider != null ) {try {return provider.getInstance(zone, aLocale);catch (IllegalArgumentException iae) {Calendar cal = null ;if (aLocale.hasExtensions()) {String caltype = aLocale.getUnicodeLocaleType("ca" );if (caltype != null ) {switch (caltype) {case "buddhist" :new BuddhistCalendar (zone, aLocale);break ;case "japanese" :new JapaneseImperialCalendar (zone, aLocale);break ;case "gregory" :new GregorianCalendar (zone, aLocale);break ;if (cal == null ) {if (aLocale.getLanguage() == "th" && aLocale.getCountry() == "TH" ) {new BuddhistCalendar (zone, aLocale);else if (aLocale.getVariant() == "JP" && aLocale.getLanguage() == "ja" "JP" ) {new JapaneseImperialCalendar (zone, aLocale);else {new GregorianCalendar (zone, aLocale);return cal;
工厂方法模式(⭐⭐⭐⭐⭐) 抽象工厂模式(⭐⭐⭐⭐⭐) 原型模式(⭐⭐⭐)
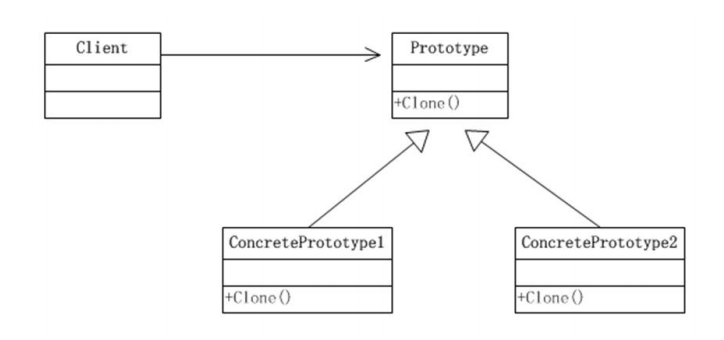
原型模式(Prototype模式)是指:用原型实例指定创建对象的种类,并且通过拷贝这些原型,创建新的对象
原型模式是一种创建型设计模式,允许一个对象再创建另外一个可定制的对象,无需知道如何创建的细节
工作原理是:通过将一个原型对象传给那个要发动创建的对象,这个要发动创建的对象通过请求原型对象拷贝它们自己来实施创建,即对象.clone()
形象的理解:孙大圣拔出猴毛,变出其它孙大圣
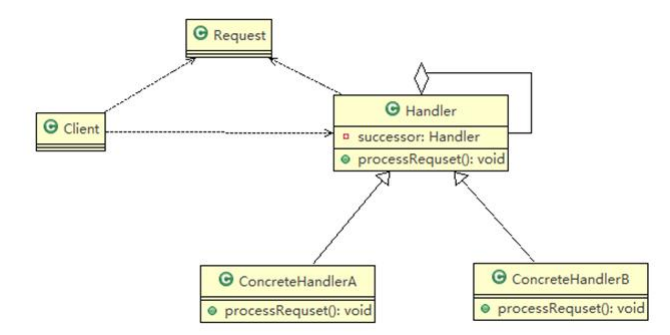
Prototype:原型类,声明一个克隆自己的接口
ConcretePrototype:具体的原型类,实现一个克隆自己的操作
Client:让一个原型对象克隆自己,从而创建一个新的对象(属性一样)
传统模式
传统模式优缺点
优点是比较好理解,简单易操作。
在创建新的对象时,总是需要重新获取原始对象的属性,如果创建的对象比较复杂时,效率较低
总是需要重新初始化对象,而不是动态地获得对象运行时的状态,不够灵活
改进的思路分析clone()方法,该方法可以将一个Java对象复制一份,但是需要实现clone的Java类必须要实现一个接口Cloneable,该接口表示该类能够复制且具有复制的能力→原型模式
原型模式代码实现 1 2 3 4 5 6 7 8 9 10 11 12 13 14 15 16 17 18 19 20 21 22 23 24 25 26 27 28 29 30 31 32 33 34 35 36 37 38 39 40 41 42 43 44 45 46 47 48 49 50 51 52 53 54 55 56 57 58 59 60 61 62 63 package PrototypePattern;public class Sheep implements Cloneable {private String name;private int age;private String color;public String getName () {return name;public void setName (String name) {this .name = name;public int getAge () {return age;public void setAge (int age) {this .age = age;public String getColor () {return color;public void setColor (String color) {this .color = color;public Sheep (String name, int age, String color) {this .name = name;this .age = age;this .color = color;@Override public String toString () {return "Sheep{" +"name='" + name + '\'' +", age=" + age +", color='" + color + '\'' +'}' ;@Override protected Object clone () throws CloneNotSupportedException {Sheep sheep = null ;try {super .clone();catch (Exception e) {return sheep;
1 2 3 4 5 6 7 8 9 10 11 12 13 14 15 16 17 18 19 20 21 22 23 24 package PrototypePattern;public class Client {public static void main (String[] args) throws CloneNotSupportedException {Sheep sheep = new Sheep ("tom" , 1 , "白色" );Sheep sheep1 = (Sheep) sheep.clone();Sheep sheep2 = (Sheep) sheep.clone();Sheep sheep3 = (Sheep) sheep.clone();Sheep sheep4 = (Sheep) sheep.clone();"sheep1:" + sheep1);"sheep2:" + sheep2);"sheep3:" + sheep3);"sheep4:" + sheep4);
原型模式在Spring框架中源码分析
Spring中原型bean的创建,就是原型模式的应用
代码分析
pom.xml导入依赖
1 2 3 4 5 6 7 <dependencies > <dependency > <groupId > org.springframework</groupId > <artifactId > spring-context</artifactId > <version > 5.0.2.RELEASE</version > </dependency > </dependencies >
resources/beans.xml
1 2 3 4 5 6 7 8 9 10 11 12 13 14 15 16 17 <?xml version="1.0" encoding="UTF-8" ?> <beans xmlns ="http://www.springframework.org/schema/beans" xmlns:xsi ="http://www.w3.org/2001/XMLSchema-instance" xmlns:p ="http://www.springframework.org/schema/p" xmlns:util ="http://www.springframework.org/schema/util" xmlns:context ="http://www.springframework.org/schema/context" xsi:schemaLocation ="http://www.springframework.org/schema/beans http://www.springframework.org/schema/beans/spring-beans.xsd http://www.springframework.org/schema/util http://www.springframework.org/schema/util/spring-util-4.0.xsd http://www.springframework.org/schema/context http://www.springframework.org/schema/context/spring-context-4.0.xsd" ><bean id ="id01" class ="Spring.bean.Monster" scope ="prototype" /> </beans >
spring/bean/Monster
1 2 3 4 5 6 7 8 9 10 11 12 13 14 15 16 17 18 19 20 21 22 23 24 25 26 27 28 29 30 31 32 33 34 35 36 37 38 39 40 41 42 43 44 45 46 47 48 49 50 51 52 53 package Spring.bean;public class Monster {private Integer id = 10 ;private String nickname = "牛魔王" ;private String skill = "芭蕉扇" ;public Monster () {"monster 创建.." );public Monster (Integer id, String nickname, String skill) {this .id = id;this .nickname = nickname;this .skill = skill;public Monster ( String nickname, String skill,Integer id) {this .id = id;this .nickname = nickname;this .skill = skill;public Integer getId () {return id;public void setId (Integer id) {this .id = id;public String getNickname () {return nickname;public void setNickname (String nickname) {this .nickname = nickname;public String getSkill () {return skill;public void setSkill (String skill) {this .skill = skill;@Override public String toString () {return "Monster [id=" + id + ", nickname=" + nickname + ", skill=" "]" ;
prototype
1 2 3 4 5 6 7 8 9 10 11 12 13 14 15 16 17 18 19 20 21 22 23 24 25 package Spring;import org.springframework.context.ApplicationContext;import org.springframework.context.support.ClassPathXmlApplicationContext;public class prototype {public static void main (String[] args) {ApplicationContext applicationContext = new ClassPathXmlApplicationContext ("beans.xml" );Object bean = applicationContext.getBean("id01" );"bean" + bean); Object bean2 = applicationContext.getBean("id01" );"bean2" + bean2);
源码
1 2 3 4 @Override public Object getBean (String name) throws BeansException {return doGetBean(name, null , null , false );
浅拷贝和深拷贝
对于数据类型是基本数据类型的成员变量,浅拷贝会直接进行值传递,也就是将该属性值复制–份给新的对象。
对于数据类型是引用数据类型的成员变量,比如说成员变量是某个数组、某个类的对象等,那么浅拷贝会进行引用传递,也就是只是将该成员变量的引用值(内存地址)复制一份给新的对象。因为实际上两个对象的该成员变量都指向同一个实例。在这种情况下,在-一个对象中修改该成员变量会影响到另一个对象的该成员变量值
前面我们克隆羊就是浅拷贝.
浅拷贝是使用默认的clone( )方法来实现
深拷贝
复制对象的所有基本数据类型的成员变量值
为所有引用数据类型的成员变量申请存储空间,并复制每个引用数据类型成员变量所引用的对象,直到该对象可达的所有对象。也就是说,对象进行深拷贝要对整个对象(包括对象的引用类型)进行拷贝
深拷贝实现方式1:重写clone方法来实现深拷贝
深拷 贝实现方式2:通过对象序列化实现深拷贝(推荐)
1 2 3 4 5 6 7 8 9 10 11 12 13 14 15 16 17 18 19 20 21 22 23 24 25 26 27 28 29 30 31 32 33 34 35 36 37 38 39 40 41 42 package PrototypePattern.deepclone;import java.io.Serializable;public class DeepCloneableTarget implements Serializable , Cloneable {private static final long serialVersionUID= 1L ;private String cloneName;private String cloneClass;public String getCloneName () {return cloneName;public void setCloneName (String cloneName) {this .cloneName = cloneName;public DeepCloneableTarget (String cloneName, String cloneClass) {this .cloneName = cloneName;this .cloneClass = cloneClass;public String getCloneClass () {return cloneClass;public void setCloneClass (String cloneClass) {this .cloneClass = cloneClass;@Override protected Object clone () throws CloneNotSupportedException {return super .clone();
1 2 3 4 5 6 7 8 9 10 11 12 13 14 15 16 17 18 19 20 21 22 23 24 25 26 27 28 29 30 31 32 33 34 35 36 37 38 39 40 41 42 43 44 45 46 47 48 49 50 51 52 53 54 55 56 57 58 59 60 61 62 63 64 65 66 67 package PrototypePattern.deepclone;import java.io.*;public class DeepProtoType implements Serializable , Cloneable {public String name;public DeepCloneableTarget deepCloneableTarget; public DeepProtoType () {@Override protected Object clone () throws CloneNotSupportedException {ByteArrayOutputStream bos = null ;ObjectOutputStream oos = null ;ByteArrayInputStream bis = null ;ObjectInputStream ois = null ;try {new ByteArrayOutputStream ();new ObjectOutputStream (bos);this ); new ByteArrayInputStream (bos.toByteArray());new ObjectInputStream (bis);DeepProtoType deepProtoType = (DeepProtoType)ois.readObject();return deepProtoType;catch (Exception e) {return null ;finally {try {catch (Exception e) {
1 2 3 4 5 6 7 8 9 10 11 12 13 14 15 16 17 18 19 package PrototypePattern.deepclone;public class Test {public static void main (String[] args) throws CloneNotSupportedException {DeepProtoType p = new DeepProtoType ();"宋江" ;new DeepCloneableTarget ("大牛" , "小牛" );DeepProtoType p2 = (DeepProtoType) p.clone();"p.name= =" + p.name + "p.deepCloneableTarget= " + p.deepCloneableTarget.hashCode());"p2.name=" + p.name + "p2 deepCloneableTarget=" + p2 .deepCloneableTarget.hashCode());
总结
创建新的对象比较复杂时,可以利用原型模式简化对象的创建过程,同时也能够提高效率
不用 重新初始化对象,而是动态地获得对象运行时的状态
如果原始对象发生变化(增加或者减少属性),其它克隆对象的也会发生相应的变化,无需修改代码
在实现深克隆的时候可能需要比较复杂的代码
缺点:需要为每一个类配备-一个克隆方法,这对全新的类来说不是很难,但对已有的类进行改造时,需要修改其源代码,违背了ocp原则,这点请同学们注意.
建造者模式(⭐⭐) 传统方式解决盖房需求
优点是比较好理解,简单易操作。
设计的程序结构,过于简单,没有设计缓存层对象,程序的扩展和维护不好.也就是说,这种设计方案,把产品(即:房子)和创建产品的过程(即:建房子流程)封装在一起,耦合性增强了。
解决方案:将产品和产品建造过程解耦=>建造者模式
建造者模式介绍
建造者模式:将一个对象的构建与它的表示分离,使得同样的构建过程可以创建不同的表示。
建造者模式**(Builder Pattern)又叫 生成器模式,是-种对象 构建模式**。它可以将复杂对象的建造过程抽象出来(抽象类别),使这个抽象过程的不同实现方法可以构造出不同表现(属性)的对象。
建造者模式是–步一步创建-一个复杂的对象,它允许用户只通过指定复杂对象的类型和内容就可以构建它们,用户不需要知道内部的具体构建细节。
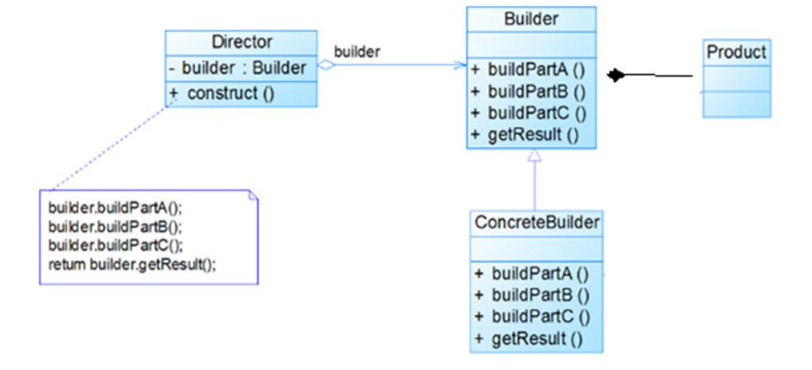
建造模式的四个角色
Product (产品角色) :一个具体的产品对象。
Builder (抽象建造者) :创建 一个Product对象的各个部件指定的接口/抽象类。
ConcreteBuilder (具体建造者) :实现接口,构建和装配各个部件。
Director (指挥者) :构建一个使用Builder接口的对象。它主要是用于创建-一个复杂的对象。它主要有两个作用,- -是: 隔离了客户与对象的生产过程,二是:负责控制产品对象的生产过程。
建造者模式原理类图
代码实现
House(产品)
1 2 3 4 5 6 7 8 9 10 11 12 13 14 15 16 17 18 19 20 21 22 23 24 25 26 27 28 29 30 31 32 33 34 35 36 37 38 39 40 41 42 43 44 45 46 47 package builderPattern;public class House {private String baise;private String wall;private String roofed;public String getBaise () {return baise;public void setBaise (String baise) {this .baise = baise;public String getWall () {return wall;public void setWall (String wall) {this .wall = wall;public String getRoofed () {return roofed;public void setRoofed (String roofed) {this .roofed = roofed;@Override public String toString () {return "House{" +"baise='" + baise + '\'' +", wall='" + wall + '\'' +", roofed='" + roofed + '\'' +'}' ;
HouseBuilder(抽象建造者)
1 2 3 4 5 6 7 8 9 10 11 12 13 14 15 16 17 18 19 20 21 22 package builderPattern;public abstract class HouseBuilder {House house = new House ();public abstract void buildBasic () ;public abstract void buildWalls () ;public abstract void roofed () ;public House buildHouse () {return house;
CommonsBuilder(具体建造者1)
1 2 3 4 5 6 7 8 9 10 11 12 13 14 15 16 17 18 19 20 21 22 23 24 25 26 27 package builderPattern;public class CommonsHouse extends HouseBuilder {@Override public void buildBasic () {"普通房子打地基10米" );"普通房子打地基10米" );@Override public void buildWalls () {"普通房子砌墙10cm" );"普通房子砌墙10cm" );@Override public void roofed () {"普通房子屋顶" );"普通房子屋顶" );
HighBuilding(具体建造者2)
1 2 3 4 5 6 7 8 9 10 11 12 13 14 15 16 17 18 19 20 21 22 23 24 25 26 27 package builderPattern;public class HighBuilding extends HouseBuilder {@Override public void buildBasic () {"高楼打地基100米" );"高楼打地基100米" );@Override public void buildWalls () {"高楼砌墙30cm" );"高楼砌墙30cm" );@Override public void roofed () {"高楼建造房顶" );"高楼建造房顶" );
HouseDirector(指挥者)
1 2 3 4 5 6 7 8 9 10 11 12 13 14 15 16 17 18 19 20 21 22 23 24 25 26 27 28 29 30 package builderPattern;public class HouseDirector {HouseBuilder houseBuilder = null ;public HouseDirector (HouseBuilder houseBuilder) {this .houseBuilder = houseBuilder;public void setHouseBuilder (HouseBuilder houseBuilder) {this .houseBuilder = houseBuilder;public House ConstructHouse () {return houseBuilder.buildHouse();
Client
1 2 3 4 5 6 7 8 9 10 11 12 13 14 15 16 17 18 19 20 21 22 23 24 25 26 27 28 29 package builderPattern;public class Client {public static void main (String[] args) {CommonsHouse commonsHouse = new CommonsHouse ();HouseDirector director = new HouseDirector (commonsHouse);House house = director.ConstructHouse();"-------------" );HighBuilding highBuilding = new HighBuilding ();HouseDirector director2 = new HouseDirector (highBuilding);House house2 = director2.ConstructHouse();
建造者模式在JDK的应用和源码分析 1 2 3 4 5 6 7 8 9 public interface Appendable {append (CharSequence csq) throws IOException;append (CharSequence csq, int start, int end) throws IOException;append (char c) throws IOException;
Appendable 接口定义了多个append方法(抽象方法),即Appendable为抽象建造者,定义了抽象方法
AbstractStringBuilder 实现了Appendable 接口方法,这里的AbstractStringBuilder 已经是建造者, 只是不能实例化
StringBuilder 即充当了指挥者角色,同时充当了具体的建造者,建造方法的实现是由AbstractStringBuilder 完成,而StringBuilder继承了AbstractStringBuilder
总结
客户端(使用程序)不必知道产品内部组成的细节,将产品本身与产品的创建过程解耦,使得相同的创建过程可以创建不同的产品对象
每一个具体建造者都相对独立,而与其他的具体建造者无关,因此可以很方便地替换具体建造者或增加新的具体建造者,用户使用不同的具体建造者即可得到不同的产品对象
可以更加精细地控制产品的创建过程。将复杂产品的创建步骤分解在不同的方法中,使得创建过程更加清晰,也更方便使用程序来控制创建过程
增加新的具体建造者无须修改原有类库的代码,指挥者类针对抽象建造者类编程,系统扩展方便,符合“开闭原则”
建造者模式所创建的产品一般具有较多的共同点,其组成部分相似,如果产品之间的差异性很大,则不适合使用建造者模式 ,因此其使用范围受到一定的限制。
如果产品的内部变化复杂,可能会导致需要定义很多具体建造者类来实现这种变化,导致系统变得很庞大,因此在这种情况下,要考虑是否选择建造者模式.
抽象工厂模式VS建造者模式
结构型模式 适配器模式(⭐⭐⭐⭐)
适配器模式(Adapter Patterm)将某个类的接口转换成客户端期望的另一个接口表示,主的目的是兼容性 ,让原本因接口不匹配不能一起工作的两个类可以协同工作。其别名为包装器(Wrapper)
适配器模式属于结构型模式
主要分为三类:类适配器模式 、对象适配器模式 、接口适配器模式
工作原理
适配器模式:将一个类的接口转换成另一种接口.让原本接口不兼容的类可以兼容
从用户的角度看不到被适配者,是解耦的
用户调用适配器转化出来的目标接口方法,适配器再调用被适配者的相关接口方法
用户收到反馈结果,感觉只是和目标接口交互,如图
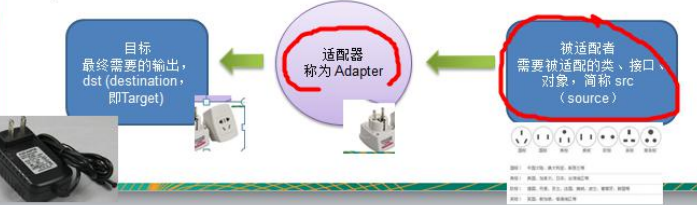
类适配器模式 基本介绍: Adapter类,通过继承src类,实现dst类接口,完成src->dst 的适配。
适配器模式应用实例 以生活中充电器的例子来讲解适配器,充电器本身相当于Adapter,220V交流电相当于src (即被适配者),我们的目dst(即目标)是5V直流电
代码实现 Voltage220V(被适配的类)
1 2 3 4 5 6 7 8 9 10 11 12 13 14 15 16 17 package adapterPattern.classAdapter;public class Voltage220V {public int output220V () {int src = 220 ;"电压=" + src + "伏" );return src;
IVoltage5V(适配接口)
1 2 3 4 5 6 7 8 9 10 11 12 13 package adapterPattern.classAdapter;public interface IVoltage5V {public int output5V () ;
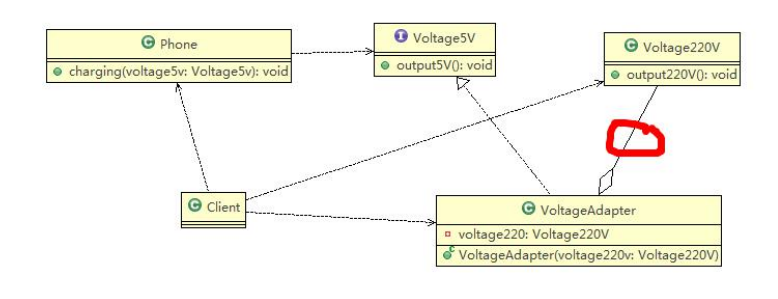
VoltageAdapter(适配器类)
1 2 3 4 5 6 7 8 9 10 11 12 13 14 15 16 package adapterPattern.classAdapter;public class VoltageAdapter extends Voltage220V implements IVoltage5V {@Override public int output5V () {int src = output220V();int dist = src / 44 ; return dist;
Phone
1 2 3 4 5 6 7 8 9 10 11 12 13 14 15 16 17 package adapterPattern.classAdapter;public class Phone {public void charging (IVoltage5V iVoltage5V) {if (iVoltage5V.output5V() == 5 ) {"电压为5v,可以正常充电" );else {"电压异常不能充电" );
1 2 3 4 5 6 7 8 9 10 11 12 13 14 15 package adapterPattern.classAdapter;public class Client {public static void main (String[] args) {"===适配器模式===" );Phone phone = new Phone ();new VoltageAdapter ());
Java是单继承机制,所以类适配器需要继承src类这一点算是一个缺点,因为这要求dst必须是接口,有一定局限性;
src类的方法在 Adapter中都会暴露出来,也增加了使用的成本。
由于其继承了src类,所以它可以根据需求重写src类的方法,使得Adapter的灵活性增强了。
对象适配器模式
基本思路和类的适配器模式相同,只是将Adapter类作修改,不是继承src类,而是持有src类的实例,以解决兼容性的问题。即:持有src类,实现 dst类接口,完成src->dst的适配
根据“合成复用原则 ”,在系统中尽量使用关联关系(聚合)来替代继承 关系。
对象适配器模式是适配器模式常用的一种
对象适配器模式应用实例 以生活中充电器的例子来讲解适配器,充电器本身相当于Adapter, 220V交流电相当于src (即被适配者),我们的目dst(即目标)是5V直流电,使用对象适配器模式完成。
代码实现 Voltage220V(被适配的类)
1 2 3 4 5 6 7 8 9 10 11 12 13 14 15 16 17 package adapterPattern.ObjectAdapter;public class Voltage220V {public int output220V () {int src = 220 ;"电压=" + src + "伏" );return src;
IVoltage5V(适配接口)
1 2 3 4 5 6 7 8 9 10 11 12 13 package adapterPattern.ObjectAdapter;public interface IVoltage5V {public int output5V () ;
VoltageAdapter(对象适配器类)
1 2 3 4 5 6 7 8 9 10 11 12 13 14 15 16 17 18 19 20 21 22 23 24 25 26 27 28 29 30 package adapterPattern.ObjectAdapter;public class VoltageAdapter implements IVoltage5V {private Voltage220V voltage220V; public VoltageAdapter (Voltage220V voltage220V) {this .voltage220V = voltage220V;@Override public int output5V () {int dist = 0 ;if (voltage220V != null ) {int src = voltage220V.output220V();"使用对象适配器" );44 ; "适配完成,输出的电压为: " + dist);return dist;
1 2 3 4 5 6 7 8 9 10 11 12 13 14 15 16 17 18 package adapterPattern.ObjectAdapter;public class Phone {public void charging (IVoltage5V iVoltage5V) {if (iVoltage5V.output5V() == 5 ) {"电压为5v,可以正常充电" );else {"电压异常不能充电" );
1 2 3 4 5 6 7 8 9 10 11 12 13 14 package adapterPattern.ObjectAdapter;public class Client {public static void main (String[] args) {"===适配器模式===" );Phone phone = new Phone ();new VoltageAdapter (new Voltage220V ()));
对象适配器和类适配器其实算是同一种思想,只不过实现方式不同。
使用成本更低, 更灵活。
接口适配器模式
一些书籍称为:适配器模式(Default Adapter Pattern)或缺省适配器模式 。
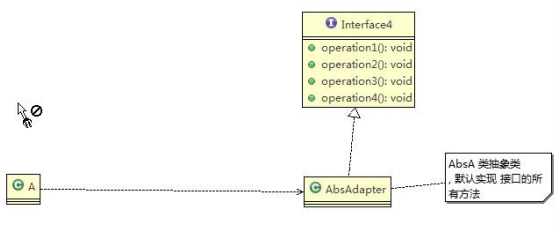
核心思路: 当不需要全部实现接口提供的方法 时,可先设计一个抽象类 实现接口 ,并为该接口中每个方法提供一个**默认实现(空方法)**,那么该抽象类的子类可有选择地覆盖父类的某些方法来实现需求
适用于一个接口不想使用其所有的方法的情况。
接口适配器模式应用实例
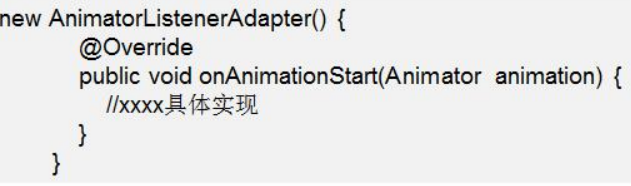
Android中的属性动画ValueAnimator类可以通过addListener(AnimatorListener listener)方法添加监听器,那么常规写法如右:
有时候我们不想实现Animator.AnimatorListener接口的全部方法,我们只想监听onAnimationStart,我们会如下写
AnimatorListenerAdapter 类,就是-一个接口适配器,代码如右图:它空实现了Animator.AnimatorListener类(src)的所有方法.
AnimatorListener 是一个接口.
程序里的匿名内部类就是Listener具体实现类.
代码实现 1 2 3 4 5 6 7 8 9 10 11 12 13 14 package adapterPattern.InterfaceAdapter;public interface Interface1 {public void m1 () ;public void m2 () ;public void m3 () ;public void m4 () ;
1 2 3 4 5 6 7 8 9 10 11 12 13 14 15 16 17 18 19 20 21 22 23 24 25 26 27 28 29 30 package adapterPattern.InterfaceAdapter;public class AbsAdapter implements Interface1 {@Override public void m1 () {@Override public void m2 () {@Override public void m3 () {@Override public void m4 () {
1 2 3 4 5 6 7 8 9 10 11 12 13 14 15 16 17 18 19 package adapterPattern.InterfaceAdapter;public class Client {public static void main (String[] args) {AbsAdapter absAdapter = new AbsAdapter (){@Override public void m1 () {"使用了m1的方法" );
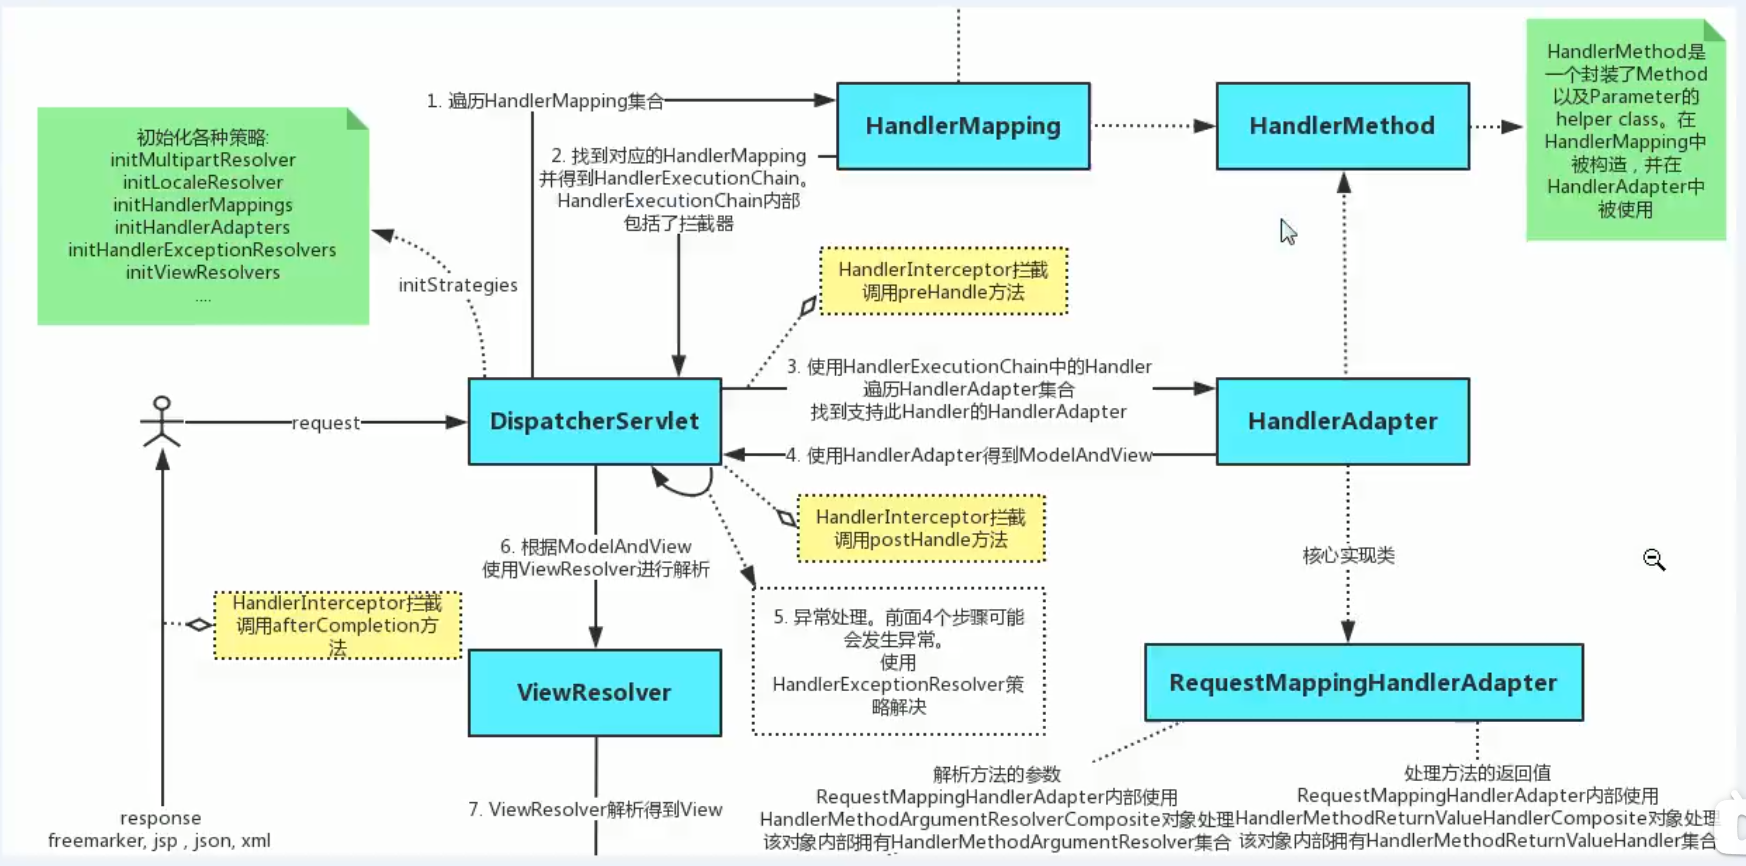
适配器模式在SpringMVC框架应用的源码剖析
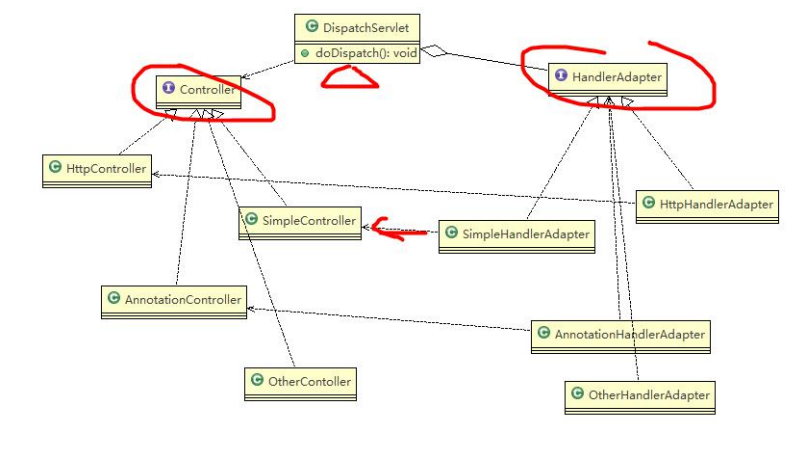
SpringMvc 中的HandlerAdapter,就使用了适配器模式
SpringMVC 处理请求的流程回顾
使用HandlerAdapter的原因分析:
代码分析+Debug源码
动手写SpringMVC通过适配器设计模式获取到对应的Controller的源码
pom.xml
1 2 3 4 5 6 7 8 9 10 11 12 13 14 15 16 17 <dependencies > <dependency > <groupId > org.springframework</groupId > <artifactId > spring-context</artifactId > <version > 5.0.2.RELEASE</version > </dependency > <dependency > <groupId > org.springframework</groupId > <artifactId > spring-web</artifactId > <version > 5.0.2.RELEASE</version > </dependency > <dependency > <groupId > org.springframework</groupId > <artifactId > spring-webmvc</artifactId > <version > 5.0.2.RELEASE</version > </dependency > </dependencies >
1 2 3 4 5 6 7 8 9 10 11 12 13 14 15 16 17 18 19 20 21 22 23 24 package Spring.springmvc;public interface Controller {class HttpController implements Controller {public void doHttpHandler () {"http..." );class SimpleController implements Controller {public void doSimplerHandler () {"simple..." );class AnnotationController implements Controller {public void doAnnotationHandler () {"annotation..." );
HandlerAdapter
1 2 3 4 5 6 7 8 9 10 11 12 13 14 15 16 17 18 19 20 21 22 23 24 25 26 27 28 29 30 31 32 33 34 35 36 37 38 39 40 41 42 43 44 45 46 47 package Spring.springmvc;public interface HandlerAdapter {public boolean supports (Object handler) ;public void handle (Object handler) ;class SimpleHandlerAdapter implements HandlerAdapter {public void handle (Object handler) {public boolean supports (Object handler) {return (handler instanceof SimpleController);class HttpHandlerAdapter implements HandlerAdapter {public void handle (Object handler) {public boolean supports (Object handler) {return (handler instanceof HttpController);class AnnotationHandlerAdapter implements HandlerAdapter {public void handle (Object handler) {public boolean supports (Object handler) {return (handler instanceof AnnotationController);
1 2 3 4 5 6 7 8 9 10 11 12 13 14 15 16 17 18 19 20 21 22 23 24 25 26 27 28 29 30 31 32 33 34 35 36 37 38 39 40 41 42 43 44 45 package Spring.springmvc;import java.util.ArrayList;import java.util.List;public class DispatchServlet {public static List<HandlerAdapter> handlerAdapters = new ArrayList <HandlerAdapter>();public DispatchServlet () {new AnnotationHandlerAdapter ());new HttpHandlerAdapter ());new SimpleHandlerAdapter ());public void doDispatch () {HttpController controller = new HttpController ();HandlerAdapter adapter = getHandler(controller);public HandlerAdapter getHandler (Controller controller) {for (HandlerAdapter adapter : this .handlerAdapters) {if (adapter.supports(controller)) {return adapter;return null ;public static void main (String[] args) {new DispatchServlet ().doDispatch();
总结
三种命名方式,是根据src是以怎样的形式给到Adapter (在Adapter里的形式)来命名的。
类适配器: 以类给到,在Adapter里,就是将src当做类,继承
Adapter 模式最大的作用还是将原本不兼容的接口融合在一起工作。
实际开发中, 实现起来不拘泥于我们讲解的三种经典形式
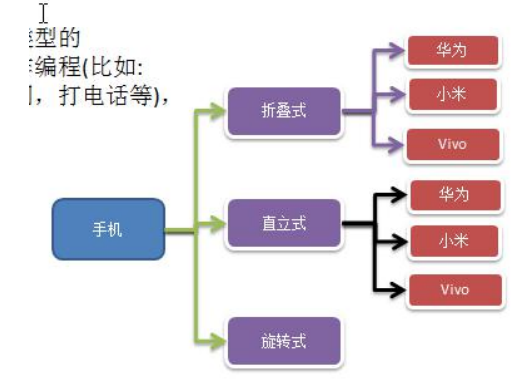
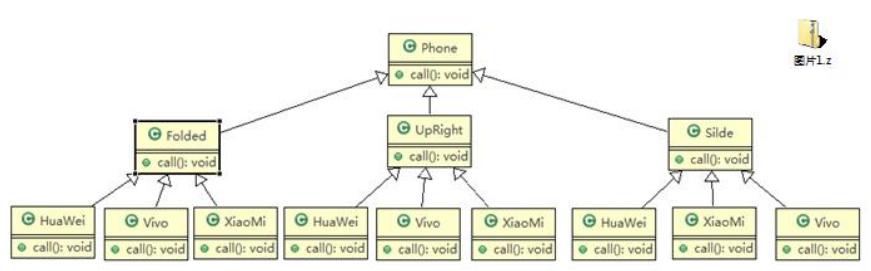
桥接模式(⭐⭐⭐) 现在对不同手机类型的不同品牌实现操作编程(比如:开机、关机、上网,打电话等),如图:
传统方案解决手机操作问题
扩展性问题**(类爆炸)**,如果我们再增加手机的样式(旋转式), 就需要增加各个品牌手机的类,同样如果我们增加一个手机品牌,也要在各个手机样式类下增加。
违反了单一职责原则,当我们增加手机样式时,要同时增加所有品牌的手机,这样增加了代码维护成本.
解决方案-使用桥接模式
桥接模式(Bridge)-基本介绍
桥接模式(Bridge模式)是指:将实现与抽象放在两个不同的类层次中,使两个层次可以独立改变。
是一种结构型设计模式
Bridge 模式基于类的最小设计原则,通过使用封装、聚合及继承等行为让不同的类承担不同的职责。它的主要特点是把抽象(Abstraction)与行为实现(Implementation)分离开来,从而可以保持各部分的独立性以及应对他们的
Client 类:桥接模式的调用者
抽象类( Abstraction) :维护了Implementor /即它的实现类ConcreteImplementor..二者是聚合关系,Abstraction充当桥接类
RefinedAbstraction: 是Abstraction 抽象类的子类
Implementor :行为实现类的接口
ConcretelmplementorA/B :行为的具体实现类
从UML图:这里的抽象类和接口是聚合的关系,其实调用和被调用关系
代码实现
1 2 3 4 5 6 7 8 9 10 11 12 13 package BridgePattern;public interface Brand {public void open () ;public void close () ;public void call () ;
1 2 3 4 5 6 7 8 9 10 11 12 13 14 15 16 17 18 19 20 21 22 23 package BridgePattern;public class Xiaomi implements Brand {@Override public void open () {"小米手机开机" );@Override public void close () {"小米手机关机" );@Override public void call () {"小米手机打电话" );
1 2 3 4 5 6 7 8 9 10 11 12 13 14 15 16 17 18 19 20 21 22 23 package BridgePattern;public class ViVo implements Brand {@Override public void open () {"ViVo手机开机" );@Override public void close () {"ViVo手机关机" );@Override public void call () {"ViVo手机打电话" );
1 2 3 4 5 6 7 8 9 10 11 12 13 14 15 16 17 18 19 20 21 22 23 24 25 26 package BridgePattern;public abstract class Phone {public Phone (Brand brand) {this .brand = brand;protected void open () {this .brand.open();protected void close () {this .brand.close();protected void call () {this .brand.call();
1 2 3 4 5 6 7 8 9 10 11 12 13 14 15 16 17 18 19 20 21 22 23 24 25 26 27 28 29 30 31 32 package BridgePattern;public class RotatePhone extends Phone {public RotatePhone (Brand brand) {super (brand);private String typeName = "旋转" ;@Override protected void open () {super .open();"手机打开" );@Override protected void close () {super .close();"手机关闭" );@Override protected void call () {super .call();"手机打电话" );
1 2 3 4 5 6 7 8 9 10 11 12 13 14 15 16 17 18 19 20 21 22 23 24 25 26 27 28 29 30 31 32 package BridgePattern;public class UprightPhone extends Phone {public UprightPhone (Brand brand) {super (brand);private String typeName = "直立" ;@Override protected void open () {super .open();"手机打开" );@Override protected void close () {super .close();"手机关闭" );@Override protected void call () {super .call();"手机打电话" );
1 2 3 4 5 6 7 8 9 10 11 12 13 14 15 16 17 18 19 20 21 22 23 24 25 package BridgePattern;public class Client {public static void main (String[] args) {Phone phone = new UprightPhone (new ViVo ());"================" );Phone phone1 = new UprightPhone (new Xiaomi ());"================" );Phone phone2 = new RotatePhone (new ViVo ());
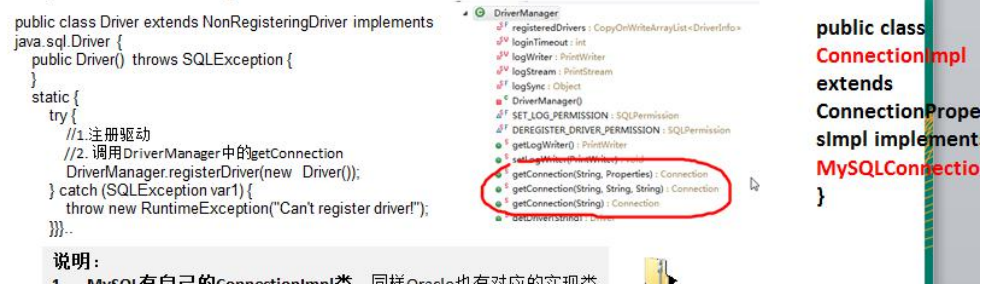
桥接模式在JDBC的源码剖析
Jdbc 的Driver 接口,如果从桥接模式来看,Driver 就是-一个接口,下面可以有MySQL的Driver,Oracle 的Driver,这些就可以当做实现接口类
总结
实现了抽象和实现部分的分离,从而极大的提供了系统的灵活性,让抽象部分和实现部分独立开来,这有助于系统进行分层设计,从而产生更好的结构化系统。
对于系统的高层部分,只需要知道抽象部分和实现部分的接口就可以了,其它的部分由具体业务来完成。
桥接模式替代多层继承方案 ,可以减少子类的个数 ,降低系统的管理和维护成本。桥模式的引入增加了系统的理解和设计难度,由于聚合关联关系建立在抽象层,要求开发者针对抽象进行设计和编程
桥接模式要求正确识别出系统中两个独立变化的维度(抽象、和实现),因此其使用范围有-定的局限性,即需要有这样的应用场景。
应用场景 1)- JDBC驱动程序
转账分类:网上转账,柜台转账,AMT转账
转账用户类型:普通用户,银卡用户,金卡用户..
消息类型:即时消息,延时消息
消息分类:手机短信,邮件消息,QQ消息…
装饰者模式(⭐⭐⭐)
动态的给一个对象增加一些额外的职责。就扩展功能而言,装饰模式提供了一种比使用子类更加灵活的替代方案。
问题描述:
咖啡种类/单品咖啡:Espresso(意大利浓咖啡)、ShortBlack、LongBlack(美式咖啡)、Decaf(无因咖啡)
调料:Milk、Soy(豆浆)、Chocolate
要求在扩展新的咖啡种类时,具有良好的扩展性、改动方便、维护方便
使用O0的来计算不同种类咖啡的费用:客户可以点单品咖啡,也可以单品咖啡+调料组合。
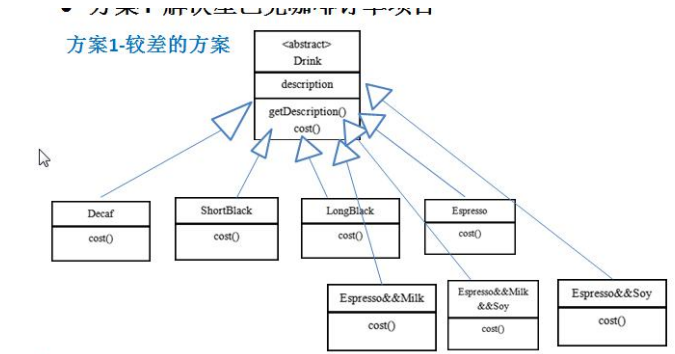
方案1-解决星巴克咖啡订单项目
Drink是一个抽象类,表示饮料
des就是对咖啡的描述,比如咖啡的名字
cost()方法就是计算费用,Drink类中做成一个抽象方法.
Decaf 就是单品咖啡,继承 Drink,并实现cost
Espress && Milk 就是单品咖啡+调料,这个组合很多
问题:这样设计,会有很多类,当我们增加一个单品咖啡,或者一个新的调料,类的数量就会倍增,就会出现类爆炸
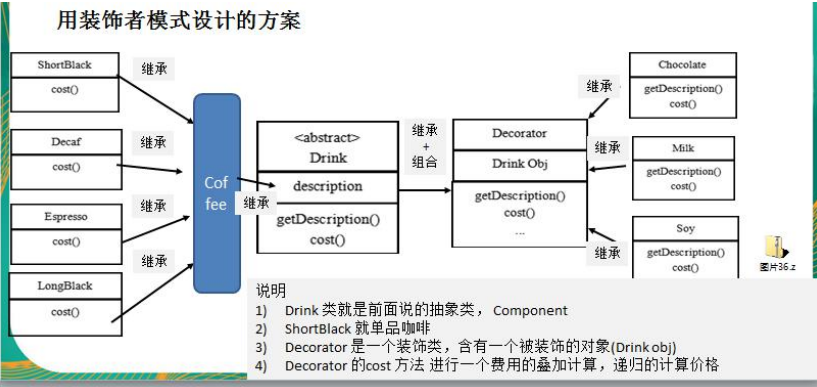
方案2-解决星巴克咖啡订单(好点)
前面分析到方案1因为咖啡单品+调料组合会造成类的倍增,因此可以做改进,将调料内置到Drink类,这样就不会造成类数量过多。从而提高项目的维护性(如图)
说明: milk,soy,chocolate可以设计为Boolean,表示是否要添加相应的调料.
分析:
方案2可以控制类的数量,不至于造成很多的类
在增加或者删除调料种类时,代码的维护量很大
考虑到用户可以添加多份调料时,可以将 hasMilk返回一个对应int
考虑使用装饰者 模式
装饰者模式定义
装饰者模式: 动态的将新功能附加到对象上。在对象功能扩展方面,它比继承更有弹性,装饰者模式也体现了开闭原则(ocp)
这里提到的动态的将新功能附加到对象和ocp原则,在后面的应用实例上会以代码的形式体现,请同学们注意体会。
装饰者模式原理
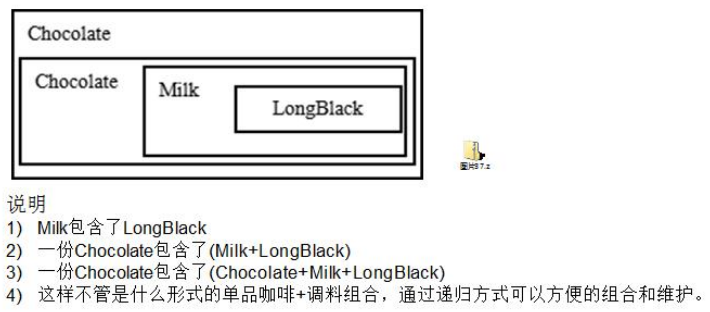
装饰者模式就像打包一个快递.
Component主体:比如类似前面的Drink
ConcreteComponent 和Decorator
Decorator:装饰者,比如各调料.
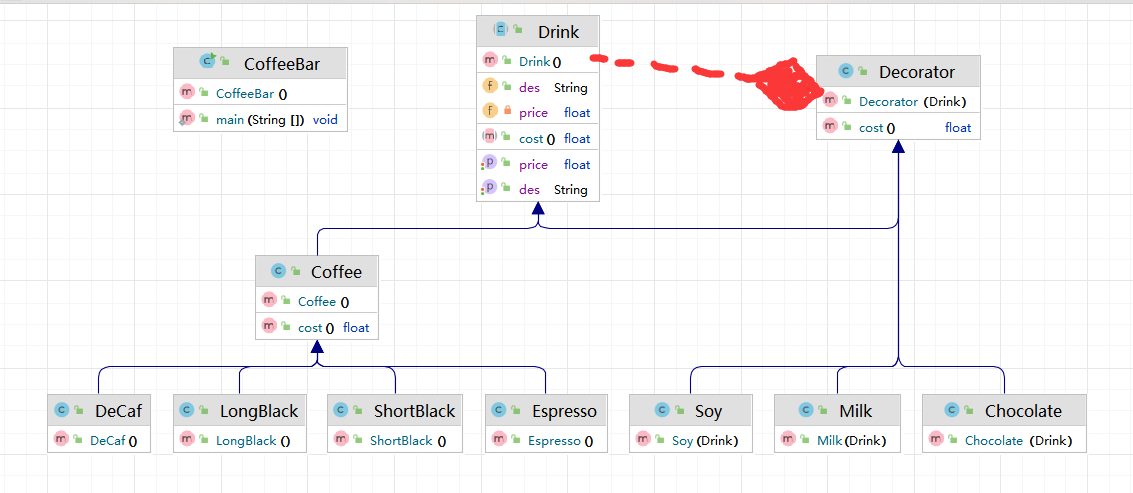
代码实现
1 2 3 4 5 6 7 8 9 10 11 12 13 14 15 16 17 18 19 20 21 22 23 24 25 26 27 28 29 30 31 32 33 34 package DecoratorPattern;public abstract class Drink {public String des; private float price = 0.0f ;public String getDes () {return des;public void setDes (String des) {this .des = des;public float getPrice () {return price;public void setPrice (float price) {this .price = price;public abstract float cost () ;
1 2 3 4 5 6 7 8 9 10 11 12 13 14 package DecoratorPattern;public class Coffee extends Drink {@Override public float cost () {return super .getPrice();
1 2 3 4 5 6 7 8 9 10 11 12 13 14 package DecoratorPattern;public class ShortBlack extends Coffee {public ShortBlack () {"shortblack" );5.0f );
1 2 3 4 5 6 7 8 9 10 11 12 13 14 package DecoratorPattern;public class LongBlack extends Coffee {public LongBlack () {"longblack" );5.0f );
1 2 3 4 5 6 7 8 9 10 11 12 13 14 15 package DecoratorPattern;public class DeCaf extends Coffee {public DeCaf () {"无因咖啡" );1.0f );
1 2 3 4 5 6 7 8 9 10 11 12 13 14 package DecoratorPattern;public class Espresso extends Coffee {public Espresso () {"意大利咖啡" );6.0f );
1 2 3 4 5 6 7 8 9 10 11 12 13 14 15 16 17 18 19 20 package DecoratorPattern;public class Decorator extends Drink {private Drink obj;public Decorator (Drink obj) { this .obj = obj;@Override public float cost () {return super .getPrice() + obj.cost();
1 2 3 4 5 6 7 8 9 10 11 12 13 14 15 16 package DecoratorPattern;public class Milk extends Decorator {public Milk (Drink obj) {super (obj);"牛奶" );2.0f );
1 2 3 4 5 6 7 8 9 10 11 12 13 14 15 package DecoratorPattern;public class Soy extends Decorator {public Soy (Drink obj) {super (obj);"豆浆" );1.5f );
1 2 3 4 5 6 7 8 9 10 11 12 13 14 15 package DecoratorPattern;public class Chocolate extends Decorator {public Chocolate (Drink obj) {super (obj);"巧克力" );3.0f );
1 2 3 4 5 6 7 8 9 10 11 12 13 14 15 16 17 18 19 20 21 22 23 24 25 26 27 28 29 30 31 32 33 34 35 36 37 38 39 40 41 package DecoratorPattern;public class CoffeeBar {public static void main (String[] args) {Drink order = new LongBlack ();"费用:" + order.cost());"描述:" + order.getDes());new Milk (order);"加一份牛奶,费用:" + order.cost());"加一份牛奶,描述:" + order.getDes());new Chocolate (order);"一份巧克力 加一份牛奶,费用:" + order.cost());"一份巧克力 加一份牛奶,描述:" + order.getDes());new Chocolate (order);"2份巧克力 加一份牛奶,费用:" + order.cost());"2份巧克力 加一份牛奶,描述:" + order.getDes());"====================" );Drink order2 = new DeCaf ();"无因咖啡,费用:" + order2.cost());"无因咖啡,描述:" + order2.getDes());new Milk (order2);"无因咖啡 加一份牛奶,费用:" + order2.cost());"无因咖啡 加一份牛奶,描述:" + order2.getDes());
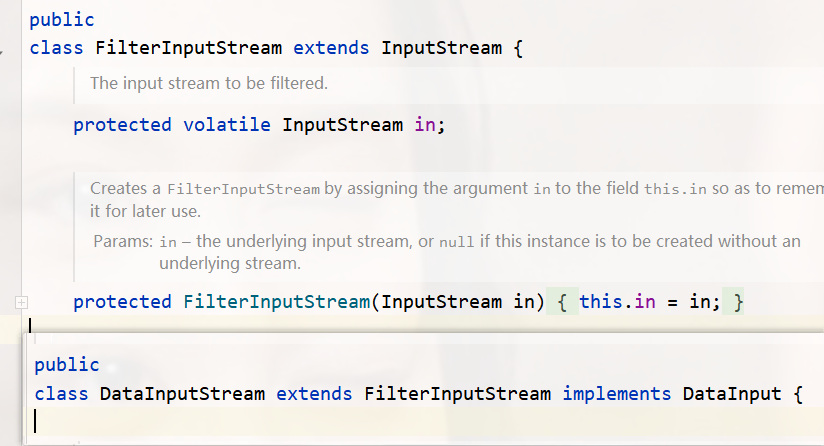
装饰者模式在JDK应用的源码分析
1 2 3 4 5 6 7 8 9 10 11 12 13 14 15 16 17 18 19 20 21 22 23 24 25 26 27 28 package JDK_SRC;import java.io.DataInputStream;import java.io.FileInputStream;import java.io.FileNotFoundException;import java.io.IOException;public class Decorator {public static void main (String[] args) throws IOException {DataInputStream dis = new DataInputStream (new FileInputStream ("d:\\abc.txt" ));
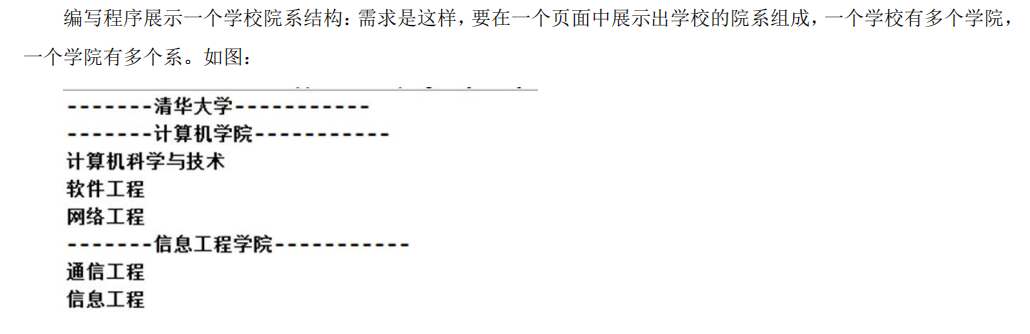
组合模式(⭐⭐⭐⭐)
传统方式
传统方式存在的问题:
1)将学院看做是学校的子类,系是学院的子类,这样实际上是站在组织大小来进行分层次的
组合模式基本介绍
组合模式(Composite Patterm) ,又叫部分整体模式,它创建了对象组的树形结构,将对象组合成树状结构以表示“整体-部分 ”的层次关系。
组合模式依据树形结构来组合对象 ,用来表示部分以及整体层次。
这种类型的设计模式属于结构型模式。
组合 模式使得用户对单个对象和组合对象的访问具有一致性 ,即:组合能让客户以一致的方式处理个别对象以及组合对象
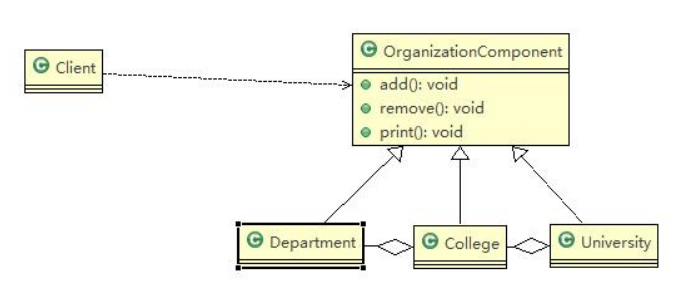
组合模式原理类图
Component :这是组合中对象声明接口,在适当情况下,实现所有类共有的接口默认行为,用于访问和管理,Component子部件, Component可以是抽象类或者接口Leaf : 在组合中表示叶子节点,叶子节点没有子节点Composite :非叶子节点,用于存储子 部件,在 Component接口中实现 子部件的相关操作,比如增加(add),删除。
代码实现
1 2 3 4 5 6 7 8 9 10 11 12 13 14 15 16 17 18 19 20 21 22 23 24 25 26 27 28 29 30 31 32 33 34 35 36 37 38 39 40 41 42 43 44 45 46 package CompositePattern;public abstract class OrganizationComponent {private String name; private String des; public void add (OrganizationComponent organizationComponent) {throw new UnsupportedOperationException ();public void remove (OrganizationComponent organizationComponent) {throw new UnsupportedOperationException ();public OrganizationComponent (String name, String des) {this .name = name;this .des = des;public String getName () {return name;public void setName (String name) {this .name = name;public String getDes () {return des;public void setDes (String des) {this .des = des;public abstract void print () ;
1 2 3 4 5 6 7 8 9 10 11 12 13 14 15 16 17 18 19 20 21 22 23 24 25 26 27 28 29 30 31 32 33 34 35 36 37 38 39 40 41 42 43 44 45 46 47 48 49 package CompositePattern;import java.util.ArrayList;import java.util.List;public class University extends OrganizationComponent {new ArrayList <>();public University (String name, String des) {super (name, des);@Override public void add (OrganizationComponent organizationComponent) {@Override public void remove (OrganizationComponent organizationComponent) {@Override public String getDes () {return super .getDes();@Override public String getName () {return super .getName();@Override public void print () {"------------" + getName() + "------------" );for (OrganizationComponent organizationComponent : organizationComponents) {
1 2 3 4 5 6 7 8 9 10 11 12 13 14 15 16 17 18 19 20 21 22 23 24 25 26 27 28 29 30 31 32 33 34 35 36 37 38 39 40 41 42 43 44 45 46 47 48 49 package CompositePattern;import java.util.ArrayList;import java.util.List;public class Colleage extends OrganizationComponent {new ArrayList <>();public Colleage (String name, String des) {super (name, des);@Override public void add (OrganizationComponent organizationComponent) {@Override public void remove (OrganizationComponent organizationComponent) {@Override public String getDes () {return super .getDes();@Override public String getName () {return super .getName();@Override public void print () {"------------" + getName() + "------------" );for (OrganizationComponent organizationComponent : organizationComponents) {
1 2 3 4 5 6 7 8 9 10 11 12 13 14 15 16 17 18 19 20 21 22 23 24 25 26 27 28 29 30 31 32 33 package CompositePattern;import java.util.ArrayList;import java.util.List;public class Department extends OrganizationComponent {public Department (String name, String des) {super (name, des);@Override public String getDes () {return super .getDes();@Override public String getName () {return super .getName();@Override public void print () {
1 2 3 4 5 6 7 8 9 10 11 12 13 14 15 16 17 18 19 20 21 22 23 24 25 package CompositePattern;public class Client {public static void main (String[] args) {OrganizationComponent university = new University ("清华大学" ,"985/211" );OrganizationComponent colleage1 = new Colleage ("计算机学院" ,"计算机学院" );OrganizationComponent colleage2 = new Colleage ("软件学院" ,"软件学院" );new Department ("计算机技术" , "111" ));new Department ("人工智能" , "111" ));new Department ("大数据" , "111" ));new Department ("软件工程" , "111" ));"================" );
组合模式在JDK集合的源码分析 Java的集合类-HashMap 就使用了组合模式
1 2 3 4 5 6 7 8 9 10 11 12 13 14 15 16 17 18 19 20 21 22 23 24 25 package JDK_SRC;import java.util.HashMap;public class Composite {public static void main (String[] args) {new HashMap <>();1 ,"红楼梦" );new HashMap <>();2 ,"三国演义" );3 ,"水浒传" );4 ,"西游记" );
总结
简化客户端操作。客户端只需要面对一致的对象而不用考虑整体部分或者节点叶子的问题。
具有较强的扩展性。当我们要更改组合对象时,我们只需要调整内部的层次关系,客户端不用做出任何改动.
方便创建出复杂的层次结构。客户端不用理会组合里面的组成细节,容易添加节点或者叶子从而创建出复杂的树形结构
需要遍历组织机构,或者处理的对象具有树形结构时 ,非常适合使用组合模式 .
要求较高的抽象性,如果节点和叶子有很多差异性的话 ,比如很多方法和属性都不一样,不适合使用组合 模式
外观模式(⭐⭐⭐⭐⭐) 组建一个家庭影院:
传统方式解决影院管理
在ClientTest 的main方法中,创建各个子系统的对象,并直接去调用子系统(对象)相关方法,会造成调用过程
不利于在ClientTest中,去维护对子系统的操作
解决思路:定义一个高层接口 ,给子系统中的一组接口提供一个一致的界面 (比如在高层接口提供四个方法
也就是说就是通过定义一个一致的接口(界面类),用以屏蔽内部子系统的细节,使得调用端只需跟这个接口发外观模式
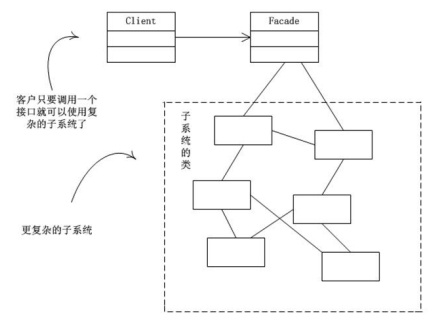
外观模式基本介绍
外观模式(Facade),也叫“过程模式:外观模式为子系统中的一组接口提供一个一致的界面 ,此模式定义了
外观模式通过定义一个一致的接口,用以屏蔽内部子系统的细节 ,使得调用端只需跟这个接口发生调用 ,而无需关心这个子系统的内部细节
外观类(Facade):为调用端提供统一的调用接口,外观类知道哪些子系统负责处理请求,从而将调用端的请求代
调用者(Client):外观接口的调用者
子系统的集合:指模块或者子系统,处理Facade对象指派的任务,他是功能的实际提供者
代码实现
1 2 3 4 5 6 7 8 9 10 11 12 13 14 15 16 17 18 19 20 21 22 23 24 25 26 27 28 package FacadePattern;public class DVDPlayer {private static DVDPlayer instance = new DVDPlayer ();public static DVDPlayer getInstanc () {return instance;public void on () {" dvd on " );public void off () {" dvd off " );public void play () {" dvd is playing " );public void pause () {" dvd pause .." );
1 2 3 4 5 6 7 8 9 10 11 12 13 14 15 16 17 18 19 20 21 22 23 package FacadePattern;public class Popcorn {private static Popcorn instance = new Popcorn ();public static Popcorn getInstance () {return instance;public void on () {" popcorn on " );public void off () {" popcorn ff " );public void pop () {" popcorn is poping " );
1 2 3 4 5 6 7 8 9 10 11 12 13 14 15 16 17 18 19 20 21 22 23 24 25 package FacadePattern;public class Projector {private static Projector instance = new Projector ();public static Projector getInstance () {return instance;public void on () {" Projector on " );public void off () {" Projector ff " );public void focus () {" Projector is Projector " );
1 2 3 4 5 6 7 8 9 10 11 12 13 14 15 16 17 18 19 20 package FacadePattern;public class Screen {private static Screen instance = new Screen ();public static Screen getInstance () {return instance;public void up () {" Screen up " );public void down () {" Screen down " );
1 2 3 4 5 6 7 8 9 10 11 12 13 14 15 16 17 18 19 20 21 22 23 24 package FacadePattern;public class Stereo {private static Stereo instance = new Stereo ();public static Stereo getInstance () {return instance;public void on () {" Stereo on " );public void off () {" Screen off " );public void up () {" Screen up.. " );
1 2 3 4 5 6 7 8 9 10 11 12 13 14 15 16 17 18 19 20 21 22 23 24 25 26 package FacadePattern;public class TheaterLight {private static TheaterLight instance = new TheaterLight ();public static TheaterLight getInstance () {return instance;public void on () {" TheaterLight on " );public void off () {" TheaterLight off " );public void dim () {" TheaterLight dim.. " );public void bright () {" TheaterLight bright.. " );
1 2 3 4 5 6 7 8 9 10 11 12 13 14 15 16 17 18 19 20 21 22 23 24 25 26 27 28 29 30 31 32 33 34 35 36 37 38 39 40 41 42 43 44 45 46 47 48 49 50 51 package FacadePattern;public class HomeTheaterFacade {private TheaterLight theaterLight;private Popcorn popcorn;private Stereo stereo;private Projector projector;private Screen screen;private DVDPlayer dVDPlayer;public HomeTheaterFacade () {super ();this .theaterLight = TheaterLight.getInstance();this .popcorn = Popcorn.getInstance();this .stereo = Stereo.getInstance();this .projector = Projector.getInstance();this .screen = Screen.getInstance();this .dVDPlayer = DVDPlayer.getInstanc();public void ready () {public void play () {public void pause () {public void end () {
1 2 3 4 5 6 7 8 9 10 11 package FacadePattern;public class Client {public static void main (String[] args) {HomeTheaterFacade homeTheaterFacade = new HomeTheaterFacade ();
外观模式在MyBatis框架应用的源码分析
总结
外观模式对外屏蔽了子系统的细节 ,因此外观模式降低了客户端对子系统使用的复杂性
外观模式对客户端与子系统的耦合关系–解耦,让子系统内部的模块更易维护和扩展
通过合理的使用外观模式,可以帮我们更好的划分访问的层次
当系统需要进行分层设计时,可以考虑使用Facade模式
在维护一个遗留的大型系统时,可能这个系统已经变得非常难以维护和扩展,此时可以考虑为新系统开发一个Facade类,来提供遗留系统的比较清晰简单的接口,让新系统与Facade类交互,提高复用性
不能过多的或者不合理的使用外观模式,使用外观模式好,还是直接调用模块好。要以让系统有层次,利于维护为目的。
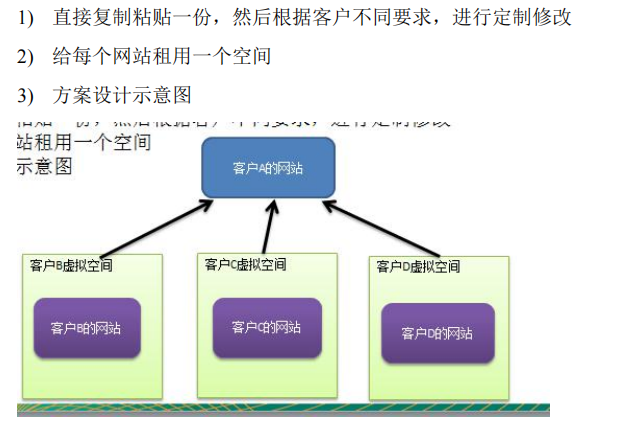
享元模式(⭐) 需求:
小型的外包项目,给客户A做一个产品展示网站,客户A的朋友感觉效果不错,也希望做这样的产品展示网站,但是要求都有些不同:
有客户要求以新闻的形式发布
有客户人要求以博客的形式发布
有客户希望以微信公众号的形式发布
传统解决方案:
问题:
需要的网站结构相似度很高,而且都不是高访问量网站,如果分成多个虚拟空间来处理,相当于一个相同网站的实例对象很多,造成服务器的资源浪费
解决思路:整合到一个网站中,共享其相关的代码和数据,对于硬盘、内存、CPU、数据库空间等服务器资源
对于代码来说,由于是一份实例,维护和扩展都更加容易
上面的解决思路就可以使用享元模式来解决
享元模式基本介绍
享元模式(Flyweight Pattern)也叫蝇量模式:运用共享技术有效地支持大量细粒度的对象
常用于系统底层开发,解决系统的性能问题。像数据库连接池,里面都是创建好的连接对象,在这些连接对象中有我们需要的则直接拿来用,避免重新创建,如果没有我们需要的,则创建一个
享元模式能够解决重复对象的内存浪费的问题,当系统中有大量相似对象,需要缓冲池时。不需总是创建新对象,可以从缓冲池里拿。这样可以降低系统内存,同时提高效率
享元模式经典的应用场景 就是池技术 了,String常量池 、数据库连接池 、缓冲池 等等都是享元模式的应用,享元模式是池技术的重要实现方式
享元模式的原理类图
FlyWeight 是抽象的享元角色,他是产品的抽象类,同时定义出对象的外部状态 和内部状态 (后面介绍)的接口或实现ConcreteFlyWeight是具体的享元角色,是具体的产品类,实现抽象角色定义相关业务UnSharedConcreteFlyWeight是不可共享的角色,一般不会出现在享元工厂。FlyWeightFactory享元工厂类,用于构建一个池容器(集合),同时提供从池中获取对象方法
内部状态和外部状态 比如围棋、五子棋、跳棋,它们都有大量的棋子对象,围棋和五子棋只有黑白两色,跳棋颜色多一点,所以棋子颜色就是棋子的内部状态;而各个棋子之间的差别就是位置的不同,当我们落子后,落子颜色是定的,但位置是变化的,所以棋子坐标就是棋子的外部状态
享元模式提出了两个要求:细粒度和共享对象。这里就涉及到内部状态和外部状态了,即将对象的信息分为两
内部状态 指对象共享出来的信息,存储在享元对象内部且不会随环境的改变而改变 外部状态指对象得以依赖的一个标记 ,是随环境改变而改变的、不可共享 的状态。
举个例子:围棋理论上有361个空位可以放棋子,每盘棋都有可能有两三百个棋子对象产生,因为内存空间有
代码实现
1 2 3 4 5 6 7 8 9 10 11 12 13 14 15 16 17 18 19 20 21 22 package FlyweightPattern;public class User {private String name;public User (String name) {this .name = name;public String getName () {return name;public void setName (String name) {this .name = name;
1 2 3 4 5 6 7 8 9 10 package FlyweightPattern;public abstract class WebSite {public abstract void use (User user) ;
1 2 3 4 5 6 7 8 9 10 11 12 13 14 15 16 17 18 19 20 package FlyweightPattern;public class ConcreteWebSite extends WebSite {private String type = "" ;public ConcreteWebSite (String type) {this .type = type;@Override public void use (User user) {"网站的发布形式是:" + type + "使用者是:" + user.getName());
1 2 3 4 5 6 7 8 9 10 11 12 13 14 15 16 17 18 19 20 21 22 23 24 25 26 27 28 29 package FlyweightPattern;import java.util.HashMap;public class WebSiteFactory {private HashMap<String,ConcreteWebSite> pools = new HashMap <>();public WebSite getWebSite (String type) {if ( !pools.containsKey(type)) {new ConcreteWebSite (type));return pools.get(type);public int getWebSiteCount () {return pools.size();
1 2 3 4 5 6 7 8 9 10 11 12 13 14 15 16 17 18 19 20 21 22 23 24 25 26 27 28 29 package FlyweightPattern;public class Client {public static void main (String[] args) {WebSiteFactory webSiteFactory = new WebSiteFactory ();WebSite webSite = webSiteFactory.getWebSite("微博" );new User ("张三" ));WebSite webSite1 = webSiteFactory.getWebSite("公众号" );new User ("李四" ));WebSite webSite2 = webSiteFactory.getWebSite("微博" );new User ("张三1" ));WebSite webSite3 = webSiteFactory.getWebSite("微博" );new User ("张三2" ));WebSite webSite4 = webSiteFactory.getWebSite("微博" );new User ("张三3" ));
享元模式在JDK-Interger的应用源码分析 1 2 3 4 5 6 7 8 9 10 11 12 13 14 15 16 17 18 19 20 21 22 23 24 25 public static void main (String[] args) {Integer x = Integer.valueOf(127 );Integer y = new Integer (127 );Integer z = Integer.valueOf(127 ); Integer w = new Integer (127 );Integer x1 = Integer.valueOf(200 );Integer x2 = Integer.valueOf(200 );"x1==x2 = " + (x1 == x2));
总结
在享元模式这样理解,“享”就表示共享 ,“元”表示对象
系统中有大量对象,这些对象消耗大量内存,并且对象的状态大部分可以外部化时,我们就可以考虑选用享元模式
用唯一标识码判断,如果在内存中有,则返回这个唯一标识码所标识的对象,用HashMap/HashTable存储
享元模式大大减少了对象的创建,降低了程序内存的占用,提高效率
享元模式提高了系统的复杂度 。需要分离出内部状态和外部状态 ,而外部状态具有固化特性,不应该随着内部状态的改变而改变,这是我们使用享元模式需要注意的地方.
使用享元模式时,注意划分内部状态和外部状态,并且需要有一个工厂类加以控制。7)享元模式经典的应用场景是需要缓冲池的场景,比如String常量池、数据库连接池
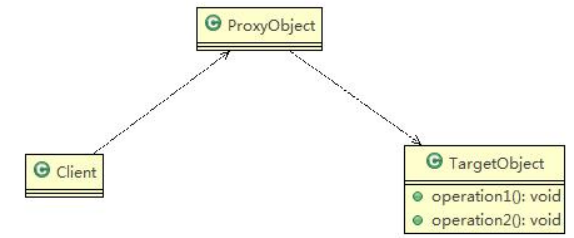
代理模式(⭐⭐⭐⭐) 代理模式(Proxy)
代理模式:为一个对象提供一个替身,以控制对这个对象的访问。即通过代理对象访问目标对象.这样做的好处
被代理的对象可以是远程对象、创建开销大的对象或需要安全控制的对象
代理模式有不同的形式,主要有三种静态代理 、动态代理(JDK 代理、接口代理)和 Cglib代理 (可以在内存
代理模式示意图
静态代理 静态代理在使用时,需要定义接口或者父类,被代理对象(即目标对象)与代理对象一起实现相同的接口或者是继承相同父类
定义一个接口:ITeacherDao
目标对象TeacherDAO实现接口ITeacherDAO
使用静态代理方式,就需要在代理对象TeacherDAOProxy 中也实现ITeacherDAO
调用的时候通过调用代理对象的方法来调用目标对象.
特别提醒:代理对象与目标对象要实现相同的接口,然后通过调用相同的方法来调用目标对象的方法
代码实现 1 2 3 4 5 6 7 8 9 10 11 12 package ProxyPattern.staticpattern;public interface ITeacherDao {void teach () ;
1 2 3 4 5 6 7 8 9 10 11 12 13 14 package ProxyPattern.staticpattern;public class TeacherDao implements ITeacherDao {@Override public void teach () {"老师授课中...." );
1 2 3 4 5 6 7 8 9 10 11 12 13 14 15 16 17 18 19 20 21 22 23 package ProxyPattern.staticpattern;public class TeacherDaoProxy implements ITeacherDao {private ITeacherDao iTeacherDao; public TeacherDaoProxy (ITeacherDao iTeacherDao) {this .iTeacherDao = iTeacherDao;@Override public void teach () {"开始代理,完成某些操作" );"提交...." );
1 2 3 4 5 6 7 8 9 10 11 12 13 14 15 16 17 18 19 20 package ProxyPattern.staticpattern;public class Client {public static void main (String[] args) {TeacherDao teacherDao = new TeacherDao ();TeacherDaoProxy teacherDaoProxy = new TeacherDaoProxy (teacherDao);
静态代理优缺点
动态代理 动态代理模式的基本介绍
代理对象,不需要实现接口,但是目标对象要实现接口,否则不能用动态代理
代理对象的生成,是利用JDK的API,动态的在内存中构建代理对象
动态代理也叫做:JDK代理 、接口代理
JDK中生成代理对象的API
代理类所在包:java.lang.reflect.Proxy
JDK实现代理只需要使用newProxyInstance方法,但是该方法需要接收三个参数,完整的写法是:static Object newProxyInstance(ClassLoader loader, Class<?>[]interfaces,InvocationHandler h )
代码实现
1 2 3 4 5 6 7 8 9 10 11 12 13 14 package ProxyPattern.dynamicProxy;public interface ITeacherDao {void teach () ;void sayHello (String name) ;
1 2 3 4 5 6 7 8 9 10 11 12 13 14 15 16 17 18 19 package ProxyPattern.dynamicProxy;public class TeacherDao implements ITeacherDao {@Override public void teach () {"开始授课...." );@Override public void sayHello (String name) {"hi~" + name);
1 2 3 4 5 6 7 8 9 10 11 12 13 14 15 16 17 18 19 20 21 22 23 24 25 26 27 28 29 30 31 32 33 34 35 36 37 38 39 40 41 42 43 package ProxyPattern.dynamicProxy;import java.lang.reflect.InvocationHandler;import java.lang.reflect.Method;import java.lang.reflect.Proxy;public class ProxyFactory {private Object target;public ProxyFactory (Object target) {this .target = target;public Object getProxyInstance () {return Proxy.newProxyInstance(target.getClass().getClassLoader(), target.getClass().getInterfaces(), new InvocationHandler () {@Override public Object invoke (Object proxy, Method method, Object[] args) throws Throwable {"JDK代理开始~~" );Object invoke = method.invoke(target, args);"JDK代理提交" );return invoke;
1 2 3 4 5 6 7 8 9 10 11 12 13 14 15 16 17 18 19 20 21 package ProxyPattern.dynamicProxy;public class Client {public static void main (String[] args) {ITeacherDao target = new TeacherDao ();ITeacherDao proxyInstance = (ITeacherDao) new ProxyFactory (target).getProxyInstance();"张三" );"==============" );
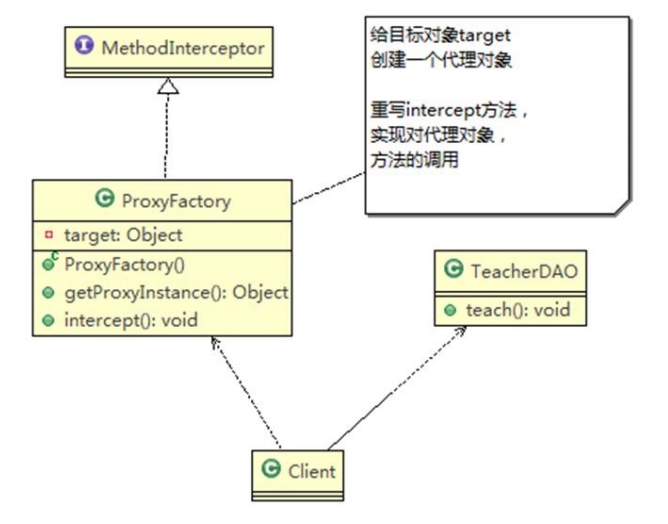
Cglib代理 Cglib代理模式的基本介绍
静态代理和JDK代理模式都要求目标对象是实现一个接口,但是有时候目标对象只是一个单独的对象 ,并没有实 现任何的接口 ,这个时候可使用目标对象子类来实现代理-这就是Cglib代理
Cglib代理也叫作子类代理 ,它是在内存中构建一个子类对象从而实现对目标对象功能扩展,有些书也将Cglib
Cglib是一个强大的高性能的代码生成包,它可以在运行期扩展java类与实现java接口.它广泛的被许多AOP
在AOP编程中如何选择代理模式:实现接口 ,用JDK代理
2.目标对象不需要实现接口 ,用Cglib 代理
Cglib包的底层是通过使用字节码处理框架ASM来转换字节码并生成新的类
Cglib代理模式实现步骤
导入jar包
在内存中动态构建子类,注意代理的类不能为final,否则报错java.lang.IllegalArgumentException:
目标对象的方法如果为final/static,那么就不会被拦截,即不会执行目标对象额外的业务方法.
代码实现
1 2 3 4 5 6 7 8 9 10 11 12 13 14 15 16 17 package ProxyPattern.CglibProxy;public class TeacherDao {public void teach () {"老师授课中...,我是cglib代理,我不需要实现接口" );public void sayHello (String name) {"你好~~~" + name);
1 2 3 4 5 6 7 8 9 10 11 12 13 14 15 16 17 18 19 20 21 22 23 24 25 26 27 28 29 30 31 32 33 34 35 36 37 38 39 40 41 42 43 44 45 46 package ProxyPattern.CglibProxy;import net.sf.cglib.proxy.Enhancer;import net.sf.cglib.proxy.MethodInterceptor;import net.sf.cglib.proxy.MethodProxy;import java.lang.reflect.Method;public class ProxyFactory implements MethodInterceptor {private Object target;public ProxyFactory (Object target) {this .target = target;public Object getProxyInstance () {Enhancer enhancer = new Enhancer ();this );return enhancer.create();@Override public Object intercept (Object o, Method method, Object[] args, MethodProxy methodProxy) throws Throwable {"Cglib代理模式~~开始" );Object invoke = method.invoke(target, args);"Cglib代理模式~~结束" );return invoke;
1 2 3 4 5 6 7 8 9 10 11 12 13 14 15 16 17 18 package ProxyPattern.CglibProxy;public class Client {public static void main (String[] args) {TeacherDao teacherDao = new TeacherDao ();TeacherDao proxyInstance = (TeacherDao)new ProxyFactory (teacherDao).getProxyInstance();"张三" );
几种常见的代理模式介绍一几种变体
防火墙代理 缓存代理 远程代理 同步代理 :主要使用在多线程编程中,完成多线程间同步工作
行为型模式 模板方法模式(⭐⭐⭐) 问题:
制作豆浆的流程选材—>添加配料—>浸泡—>放到豆浆机打碎
通过添加不同的配料,可以制作出不同口味的豆浆
选材、浸泡和放到豆浆机打碎这几个步骤对于制作每种口味的豆浆都是一样的
请使用模板方法模式完成(说明:因为模板方法模式,比较简单,很容易就想到这个方案,因此就直接使用,
模板方法模式基本介绍
模板方法模式(Template Method Pattern),又叫模板模式(Template Pattern),在一个抽象类公开定义了执行它的方法的模板。它的子类可以按需要重写方法实现,但调用将以抽象类中定义的方式进行。
简单说,模板方法模式定义一个操作中的算法的骨架,而将一些步骤延迟到子类中,使得子类可以不改变
这种类型的设计模式属于行为型模式。
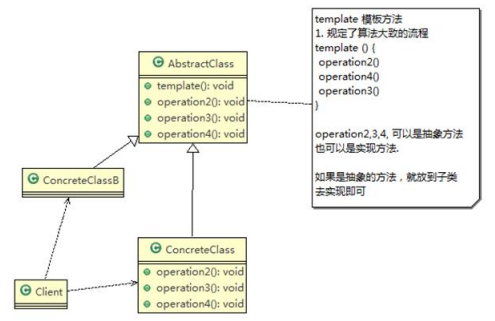
模板方法模式原理类图
AbstractClass 抽象类,类中实现了模板方法(template),定义了算法的骨架,具体子类需要去实现其它的抽象方法operationr2,3,4ConcreteClass实现抽象方法 operationr2,3,4,以完成算法中特点子类的步骤
代码实现
1 2 3 4 5 6 7 8 9 10 11 12 13 14 15 16 17 18 19 20 21 22 23 24 25 26 27 28 29 30 31 32 33 34 35 package TemplatePattern;public abstract class SoyaMilk {final void make () {void select () {"第一步:选择新鲜黄豆" );abstract void addCondiments () ;void soak () {"第三步:黄豆和配料开始浸泡,需要3小时" );void beat () {"第四步:黄豆和配料放到豆浆机区打碎" );
1 2 3 4 5 6 7 8 9 10 11 12 13 14 package TemplatePattern;public class RedBeanSoyaMilk extends SoyaMilk {@Override void addCondiments () {"加入上好的红豆" );
1 2 3 4 5 6 7 8 9 10 11 12 13 14 package TemplatePattern;public class PeanutSoyaMilk extends SoyaMilk {@Override void addCondiments () {" 加入上好的花生 " );
1 2 3 4 5 6 7 8 9 10 11 12 13 14 15 16 17 18 19 package TemplatePattern;public class Client {public static void main (String[] args) {"-----制作红豆豆浆-------" );SoyaMilk redBeanSoyaMilk = new RedBeanSoyaMilk ();"-----制作花生豆浆-------" );SoyaMilk peanutSoyaMilk = new PeanutSoyaMilk ();
模板方法模式的钩子方法
在模板方法模式的父类中,我们可以定义一个方法,它默认不做任何事 ,子类可以视情况要不要覆盖它 ,该方法称为“钩子”。
还是用上面做豆浆的例子来讲解,比如,我们还希望制作纯豆浆,不添加任何的配料,请使用钩子方法对前面
1 2 3 4 5 6 7 8 9 10 11 12 13 14 15 16 17 18 19 20 21 22 23 24 25 26 27 28 29 30 31 32 33 34 35 36 37 38 39 40 41 package TemplatePattern.improve;public abstract class SoyaMilk {final void make () {if (customerWantCondiments()){void select () {"第一步:选择新鲜黄豆" );abstract void addCondiments () ;void soak () {"第三步:黄豆和配料开始浸泡,需要3小时" );void beat () {"第四步:黄豆和配料放到豆浆机区打碎" );customerWantCondiments () {return true ;
1 2 3 4 5 6 7 8 9 10 11 12 13 14 15 16 17 18 19 package TemplatePattern.improve;public class PureSoyaMilk extends SoyaMilk {@Override void addCondiments () {@Override customerWantCondiments () {return false ;
1 2 3 4 5 6 7 8 9 10 11 12 13 14 15 16 17 18 19 20 21 22 23 package TemplatePattern.improve;public class Client {public static void main (String[] args) {"-----制作红豆豆浆-------" );SoyaMilk redBeanSoyaMilk = new RedBeanSoyaMilk ();"-----制作花生豆浆-------" );SoyaMilk peanutSoyaMilk = new PeanutSoyaMilk ();"-----制作纯豆浆-------" );SoyaMilk pureSoyaMilk = new PureSoyaMilk ();
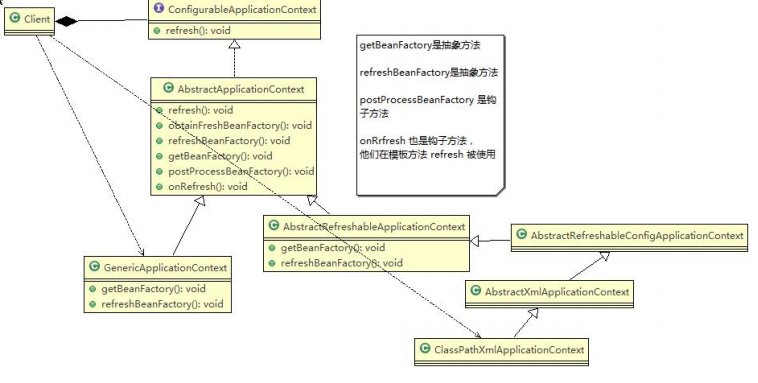
模板方法模式在Spring框架应用的源码分析
总结
基本思想是:算法只存在于一个地方,也就是在父类中,容易修改 。需要修改算法时,只要修改父类的模板方
实现了最大化代码复用 。父类的模板方法和已实现的某些步骤会被子类继承而直接使用。
既统一了算法,也提供了很大的灵活性 。父类的模板方法确保了算法的结构保持不变,同时由子类提供部分步骤的实现。该模式的不足之处:每一个不同的实现都需要一个子类实现,导致类的个数增加,使得系统更加庞大
一般模板方法都加上 final关键字,防止子类重写模板方法.
模板方法模式使用场景 :当要完成在某个过程,该过程要执行一系列步骤,这一系列的步骤基本相同 ,但其个别步骤 在实现时可能不同,通常考虑用模板方法模式来处理
命令模式(⭐⭐⭐⭐)
命令模式(Command Pattern):在软件设计中,我们经常需要向某些对象发送请求,但是并不知道请求的接收者是谁,也不知道被请求的操作是哪个,我们只需在程序运行时指定具体的请求接收者即可,此时,可以使用命令模式来进行设计
命名模式使得请求发送者与请求接收者消除彼此之间的耦合 ,让对象之间的调用关系更加灵活,实现解耦。
在命名模式中,会将一个请求封装为一个对象,以便使用不同参数来表示不同的请求(即命名),同时命令模式
通俗易懂的理解:将军发布命令,士兵去执行。其中有几个角色:将军(命令发布者)、士兵(命令的具体执行者)、命令(连接将军和士兵)。Invoker是调用者(将军),Receiver是被调用者(士兵),MyCommand是命令,实现了Command接口,持有接收对象
命令模式的原理类图
Invoker:是调用者角色Command:是命令角色,需要执行的所有命令都在这里,可以是接口或抽象类Receiver:接受者角色,知道如何实施和执行一个请求相关的操作 ConcreteCommand:将一个接受者对象与一个动作绑定,调用接受者相应的操作,实现execute
代码实现
1 2 3 4 5 6 7 8 9 10 11 12 13 14 15 16 17 package CommandPattern;public interface Command {public void execute () ;public void undo () ;
1 2 3 4 5 6 7 8 9 10 11 12 13 14 15 16 17 18 package CommandPattern;public class LightReceiver {public void on () {"电灯打开了...." );public void off () {"电灯关闭了..." );
1 2 3 4 5 6 7 8 9 10 11 12 13 14 15 16 17 18 19 20 21 22 23 24 25 26 package CommandPattern;public class LightOnCommand implements Command {public LightOnCommand (LightReceiver light) {this .light = light;@Override public void execute () {@Override public void undo () {
1 2 3 4 5 6 7 8 9 10 11 12 13 14 15 16 17 18 19 20 21 22 23 24 25 26 27 28 29 30 31 package CommandPattern;import javafx.scene.effect.Light;public class LightOffCommand implements Command {public LightOffCommand (LightReceiver light) {this .light = light;@Override public void execute () {@Override public void undo () {
1 2 3 4 5 6 7 8 9 10 11 12 13 14 15 16 17 18 19 20 21 package CommandPattern;public class NoCommand implements Command {@Override public void execute () {@Override public void undo () {
1 2 3 4 5 6 7 8 9 10 11 12 13 14 15 16 17 18 19 20 21 22 23 24 25 26 27 28 29 30 31 32 33 34 35 36 37 38 39 40 41 42 43 44 45 46 47 48 49 50 51 52 53 54 package CommandPattern;public class RemoteController {public RemoteController () {new Command [5 ];new Command [5 ];for (int i = 0 ; i < 5 ; i++) {new NoCommand ();new NoCommand ();public void setCommand (int no, Command onCommand, Command offCommand) {public void onButtonWasPushed (int no) { public void offButtonWasPushed (int no) {public void undoButtonWasPushed () {
1 2 3 4 5 6 7 8 9 10 11 12 13 14 15 16 17 package CommandPattern;public class TvReceiver {public void on () {"电视机打开了" );public void off () {"电视机关闭了" );
1 2 3 4 5 6 7 8 9 10 11 12 13 14 15 16 17 18 19 20 21 22 23 24 25 26 package CommandPattern;public class TvOnCommand implements Command {private TvReceiver tv;public TvOnCommand (TvReceiver tv) {this .tv = tv;@Override public void execute () {@Override public void undo () {
1 2 3 4 5 6 7 8 9 10 11 12 13 14 15 16 17 18 19 20 21 22 23 24 25 package CommandPattern;public class TvOffCommand implements Command {private TvReceiver tv;public TvOffCommand (TvReceiver tv) {this .tv = tv;@Override public void execute () {@Override public void undo () {
1 2 3 4 5 6 7 8 9 10 11 12 13 14 15 16 17 18 19 20 21 22 23 24 25 26 27 28 29 30 31 32 33 34 35 36 37 38 39 40 41 42 43 44 45 46 47 48 package CommandPattern;public class Client {public static void main (String[] args) {LightReceiver lightReceiver = new LightReceiver ();LightOnCommand lightOnCommand = new LightOnCommand (lightReceiver);LightOffCommand lightOffCommand = new LightOffCommand (lightReceiver);RemoteController remoteController = new RemoteController ();0 , lightOnCommand, lightOffCommand);"---------按下灯的开按钮---------" );0 );"---------按下灯的关按钮---------" );0 );"---------按下灯的撤销按钮---------" );"=======================================" );TvReceiver tvReceiver = new TvReceiver ();TvOnCommand tvOnCommand = new TvOnCommand (tvReceiver);TvOffCommand tvOffCommand = new TvOffCommand (tvReceiver);1 ,tvOnCommand,tvOffCommand);"---------按下电视机的开按钮---------" );1 );"---------按下电视机的关按钮---------" );1 );"---------按下电视机的撤销按钮---------" );
命令模式在 Spring框架JdbcTemplate应用的源码分析
StatementCallback接口,类似命令接口(Command)class QueryStatementCallback implements StatementCallback<T>, SqIProvider ,匿名内部类,实现了命令接口,同时也充当命令接收者命令调用者是JdbcTemplate,其中 execute(StatementCallbackaction)方法中,调用action.doInStatement方法. 不同的实现StatementCallback接口的对象,对应不同的doInStatemnt 实现逻辑
另外实现 StatementCallback命令接口的子类还有QueryStatementCallback、
总结
将发起请求的对象与执行请求的对象解耦。发起请求的对象是调用者,调用者只要调用命令对象的execute()方法就可以让接收者工作,而不必知道具体的接收者对象是谁、是如何实现的,命令对象会负责让接收者执行请求的动作,也就是说:”请求发起者”和“请求执行者”之间的解耦是通过命令对象实现的,命令对象起到了
容易设计一个命令队列。只要把命令对象放到列队,就可以多线程的执行命令
容易实现对请求的撤销和重做
**命令模式不足:**可能导致某些系统有过多的具体命令类,增加了系统的复杂度,这点在在使用的时候要注意
空命令也是一种设计模式 ,它为我们省去了判空的操作 。在上面的实例中,如果没有用空命令,我们每按下一个按键都要判空,这给我们编码带来一定的麻烦。命令模式经典的应用场景:界面的一个按钮都是一条命令、模拟CMD(DOS命令)订单的撤销/恢复、触发-
访问者模式(⭐) 需求:
完成测评系统需求
传统方案的问题分析:
如果系统比较小,还是ok的,但是考虑系统增加越来越多新的功能时,对代码改动较大,违反了ocp原则,不
扩展性不好,比如增加了新的人员类型,或者管理方法,都不好做
引出我们会使用新的设计模式–访问者模式
访问者模式基本介绍
访问者模式(Visitor Pattern),封装一些作用于某种数据结构的各元素的操作,它可以在不改变数据结构的前提下定义作用于这些元素的新的操作。
主要将数据结构与数据操作分离,解决数据结构和操作耦合性问题
访问者模式的基本工作原理是:在被访问的类里面加一个对外提供接待访问者的接口
访问者模式主要应用场景是:需要对一个对象结构中的对象进行很多不同操作(这些操作彼此没有关联),同时需要避免让这些操作”污染”这些对象的类,可以选用访问者模式解决
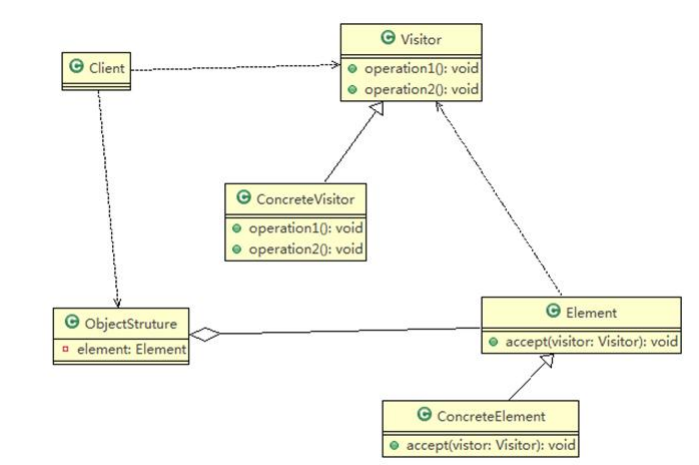
访问者模式的原理类图
Visitor是抽象访问者,为该对象结构中的ConcreteElement的每一个类声明一个visit操作ConcreteVisitor :是一个具体的访问值实现每个有Visitor声明的操作,是每个操作实现的部分.ObjectStructure能枚举它的元素,可以提供一个高层的接口,用来允许访问者访问元素Element定义一个accept方法,接收一个访问者对象ConcreteElement为具体元素,实现了accept方法
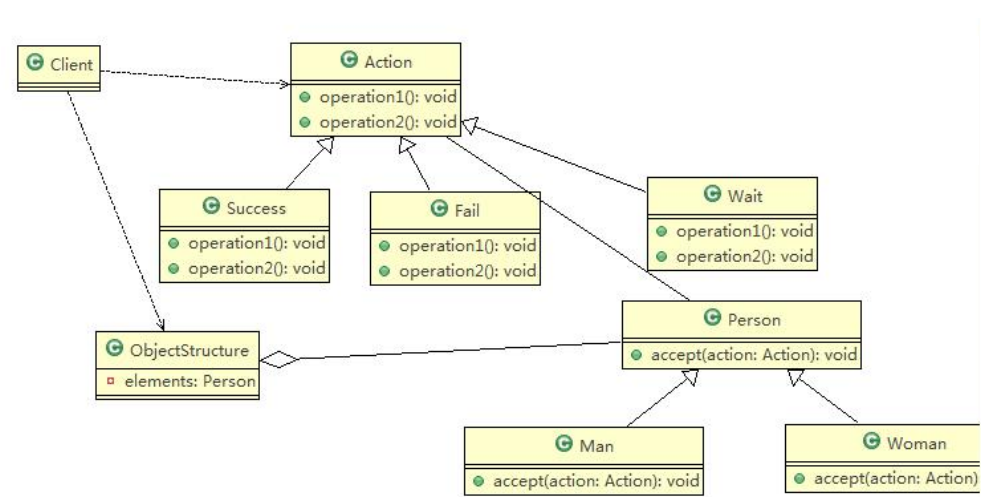
代码实现
1 2 3 4 5 6 7 8 9 10 11 12 13 14 package VisitorPattern;public abstract class Person {public abstract void accept (Action action) ;
1 2 3 4 5 6 7 8 9 10 11 12 13 14 15 16 17 18 19 20 21 22 23 24 package VisitorPattern;public class Man extends Person {private String name;public Man (String name) {this .name = name;public String getName () {return name;@Override public void accept (Action action) {this );
1 2 3 4 5 6 7 8 9 10 11 12 13 14 15 16 17 18 19 20 21 22 23 package VisitorPattern;public class Woman extends Person {private String name;public Woman (String name) {this .name = name;public String getName () {return name;@Override public void accept (Action action) {this );
1 2 3 4 5 6 7 8 9 10 11 12 13 14 15 16 package VisitorPattern;public abstract class Action {public abstract void getManResult (Man man) ;public abstract void getWomanResult (Woman woman) ;
1 2 3 4 5 6 7 8 9 10 11 12 13 14 15 16 17 18 19 package VisitorPattern;public class Success extends Action {@Override public void getManResult (Man man) {" 给的评价:该歌手成功" );@Override public void getWomanResult (Woman woman) {" 给的评价:该歌手成功" );
1 2 3 4 5 6 7 8 9 10 11 12 13 14 15 16 17 18 package VisitorPattern;public class Fail extends Action {@Override public void getManResult (Man man) {" 给的评价:该歌手失败" );@Override public void getWomanResult (Woman woman) {" 给的评价:该歌手失败" );
1 2 3 4 5 6 7 8 9 10 11 12 13 14 15 16 17 18 package VisitorPattern;public class Wait extends Action {@Override public void getManResult (Man man) {" 给的评价:该歌手待定" );@Override public void getWomanResult (Woman woman) {" 给的评价:该歌手待定" );
1 2 3 4 5 6 7 8 9 10 11 12 13 14 15 16 17 18 19 20 21 22 23 24 25 26 27 28 29 30 31 package VisitorPattern;import java.util.LinkedList;import java.util.List;public class ObjectStructure {private List<Person> persons = new LinkedList <>();public void attach (Person p) {public void detach (Person p) {public void display (Action action) {for (Person p : persons) {
1 2 3 4 5 6 7 8 9 10 11 12 13 14 15 16 17 18 19 20 21 22 23 24 package VisitorPattern;public class Client {public static void main (String[] args) {ObjectStructure objectStructure = new ObjectStructure ();new Man ("张三" ));new Woman ("李思曼" ));Success success = new Success ();"========================" );Fail fail = new Fail ();
总结 优点
访问者模式符合单一职责原则、让程序具有优秀的扩展性、灵活性非常高
访问者模式可以对功能进行统一,可以做报表、UI、拦截器与过滤器,适用于数据结构相对稳定的系统
缺点
具体元素对访问者公布细节,也就是说访问者关注了其他类的内部细节,这是迪米特法则所不建议的,这样造
违背了依赖倒转原则。访问者依赖的是具体元素,而不是抽象元素
因此,如果一个系统有比较稳定的数据结构 ,又有经常变化的功能需求,那么访问者模式就是比较合适 的.
迭代器模式(⭐⭐⭐⭐⭐) 需求:
迭代器模式基本介绍
迭代器模式(Iterator Pattern)是常用的设计模式,属于行为型模式
如果我们的集合元素是用不同的方式实现的,有数组,还有java的集合类,或者还有其他方式,当客户端要遍历这些集合元素的时候就要使用多种遍历方式,而且还会暴露元素的内部结构,可以考虑使用迭代器模式解决。
迭代器模式,提供一种遍历集合元素的统一接口,用一致的方法遍历集合元素,不需要知道集合对象的底层表示,即:不暴露其内部的结构。
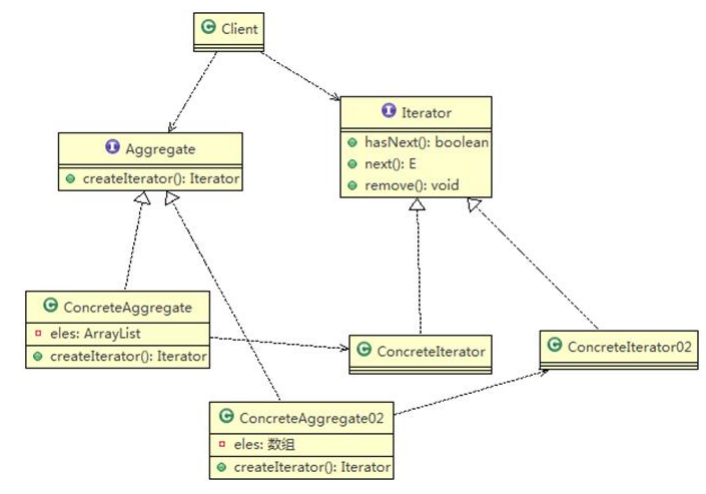
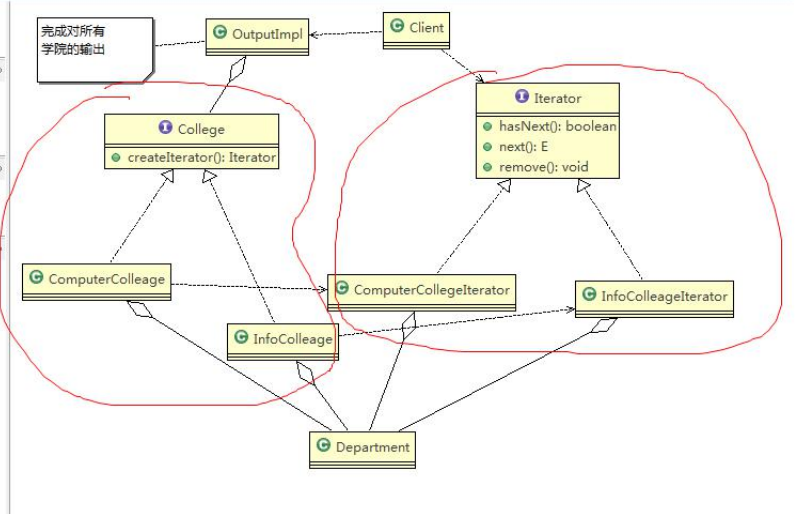
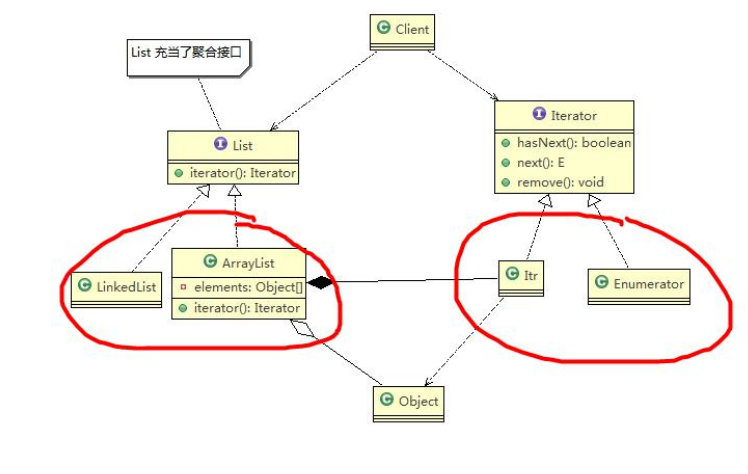
迭代器模式原理类图
Iterator :迭代器接口,是系统提供,含义hasNext, next, removeConcretelterator:具体的迭代器类,管理迭代Aggregate :一个统一的聚合接口,将客户端和具体聚合解耦ConcreteAggreage:具体的聚合持有对象集合,并提供一个方法,返回一个迭代器,该迭代器可以正确遍历集合Client :客户端,通过Iterator和Aggregate依赖子类
代码实现
1 2 3 4 5 6 7 8 9 10 11 12 13 14 15 16 17 18 19 20 21 22 23 24 25 26 27 28 29 30 31 32 33 34 package IteratorPattern;public class Department {private String name;private String Desc;public Department (String name, String desc) {this .name = name;public String getName () {return name;public void setName (String name) {this .name = name;public String getDesc () {return Desc;public void setDesc (String desc) {
1 2 3 4 5 6 7 8 9 10 11 12 13 14 15 16 17 18 19 20 package IteratorPattern;import java.util.Iterator;public interface College {public String getName () ;public void addDepartment (String name, String desc) ;public Iterator createIterator () ;
1 2 3 4 5 6 7 8 9 10 11 12 13 14 15 16 17 18 19 20 21 22 23 24 25 26 27 28 29 30 31 32 33 34 35 36 37 38 39 40 41 42 package IteratorPattern;import java.util.Iterator;public class ComputerCollegeIterator implements Iterator {int position = 0 ; public ComputerCollegeIterator (Department[] departments) {this .departments = departments;@Override public boolean hasNext () {if (position >= departments.length || departments[position] == null ) {return false ;else {return true ;@Override public Object next () {Department department = departments[position];1 ;return department;public void remove () {
1 2 3 4 5 6 7 8 9 10 11 12 13 14 15 16 17 18 19 20 21 22 23 24 25 26 27 28 29 30 31 32 33 34 35 36 package IteratorPattern;import java.util.Iterator;import java.util.List;public class InfoCollegeIterator implements Iterator {int index = -1 ; public InfoCollegeIterator (List<Department> departmentList) {this .departmentList = departmentList;@Override public boolean hasNext () {if (index >= departmentList.size() - 1 ) {return false ;else {1 ;return true ;@Override public Object next () {return departmentList.get(index);
1 2 3 4 5 6 7 8 9 10 11 12 13 14 15 16 17 18 19 20 21 22 23 24 25 26 27 28 29 30 31 32 33 34 35 36 37 38 39 40 package IteratorPattern;import java.util.Iterator;public class ComputerCollege implements College {int numOfDepartment = 0 ; public ComputerCollege () {new Department [5 ];"JAVA专业" , "JAVA专业" );"PHP专业" , "PHP专业" );"大数据专业" , "大数据专业" );"人工智能专业" , "人工智能专业" );@Override public String getName () {return "计算机学院" ;@Override public void addDepartment (String name, String desc) {Department department = new Department (name, desc);@Override public Iterator createIterator () {return new ComputerCollegeIterator (departments);
1 2 3 4 5 6 7 8 9 10 11 12 13 14 15 16 17 18 19 20 21 22 23 24 25 26 27 28 29 30 31 32 33 34 35 36 37 38 39 package IteratorPattern;import java.util.ArrayList;import java.util.Iterator;import java.util.List;public class InfoCollege implements College {public InfoCollege () {new ArrayList <>();"信息安全专业" , "信息安全专业" );"网络安全专业" , "网络安全专业" );"服务器安全专业" , "服务器安全专业" );@Override public String getName () {return "信息工程学院" ;@Override public void addDepartment (String name, String desc) {Department department = new Department (name, desc);@Override public Iterator createIterator () {return new InfoCollegeIterator (departmentList);
1 2 3 4 5 6 7 8 9 10 11 12 13 14 15 16 17 18 19 20 21 22 23 24 25 26 27 28 29 30 31 32 33 34 35 36 37 38 package IteratorPattern;import java.util.Iterator;import java.util.List;public class OutPutImpl {public OutPutImpl (List<College> collegeList) {this .collegeList = collegeList;public void printCollege () {while (iterator.hasNext()) {College college = iterator.next();"=======" + college.getName());private void printDepartment (Iterator iterator) {while (iterator.hasNext()) {Department department = (Department)iterator.next();
1 2 3 4 5 6 7 8 9 10 11 12 13 14 15 16 17 18 19 20 21 22 23 24 25 26 package IteratorPattern;import java.util.ArrayList;public class Client {public static void main (String[] args) {new ArrayList <College>();ComputerCollege computerCollege = new ComputerCollege ();InfoCollege infoCollege = new InfoCollege ();OutPutImpl outPut = new OutPutImpl (collegeList);
迭代器模式在JDK-ArrayList集合应用的源码分析 JDK的ArrayList集合中就使用了迭代器模式
内部类Itr充当具体实现迭代器Iterator的类,作为ArrayList内部类
List 就是充当了聚合接口,含有一个iterator()方法,返回一个迭代器对象ArrayList是实现聚合接口List的子类,实现了iterator()Iterator接口系统提供迭代器模式解决了不同集合(ArrayList ,LinkedList)统一遍历问题
总结 优点
提供一个统一的方法遍历对象,客户不用再考虑聚合的类型,使用一种方法就可以遍历对象了。
隐藏了聚合的内部结构,客户端要遍历聚合的时候只能取到迭代器,而不会知道聚合的具体组成。
提供了一种设计思想 ,就是一个类应该只有一个引起变化的原因(叫做单一责任原则)。在聚合类中,我们把迭代器分开,就是要把管理对象集合 和遍历对象集合 的责任分开,这样一来集合改变的话,只影响到聚合对象。而如果遍历方式改变的话,只影响到了迭代器。
当要展示一组相似对象,或者遍历一组相同对象时使用,适合使用迭代器模式
缺点
1. 每个聚合对象都要一个迭代器,会生成多个迭代器不好管理类
观察者模式(⭐⭐⭐⭐⭐) 需求:
气象站可以将每天测量到的温度,湿度,气压等等以公告的形式发布出去(比如发布到自己的网站或第三方)
需要设计开放型API ,便于其他第三方也能接入气象站获取数据 。
提供温度、气压和湿度的接口
测量数据更新时,要能实时的通知给第三方
1 2 3 4 5 6 7 8 9 10 11 12 13 14 15 16 17 18 19 20 21 22 23 24 25 26 27 28 29 30 package ObserverPattern.tradition;public class CurrentConditions {private float temperature;private float pressure;private float humidity;public void update (float temperature, float pressure, float humidity) {this .temperature = temperature;this .pressure = pressure;this .humidity = humidity;public void display () {"***Today mTemperature: " + temperature + "***" );"***Today mPressure: " + pressure+"***" );"***Today mHumidity: " + humidity + "***" );
1 2 3 4 5 6 7 8 9 10 11 12 13 14 15 16 17 18 19 20 21 22 23 24 25 26 27 28 29 30 31 32 33 34 35 36 37 38 39 40 41 42 43 44 45 package ObserverPattern.tradition;public class WeatherData {private float temperatrue;private float pressure;private float humidity;private CurrentConditions currentConditions;public WeatherData (CurrentConditions currentConditions) {this .currentConditions = currentConditions;public float getTemperature () {return temperatrue;public float getPressure () {return pressure;public float getHumidity () {return humidity;public void dataChange () {public void setData (float temperature, float pressure, float humidity) {this .temperatrue = temperature;this .pressure = pressure;this .humidity = humidity;
1 2 3 4 5 6 7 8 9 10 11 12 13 14 15 16 17 18 package ObserverPattern.tradition;public class Client {public static void main (String[] args) {CurrentConditions currentConditions = new CurrentConditions ();WeatherData weatherData = new WeatherData (currentConditions);30 , 150 , 40 );"============天气发生变化=============" );40 , 160 , 20 );
问题分析:
public void dataChange() { currentConditions.update(getTemperature(), getPressure(), getHumidity()); }
观察者模式原理
观察者模式类似订牛奶业务
奶站/气象局: Subject
用户/第三方网站:Observer
Subject:登记注册、移除和通知
registerObserver 注册removeObserver 移除 notifyObservers()通知所有的注册的用户,根据不同需求,可以是更新数据,让用户来取,也可能是实施推送,看具体需求定
Observer:接收输入
观察者模式:对象之间多对一依赖的一种设计方案,被依赖的对象为Subject,依赖的对象为Observer,Subject
代码实现
1 2 3 4 5 6 7 8 9 10 11 12 13 package ObserverPattern.improve;public interface Observer {public void update (float temperature, float pressure,float humidity) ;
1 2 3 4 5 6 7 8 9 10 11 12 13 14 15 16 17 18 19 20 21 22 23 24 25 26 27 28 29 package ObserverPattern.improve;public class CurrentConditions implements Observer {private float temperature;private float pressure;private float humidity;@Override public void update (float temperature, float pressure, float humidity) {this .temperature = temperature;this .pressure = pressure;this .humidity = humidity;public void display () {"***Today mTemperature: " + temperature + "***" );"***Today mPressure: " + pressure+"***" );"***Today mHumidity: " + humidity + "***" );
1 2 3 4 5 6 7 8 9 10 11 12 13 14 15 16 17 18 19 20 21 22 23 24 25 26 27 28 29 30 package ObserverPattern.improve;public class BaiduSite implements Observer {private float temperature;private float pressure;private float humidity;@Override public void update (float temperature, float pressure, float humidity) {this .temperature = temperature;this .pressure = pressure;this .humidity = humidity;public void display () {"===百度网站===" );"***百度网站气温:" +temperature + "***" );"***百度网站气压: " + pressure + "***" );"***百度网站湿度:" + humidity + "***" );
1 2 3 4 5 6 7 8 9 10 11 12 13 14 15 16 package ObserverPattern.improve;public interface Subject {public void registerObserver (Observer o) ;public void removeObserver (Observer o) ;public void notifyObservers () ;
1 2 3 4 5 6 7 8 9 10 11 12 13 14 15 16 17 18 19 20 21 22 23 24 25 26 27 28 29 30 31 32 33 34 35 36 37 38 39 40 41 42 43 44 45 46 47 48 49 50 51 52 53 54 55 56 57 58 59 60 61 62 63 64 65 66 67 68 69 70 71 72 73 74 75 package ObserverPattern.improve;import java.util.ArrayList;public class WeatherData implements Subject {private float temperature;private float pressure;private float humidity;private ArrayList<Observer> observes;public WeatherData () {new ArrayList <>();public void dataChange () {public void setData (float temperature, float pressure, float humidity) {this .temperature = temperature;this .pressure = pressure;this .humidity = humidity;@Override public void registerObserver (Observer o) {@Override public void removeObserver (Observer o) {if (observes.contains(o)) {@Override public void notifyObservers () {for (int i = 0 ; i < observes.size(); i++) {this .temperature, this .pressure, this .humidity);public float getTemperature () {return temperature;public float getPressure () {return pressure;public float getHumidity () {return humidity;
1 2 3 4 5 6 7 8 9 10 11 12 13 14 15 16 17 18 19 20 21 22 23 24 25 26 27 28 29 package ObserverPattern.improve;public class Client {public static void main (String[] args) {WeatherData weatherData = new WeatherData ();CurrentConditions currentConditions = new CurrentConditions ();BaiduSite baiduSite = new BaiduSite ();"通知各个注册者,看看信息" );15f ,40f ,30f );10f ,20f ,30f );
观察者模式的好处
观察者模式设计后,会以集合的方式来管理用户(Observer),包括注册,移除和通知。
这样,我们增加观察者(这里可以理解成一个新的公告板),就不需要去修改核心类WeatherData不会修改代码,遵守了ocp 原则。
观察者模式在Jdk应用的源码分析
Jdk 的Observable类就使用了观察者模式
代码分析+模式角色分析
Observable的作用和地位等价于我们前面讲过Subject
Observable 是类,不是接口,类中已经实现了核心的方法 ,即管理Observer的方法 add..delete ..
notify…Observer 的作用和地位等价于我们前面讲过的Observer,有update
Observable和 Observer的使用方法和前面讲过的一样,只是Observable是类,通过继承来实现观察者模式
中介者模式(⭐⭐)
定义一个对象来封装一系列对象的交互。中介者模式使个对象之间不需要显式地相互引用,从而使其耦合松散,而其用户可以独立的改变他们之间的交互。
需求:
智能家庭包括各种设备,闹钟、咖啡机、电视机、窗帘等
当各电器对象有多种状态改变时,相互之间的调用关系会比较复杂
各个电器对象彼此联系,你中有我,我中有你,不利于松耦合 .
各个电器对象之间所传递的消息(参数),容易混乱
当系统增加一个新的电器对象时,或者执行流程改变时,代码的可维护性、扩展性都不理想――考虑中介者模
中介者模式基本介绍
中介者模式(Mediator Pattern),用一个中介对象来封装一系列的对象交互 。中介者使各个对象不需要显式地耦合松散 ,而且可以独立地改变它们之间的交互
中介者模式属于行为型模式,使代码易于维护
比如MVC模式,C(Controller控制器)是M(Model模型)和V(View视图)的中介者,在前后端交互时起到了中间人的作用
中介者模式原理类图
Mediator 就是抽象中介者,定义了同事对象到中介者对象的接口Colleague是抽象同事类ConcreteMediator具体的中介者对象,实现抽象方法,他需要知道所有的具体的同事类,即以一个集合来管理ConcreteColleague具体的同事类,会有很多,每个同事只知道自己的行为,而不了解其他同事类的行为(方法),但是他们都依赖中介者对象
代码实现
1 2 3 4 5 6 7 8 9 10 11 12 13 14 15 16 17 18 19 20 package MediatorPattern.smarthouse;public abstract class Colleague {private Mediator mediator;public String name;public Colleague (Mediator mediator, String name) {this .mediator = mediator;this .name = name;public Mediator GetMediator () {return this .mediator;public abstract void SendMessage (int stateChange) ;
1 2 3 4 5 6 7 8 9 10 11 12 package MediatorPattern.smarthouse;public abstract class Mediator {public abstract void Register (String colleagueName, Colleague colleague) ;public abstract void GetMessage (int stateChange, String colleagueName) ;public abstract void SendMessage () ;
1 2 3 4 5 6 7 8 9 10 11 12 13 14 15 16 17 18 19 20 21 22 23 package MediatorPattern.smarthouse;public class TV extends Colleague {public TV (Mediator mediator, String name) {super (mediator, name);this );@Override public void SendMessage (int stateChange) {this .GetMediator().GetMessage(stateChange, this .name);public void StartTv () {"It's time to StartTv!" );public void StopTv () {"StopTv!" );
1 2 3 4 5 6 7 8 9 10 11 12 13 14 15 16 17 18 19 20 package MediatorPattern.smarthouse;public class Curtains extends Colleague {public Curtains (Mediator mediator, String name) {super (mediator, name);this );@Override public void SendMessage (int stateChange) {this .GetMediator().GetMessage(stateChange, this .name);public void UpCurtains () {"I am holding Up Curtains!" );
1 2 3 4 5 6 7 8 9 10 11 12 13 14 15 16 17 18 19 20 21 22 23 24 25 26 package MediatorPattern.smarthouse;public class CoffeeMachine extends Colleague {public CoffeeMachine (Mediator mediator, String name) {super (mediator, name);this );@Override public void SendMessage (int stateChange) {this .GetMediator().GetMessage(stateChange, this .name);public void StartCoffee () {"It's time to startcoffee!" );public void FinishCoffee () {"After 5 minutes!" );"Coffee is ok!" );0 );
1 2 3 4 5 6 7 8 9 10 11 12 13 14 15 16 17 18 19 20 21 22 23 24 package MediatorPattern.smarthouse;public class Alarm extends Colleague {public Alarm (Mediator mediator, String name) {super (mediator, name);this );public void SendAlarm (int stateChange) {@Override public void SendMessage (int stateChange) {this .GetMediator().GetMessage(stateChange, this .name);
1 2 3 4 5 6 7 8 9 10 11 12 13 14 15 16 17 18 19 20 21 22 23 24 25 26 27 28 29 30 31 32 33 34 35 36 37 38 39 40 41 42 43 44 45 46 47 48 49 50 51 52 53 54 55 56 57 58 59 60 61 62 63 64 65 66 67 package MediatorPattern.smarthouse;import java.util.HashMap;public class ConcreteMediator extends Mediator {private HashMap<String, Colleague> colleagueMap;private HashMap<String, String> interMap;public ConcreteMediator () {new HashMap <String, Colleague>();new HashMap <String, String>();@Override public void Register (String colleagueName, Colleague colleague) {if (colleague instanceof Alarm) {"Alarm" , colleagueName);else if (colleague instanceof CoffeeMachine) {"CoffeeMachine" , colleagueName);else if (colleague instanceof TV) {"TV" , colleagueName);else if (colleague instanceof Curtains) {"Curtains" , colleagueName);@Override public void GetMessage (int stateChange, String colleagueName) {if (colleagueMap.get(colleagueName) instanceof Alarm) {if (stateChange == 0 ) {"CoffeeMachine" )))).StartCoffee();"TV" )))).StartTv();else if (stateChange == 1 ) {"TV" )))).StopTv();else if (colleagueMap.get(colleagueName) instanceof CoffeeMachine) {"Curtains" ))))else if (colleagueMap.get(colleagueName) instanceof TV) {else if (colleagueMap.get(colleagueName) instanceof Curtains) {@Override public void SendMessage () {
1 2 3 4 5 6 7 8 9 10 11 12 13 14 15 16 17 18 19 20 21 22 23 24 25 26 27 package MediatorPattern.smarthouse;public class ClientTest {public static void main (String[] args) {Mediator mediator = new ConcreteMediator ();Alarm alarm = new Alarm (mediator, "alarm" );CoffeeMachine coffeeMachine = new CoffeeMachine (mediator,"coffeeMachine" );Curtains curtains = new Curtains (mediator, "curtains" );TV tV = new TV (mediator, "TV" );0 );1 );
总结
多个类相互耦合,会形成网状结构,使用中介者模式将网状结构分离为星型结构,进行解耦
减少类间依赖,降低了耦合,符合迪米特原则
中介者承担了较多的责任,一旦中介者出现了问题,整个系统就会受到影响 如果设计不当,中介者对象本身变得过于复杂,这点在实际使用时,要特别注意
备忘录模式(⭐⭐) 需求:
游戏角色有攻击力和防御力,在大战Boss前保存自身的状态(攻击力和防御力),当大战Boss后攻击力和防御力下降,从备忘录对象恢复到大战前的状态。
一个对象,就对应一个保存对象状态的对象,这样当我们游戏的对象很多时,不利于管理,开销也很大.
传统的方式是简单地做备份,new出另外一个对象出来,再把需要备份的数据放到这个新对象,但这就暴露了对象内部的细节
解决方案:→备忘录模式
备忘录模式基本介绍
备忘录模式(Memento Pattern)在不破坏封装性的前提 下,捕获一个对象的内部状态 ,并在该对象之外保存这个状态。这样以后就可将该对象恢复到原先保存的状态 。
可以这里理解备忘录模式:现实生活中的备忘录是用来记录某些要去做的事情,或者是记录已经达成的共同意见的事情,以防忘记了。而在软件层面,备忘录模式有着相同的含义,备忘录对象主要用来记录一个对象的某种状态,或者某些数据,当要做回退时,可以从备忘录对象里获取原来的数据进行恢复操作
备忘录模式属于行为型模式
备忘录模式的原理类图
originator:对象(需要保存状态的对象)Memento :备忘录对象,负责保存好记录,即 Originator内部状态Caretaker:守护者对象,负责保存多个备忘录对象,使用集合管理,提高效率说明:如果希望保存多个originator对象的不同时间的状态,也可以,只需要要 HashMap<String,集合>
代码实现 1 2 3 4 5 6 7 8 9 10 11 12 13 14 15 16 17 18 19 20 21 22 package Memento;public class Memento {private String state;public Memento (String state) {this .state = state;public String getState () {return state;
1 2 3 4 5 6 7 8 9 10 11 12 13 14 15 16 17 18 19 20 21 22 23 24 25 26 27 28 29 30 31 package Memento;public class Originator {private String state; public String getState () {return state;public void setState (String state) {this .state = state;public Memento saveStateMemento () {return new Memento (state);public void getStateFromMemento (Memento memento) {
1 2 3 4 5 6 7 8 9 10 11 12 13 14 15 16 17 18 19 20 21 22 23 24 25 26 package Memento;import java.util.ArrayList;import java.util.List;public class Caretaker {private List<Memento> mementoList = new ArrayList <Memento>();public void add (Memento memento) {public Memento get (int index) {return mementoList.get(index);
1 2 3 4 5 6 7 8 9 10 11 12 13 14 15 16 17 18 19 20 21 22 23 24 25 26 27 28 29 30 31 32 33 package Memento;public class Client {public static void main (String[] args) {Originator originator = new Originator ();Caretaker caretaker = new Caretaker ();"状态#1 攻击力100" );"状态#2 攻击力100" );"状态#3 攻击力50" );"当前的状态是=" + originator.getState());0 ));"恢复到状态1,当前的状态是" );"当前的状态是=" + originator.getState());
游戏角色恢复状态实例 游戏角色有攻击力和防御力,在大战Boss前保存自身的状态(攻击力和防御力),当大战Boss 后攻击力和防御力下降,从备忘录对象恢复到大战前的状态
1 2 3 4 5 6 7 8 9 10 11 12 13 14 15 16 17 18 19 20 21 22 23 24 25 26 27 28 29 30 31 32 33 34 35 36 37 package Memento.game;public class Memento {private int vit;private int def;public Memento (int vit, int def) {this .vit = vit;this .def = def;public int getVit () {return vit;public void setVit (int vit) {this .vit = vit;public int getDef () {return def;public void setDef (int def) {this .def = def;
1 2 3 4 5 6 7 8 9 10 11 12 13 14 15 16 17 18 19 20 21 22 23 24 25 26 27 28 29 30 31 32 33 34 35 package Memento.game;public class GameRole {private int vit;private int def;public Memento createMemento () {return new Memento (vit, def);public void recoverGameRoleFromMemento (Memento memento) {this .vit = memento.getVit();this .def = memento.getDef();public void display () {"游戏角色当前的攻击力:" + this .vit + "防御力: " + this .def);public void setVit (int vit) {this .vit = vit;public void setDef (int def) {this .def = def;
1 2 3 4 5 6 7 8 9 10 11 12 13 14 15 16 17 18 19 20 21 22 23 24 25 26 27 28 29 package Memento.game;import java.util.ArrayList;import java.util.HashMap;public class Caretaker {private Memento memento;private ArrayList<Memento> mementos;private HashMap<String, ArrayList<Memento>> rolesMementos;public Memento getMemento () {return memento;public void setMemento (Memento memento) {this .memento = memento;
1 2 3 4 5 6 7 8 9 10 11 12 13 14 15 16 17 18 19 20 21 22 23 24 25 26 27 28 29 30 31 32 33 34 35 36 37 38 package Memento.game;public class Client {public static void main (String[] args) {GameRole gameRole = new GameRole ();100 );100 );"和boss大战前的状态" );Caretaker caretaker = new Caretaker ();"和boss大战~~~" );30 );30 );"大战后,使用备忘录对象恢复到站前" );"恢复后的状态" );
总结
给用户提供了一种可以恢复状态的机制,可以使用户能够比较方便地回到某个历史的状态
实现了信息的封装,使得用户不需要关心状态的保存细节
如果类的成员变量过多,势必会占用比较大的资源,而且每一次保存都会消耗一定的内存,
适用的应用场景:1、后悔药。2、打游戏时的存档。3、Windows里的 ctri+z。4、E中的后退。4、数
为了节约内存,备忘录模式可以和原型模式配合使用
解释器模式(⭐) 需求:
先输入表达式的形式,比如a+b+c-d+e,要求表达式的字母不能重复
在分别输入 a ,b, c, d,e 的值
最后求出结果:如图
传统方案解决四则运算问题分析:
编写一个方法,接收表达式的形式,然后根据用户输入的数值进行解析,得到结果
问题分析:如果加入新的运算符,比如*/(等等,不利于扩展,另外让一个方法来解析会造成程序结构混乱,
解决方案:可以考虑使用解释器模式,即:表达式>解释器(可以有多种)→>结果
解释器模式基本基本介绍
在编译原理中,一个算术表达式通过词法分析器形成词法单元,而后这些词法单元再通过语法分析器构建语法分析树,最终形成一颗抽象的语法分析树。这里的词法分析器和语法分析器都可以看做是解释器
解释器模式(Interpreter Pattern):是指给定一个语言(表达式),定义它的文法的一种表示,并定义一个解释器,使用该解释器来解释语言中的句子(表达式)
应用场景
这样的例子还有,比如编译器、运算表达式计算、正则表达式、机器人等
解释器模式的原理类图
Context:是环境角色,含有解释器之外的全局信息.AbstractExpression:抽象表达式,声明一个抽象的解释操作,这个方法为抽象语法树中所有的节点所共享TerminalExpression:为终结符表达式,实现与文法中的终结符相关的解释操作NonTermialExpression:为非终结符表达式,为文法中的非终结符实现解释操作.说明:输入Context he TerminalExpression信息通过Client输入即可
代码实现
1 2 3 4 5 6 7 8 9 10 11 12 13 14 15 16 17 package Interpreter;import java.util.HashMap;public abstract class Expression {public abstract int interpreter (HashMap<String, Integer>var ) ;
1 2 3 4 5 6 7 8 9 10 11 12 13 14 15 16 17 18 19 20 21 22 23 24 25 26 package Interpreter;import java.util.HashMap;public class VarExpression extends Expression {private String key; public VarExpression (String key) {this .key = key;@Override public int interpreter (HashMap<String, Integer> var ) {return var .get(this .key);
1 2 3 4 5 6 7 8 9 10 11 12 13 14 15 16 17 18 19 20 21 22 23 24 25 26 27 28 package Interpreter;import java.util.HashMap;public class SymbolExpression extends Expression {protected Expression left;protected Expression right;public SymbolExpression (Expression left, Expression right) {this .left = left;this .right = right;@Override public int interpreter (HashMap<String, Integer> var ) {return 0 ;
1 2 3 4 5 6 7 8 9 10 11 12 13 14 15 16 17 18 19 20 21 22 23 24 25 26 27 package Interpreter;import java.util.HashMap;public class AddExpression extends SymbolExpression {public AddExpression (Expression left, Expression right) {super (left, right);@Override public int interpreter (HashMap<String, Integer> var ) {return super .left.interpreter(var ) + super .right.interpreter(var );
1 2 3 4 5 6 7 8 9 10 11 12 13 14 15 16 17 18 19 20 21 22 package Interpreter;import java.util.HashMap;public class SubExpression extends SymbolExpression {public SubExpression (Expression left, Expression right) {super (left, right);@Override public int interpreter (HashMap<String, Integer> var ) {return super .left.interpreter(var ) - super .right.interpreter(var );
1 2 3 4 5 6 7 8 9 10 11 12 13 14 15 16 17 18 19 20 21 22 23 24 25 26 27 28 29 30 31 32 33 34 35 36 37 38 39 40 41 42 43 44 45 46 47 48 49 50 51 52 53 54 package Interpreter;import java.util.HashMap;import java.util.Stack;public class Calculator {private Expression expression;public Calculator (String expStr) { new Stack <>();char [] charArray = expStr.toCharArray(); Expression left = null ;Expression right = null ;for (int i = 0 ; i < charArray.length; i++) {switch (charArray[i]) {case '+' :new VarExpression (String.valueOf(charArray[++i])); new AddExpression (left, right));break ;case '-' :new VarExpression (String.valueOf(charArray[++i]));new SubExpression (left, right));break ;default :new VarExpression (String.valueOf(charArray[i])));break ;this .expression = stack.pop();public int run (HashMap<String, Integer> var ) {return this .expression.interpreter(var );
1 2 3 4 5 6 7 8 9 10 11 12 13 14 15 16 17 18 19 20 21 22 23 24 25 26 27 28 29 30 31 32 33 34 35 36 37 38 39 40 41 42 43 44 package Interpreter;import java.io.BufferedReader;import java.io.IOException;import java.io.InputStreamReader;import java.util.HashMap;public class ClientTest {public static void main (String[] args) throws IOException {String expStr = getExpStr(); var = getValue(expStr);Calculator calculator = new Calculator (expStr);"运算结果:" + expStr + "=" + calculator.run(var ));public static String getExpStr () throws IOException {"请输入表达式:" );return (new BufferedReader (new InputStreamReader (System.in))).readLine();public static HashMap<String, Integer> getValue (String expStr) throws IOException {new HashMap <>();for (char ch : expStr.toCharArray()) {if (ch != '+' && ch != '-' ) {if (!map.containsKey(String.valueOf(ch))) {"请输入" + String.valueOf(ch) + "的值:" );String in = (new BufferedReader (new InputStreamReader (System.in))).readLine();return map;
解释器模式在Spring框架应用的源码剖析
Spring框架中 SpelExpressionParser就使用到解释器模式
1 2 3 4 5 6 7 8 9 10 11 12 13 14 15 16 17 18 19 package Spring;import org.springframework.expression.Expression;import org.springframework.expression.spel.standard.SpelExpressionParser;public class IteratorPattern {public static void main (String[] args) {SpelExpressionParser parser = new SpelExpressionParser ();Expression expression = parser.parseExpression("10*(2+1) + 66" );int result = (Integer) expression.getValue();
总结
当有一个语言需要解释执行,可将该语言中的句子表示为一个抽象语法树,就可以考虑使用解释器模式,让程序具有良好的扩展性
应用场景:编译器、运算表达式计算、正则表达式、机器人等
使用解释器可能带来的问题:解释器模式会引起类膨胀、解释器模式采用递归调用方法,将会导致调试非常复杂、效率可能降低.
状态模式(⭐⭐⭐) 需求:
请编写程序完成APP抽奖活动具体要求如下:
假如每参加一次这个活动要扣除用户50积分,中奖概率是10%
奖品数量固定,抽完就不能抽奖
活动有四个状态:可以抽奖、不能抽奖、发放奖品和奖品领完
活动的四个状态转换关系图(右图)
状态模式基本介绍
状态模式(State Pattern) :它主要用来解决对象在多种状态转换时,需要对外输出不同的行为的问题。状态当一个对象的内在状态改变时,允许改变其行为,这个对象看起来像是改变了其类
状态模式原理类图
Context类为环境角色,用于维护State实例,这个实例定义当前状态State是抽象状态角色,定义一个接口封装与Context 的一个特点接口相关行为ConcreteState具体的状态角色,每个子类实现一个与Context的一个状态相关行为
代码实现 定义出一个接口叫状态接口,每个状态都实现它。
接口有扣除积分方法、抽奖方法、发放奖品方法
1 2 3 4 5 6 7 8 9 10 11 12 13 14 15 16 17 18 19 20 21 package StatePattern;public abstract class State {public abstract void deductMoney () ;public abstract boolean raffle () ;public abstract void dispensePrize () ;
1 2 3 4 5 6 7 8 9 10 11 12 13 14 15 16 17 18 19 20 21 22 23 24 25 26 27 28 29 30 31 32 33 34 35 36 37 38 39 40 41 42 43 44 45 46 47 48 49 50 51 52 53 54 55 56 57 58 59 60 61 62 63 64 65 66 67 68 69 70 71 72 73 74 75 76 77 78 79 80 81 82 83 84 85 86 87 88 89 90 91 92 93 94 95 96 package StatePattern;public class RaffleActivity {State state = null ;int count = 0 ;State noRaffleState = new NoRaffleState (this );State canRaffleState = new CanRaffleState (this );State dispenseState = new DispenseState (this );State dispenseOutState = new DispenseOutState (this );public RaffleActivity (int count) {this .state = getNoRaffleState();this .count = count;public void debuctMoney () {public void raffle () {if (state.raffle()) {public State getState () {return state;public void setState (State state) {this .state = state;public int getCount () {int curCount = count;return curCount;public void setCount (int count) {this .count = count;public State getNoRaffleState () {return noRaffleState;public void setNoRaffleState (State noRaffleState) {this .noRaffleState = noRaffleState;public State getCanRaffleState () {return canRaffleState;public void setCanRaffleState (State canRaffleState) {this .canRaffleState = canRaffleState;public State getDispenseState () {return dispenseState;public void setDispenseState (State dispenseState) {this .dispenseState = dispenseState;public State getDispenseOutState () {return dispenseOutState;public void setDispenseOutState (State dispenseOutState) {this .dispenseOutState = dispenseOutState;
1 2 3 4 5 6 7 8 9 10 11 12 13 14 15 16 17 18 19 20 21 22 23 24 25 26 27 28 29 30 31 32 33 34 35 36 37 38 package StatePattern;public class NoRaffleState extends State {public NoRaffleState (RaffleActivity activity) {this .activity = activity;@Override public void deductMoney () {"扣除50积分成功,您可以抽奖了" );@Override public boolean raffle () {"扣除50积分才能抽奖喔!" );return false ;@Override public void dispensePrize () {"不能发放奖品" );
1 2 3 4 5 6 7 8 9 10 11 12 13 14 15 16 17 18 19 20 21 22 23 24 25 26 27 28 29 30 31 32 33 34 35 36 37 38 39 40 41 42 43 44 package StatePattern;public class DispenseState extends State {public DispenseState (RaffleActivity activity) {this .activity = activity;@Override public void deductMoney () {"不能扣除积分" );@Override public boolean raffle () {"不能抽奖" );return false ;@Override public void dispensePrize () {if (activity.getCount() > 0 ) {"恭喜中奖了" );else {"很遗憾,奖品发送完了" );"抽奖活动结束" );0 );
1 2 3 4 5 6 7 8 9 10 11 12 13 14 15 16 17 18 19 20 21 22 23 24 25 26 27 28 29 30 31 32 33 34 35 36 package StatePattern;public class DispenseOutState extends State {public DispenseOutState (RaffleActivity activity) {this .activity = activity;@Override public void deductMoney () {"奖品发送完了,请下次再长假" );@Override public boolean raffle () {"奖品发送完了,请下次再参加" );return false ;@Override public void dispensePrize () {"奖品发送完了,请下次再参加" );
1 2 3 4 5 6 7 8 9 10 11 12 13 14 15 16 17 18 19 20 21 22 23 24 25 26 27 28 29 30 31 32 33 34 35 36 37 38 39 40 41 42 43 44 45 46 47 48 49 50 package StatePattern;import java.util.Random;public class CanRaffleState extends State {public CanRaffleState (RaffleActivity activity) {this .activity = activity;@Override public void deductMoney () {"已经扣取过了积分" );@Override public boolean raffle () {"正在抽奖,请稍等" );Random random = new Random ();int num = random.nextInt(10 );if (num == 0 ) {return true ;else {"很遗憾没有抽中奖品!" );return false ;@Override public void dispensePrize () {"没奖品,不能发放奖品" );
1 2 3 4 5 6 7 8 9 10 11 12 13 14 15 16 17 18 19 20 21 22 23 24 25 26 27 28 package StatePattern;public class ClientTest {public static void main (String[] args) {RaffleActivity activity = new RaffleActivity (1 );for (int i = 0 ; i < 30 ; i++) {"--------第" + (i + 1 ) + "次抽奖----------" );
状态模式在实际项目-借贷平台 借贷平台的订单,有审核-发布-抢单等等步骤,随着操作的不同,会改变订单的状态,项目中的这个模块实现就会使用到状态模式
总结
代码有很强的可读性 。状态模式将每个状态的行为封装到对应的一个类中
方便维护 。将容易产生问题的if-else语句删除了,如果把每个状态的行为都放到一个类中,每次调用方法时都要判断当前是什么状态,不但会产出很多if-else语句,而且容易出错符合“开闭原则”。容易增删状态
会产生很多类。每个状态都要一个对应的类,当状态过多时会产生很多类,加大维护难度
应用场景:当一个事件或者对象有很多种状态,状态之间会相互转换,对不同的状态要求有不同的行为的时候,可以考虑使用状态模式
策略模式(⭐⭐⭐⭐)
定义一系列算法,将每一个算法封装起来,并让它们可以相互替换。策略模式让算法可以独立于使用它的客户而变化。
需求:
有各种鸭子(比如野鸭、北京鸭、水鸭等,鸭子有各种行为,比如叫、飞行等
显示鸭子的信息
传统继承方式问题分析:
其它鸭子,都继承了Duck类,所以fly 让所有子类都会飞了,这是不正确的
上面说的1的问题,其实是继承带来的问题:对类的局部改动,尤其超类的局部改动,会影响其他部分。会有
为了改进1问题,我们可以通过覆盖fly方法来解决=→覆盖解决
问题又来了,如果我们有一个玩具鸭子ToyDuck,这样就需要ToyDuck 去覆盖Duck的所有实现的方法=→>解
策略模式基本介绍
策略模式(Strategy Pattern)中,定义算法族(策略组) ,分别封装起来,让他们之间可以互相替换,此模式算法的变化 独立于使用算法的客户
这算法体现了几个设计原则,第一、把变化的代码从不变的代码中分离出来;第二、针对接口编程而不是具体
策略模式的原理类图
从上图可以看到,客户context有成员变量strategy或者其他的策略接口,至于需要使用到哪个策略,我们可以在构造器中指定
代码实现 策略模式:分别封装行为接口,实现算法族,超类里放行为接口对象,在子类里具体设定行为对象。原则就是:分离变化部分,封装接口,基于接口编程各种功能。此模式让行为的变化独立于算法的使用者
QuackBehavor和FlyBehavior功能相似,所以就不重复写
1 2 3 4 5 6 7 8 9 10 11 12 13 package StrategyPattern;public interface FlyBehavior {void fly () ;
1 2 3 4 5 6 7 8 9 10 11 12 package StrategyPattern;public interface QuackBehavior {void quack () ;
1 2 3 4 5 6 7 8 9 10 11 12 13 14 package StrategyPattern;public class NoFlyBehavior implements FlyBehavior {@Override public void fly () {"不会飞翔~~~" );
1 2 3 4 5 6 7 8 9 10 11 12 13 14 package StrategyPattern;public class GoodFlyBehavior implements FlyBehavior {@Override public void fly () {"飞翔技术高超~~~" );
1 2 3 4 5 6 7 8 9 10 11 12 13 14 package StrategyPattern;public class BadFlyBehavior implements FlyBehavior {@Override public void fly () {"飞翔技术一般" );
1 2 3 4 5 6 7 8 9 10 11 12 13 14 15 16 17 18 19 20 21 22 23 24 25 26 27 28 29 30 31 32 33 34 35 36 37 38 39 40 41 42 43 package StrategyPattern;public abstract class Duck {public Duck () {public abstract void display () ; public void quack () {"鸭子嘎嘎叫~~~" );public void swim () {"鸭子会游泳~~~" );public void fly () {if (flyBehavior != null ) {public void setFlyBehavior (FlyBehavior flyBehavior) {this .flyBehavior = flyBehavior;public void setQuackBehavior (QuackBehavior quackBehavior) {this .quackBehavior = quackBehavior;
1 2 3 4 5 6 7 8 9 10 11 12 13 14 15 16 17 18 19 20 package StrategyPattern;public class ToyDuck extends Duck {public ToyDuck () {new NoFlyBehavior ();@Override public void display () {"玩具鸭" );
1 2 3 4 5 6 7 8 9 10 11 12 13 14 15 16 17 18 19 package StrategyPattern;public class WildDuck extends Duck {public WildDuck () {new GoodFlyBehavior ();@Override public void display () {"这是野鸭" );
1 2 3 4 5 6 7 8 9 10 11 12 13 14 15 16 17 18 19 20 package StrategyPattern;public class PekingDuck extends Duck {public PekingDuck () {new BadFlyBehavior ();@Override public void display () {"~~北京鸭~~" );
1 2 3 4 5 6 7 8 9 10 11 12 13 14 15 16 17 18 19 20 21 22 23 24 25 package StrategyPattern;public class Client {public static void main (String[] args) {WildDuck wildDuck = new WildDuck ();ToyDuck toyDuck = new ToyDuck ();PekingDuck pekingDuck = new PekingDuck ();new NoFlyBehavior ());"北京鸭的实际飞行能力" );
策略模式在JDK-Arrays 应用的源码分析
1 2 3 4 5 6 7 8 9 10 11 12 13 14 15 16 17 18 19 20 21 22 23 24 25 26 27 28 29 30 31 32 33 34 35 36 37 38 39 40 41 42 43 44 45 46 47 48 49 50 51 52 53 package JDK_SRC;import java.util.Arrays;import java.util.Comparator;public class Strategy {public static void main (String[] args) {9 ,1 ,2 ,8 ,4 ,3 };new Comparator <Integer>() {@Override public int compare (Integer o1, Integer o2) {if (o1 >= o2) {return -1 ;else {return 1 ;19 ,11 ,12 ,18 ,14 ,13 };if (var1.compareTo(var2) > 0 ) {return -1 ;else {return 1 ;
总结
策略模式的关键是:分析项目中变化部分与不变部分
策略模式的核心思想是:多用组合/聚合少用继承;用行为类组合,而不是行为的继承。更有弹性
体现了“对修改关闭,对扩展开放”原则,客户端增加行为不用修改原有代码,只要添加一种策略(或者行为)
提供了可以替换继承关系的办法:策略模式将算法封装在独立的Strategy类中使得你可以独立于其Context 改
**需要注意的是:**每添加一个策略就要增加一个类,当策略过多是会导致类数目庞
职责链模式(⭐⭐) 需求:
采购员采购教学器材
如果金额小于等于5000,由教学主任审批(O<=x<=5000)
如果金额小于等于10000,由院长审批(5000<x<=10000)
如果金额小于等于30000,由副校长审批(10000<x<=30000)
如果金额超过30000以上,有校长审批(30000<x)
传统设计存在的问题:
传统方式是:接收到一个采购请求后,根据采购金额来调用对应的Approver (审批人)完成审批。
传统方式的问题分析︰客户端这里会使用到分支判断(比如 switch)来对不同的采购请求处理,这样就存在如下问题
(1)如果各个级别的人员审批金额发生变化,在客户端的也需要变化
(2)客户端必须明确的知道有多少个审批级别和访问
这样对一个采购请求进行处理和Approver (审批人)就存在强耦合关系,不利于代码的扩展和维护
职责链模式基本介绍
职责链模式(Chain of Responsibility Pattern),又叫责任链模式,为请求创建了一个接收者对象的链(简单示意图)。这种模式对请求的发送者和接收者进行解耦。
职责链模式通常每个接收者都包含对另一个接收者的引用。如果一个对象不能处理该请求那么它会把相同的请求传给下一个接收者,依此类推。
这种类型的设计模式属于行为型模式
职责链模式的原理类图
Handler:抽象的处理者,定义了一个处理请求的接口,同时含义另外HandlerConcretcHandlerA,B 是具体的处理者,处理它自己负责的请求,可以访问它的后继者(即下一个处理者),如果可以处理当前请求,则处理,否则就将该请求交个后继者去处理,从而形成一个职责链.Request ,含义很多属性,表示一个请求
代码实现
1 2 3 4 5 6 7 8 9 10 11 12 13 14 15 16 17 18 19 20 21 22 23 24 25 26 27 28 29 30 31 32 33 34 package ChainOfResponsibilityPattern;public class PurchaseRequest {private int type = 0 ; private float price = 0.0f ; private int id = 0 ;public PurchaseRequest (int type, float price, int id) {this .type = type;this .price = price;this .id = id;public int getType () {return type;public float getPrice () {return price;public int getId () {return id;
1 2 3 4 5 6 7 8 9 10 11 12 13 14 15 16 17 18 19 20 21 22 23 24 25 package ChainOfResponsibilityPattern;public abstract class Approver {public Approver (String name) {this .name = name;public void setApprover (Approver approver) {this .approver = approver;public abstract void processRequest (PurchaseRequest purchaseRequest) ;
1 2 3 4 5 6 7 8 9 10 11 12 13 14 15 16 17 18 19 20 21 22 package ChainOfResponsibilityPattern;public class DepartmentApprover extends Approver {public DepartmentApprover (String name) {super (name);@Override public void processRequest (PurchaseRequest purchaseRequest) {if (purchaseRequest.getPrice() <= 5000 ) {"请求编号id=" + purchaseRequest.getId()+" 被 " + this .name+"处理" );else {
1 2 3 4 5 6 7 8 9 10 11 12 13 14 15 16 17 18 19 20 21 22 23 package ChainOfResponsibilityPattern;public class CollegeApprover extends Approver {public CollegeApprover (String name) {super (name);@Override public void processRequest (PurchaseRequest purchaseRequest) {if (purchaseRequest.getPrice() > 5000 && purchaseRequest.getPrice() <= 10000 ) {"请求编号id=" + purchaseRequest.getId()+" 被 " + this .name+"处理" );else {
1 2 3 4 5 6 7 8 9 10 11 12 13 14 15 16 17 18 19 20 21 22 package ChainOfResponsibilityPattern;public class ViceSchoolMasterApprover extends Approver {public ViceSchoolMasterApprover (String name) {super (name);@Override public void processRequest (PurchaseRequest purchaseRequest) {if (purchaseRequest.getPrice() > 10000 && purchaseRequest.getPrice() <= 30000 ) {"请求编号id=" + purchaseRequest.getId()+" 被 " + this .name+"处理" );else {
1 2 3 4 5 6 7 8 9 10 11 12 13 14 15 16 17 18 19 20 21 22 23 package ChainOfResponsibilityPattern;public class SchoolMasterApprover extends Approver {public SchoolMasterApprover (String name) {super (name);@Override public void processRequest (PurchaseRequest purchaseRequest) {if (purchaseRequest.getPrice() > 30000 ) {"请求编号id=" + purchaseRequest.getId()+" 被 " + this .name+"处理" );else {
1 2 3 4 5 6 7 8 9 10 11 12 13 14 15 16 17 18 19 20 21 22 23 24 25 26 27 28 package ChainOfResponsibilityPattern;public class Client {public static void main (String[] args) {PurchaseRequest purchaseRequest = new PurchaseRequest (1 ,30001 ,1 );DepartmentApprover departmentApprover = new DepartmentApprover ("张主任" );CollegeApprover collegeApprover = new CollegeApprover ("王院长" );ViceSchoolMasterApprover viceSchoolMasterApprover = new ViceSchoolMasterApprover ("李副校长" );SchoolMasterApprover schoolMasterApprover = new SchoolMasterApprover ("邓校长" );
职责链模式在SpringMVC框架应用的源码分析
SpringMVC-HandlerExecutionChain类就使用到职责链模式
SpringMVC请求流程简图
1 2 3 4 5 6 7 8 9 10 11 12 13 14 15 16 17 18 19 20 21 22 23 24 25 26 27 28 29 30 31 32 33 34 package Spring.springmvc;import org.springframework.web.servlet.DispatcherServlet;public class Responsibility {public static void main (String[] args) {
springmvc请求的流程图中,执行了拦截器相关方法 interceptor.preHandler 等等在处理SpringMvc请求时,使用到职责链模式还使用到适配器模式
HandlerExecutionChain 主要负责的是请求拦截器的执行和请求处理,但是他本身不处理请求,只是将请求分配给链上注册处理器执行,这是职责链实现方式;减少职责链本身与处理逻辑之间的耦合,规范了处理流程
HandlerExecutionChain 维护了HandlerInterceptor的集合,可以向其中注册相应的拦截器.
总结
将请求和处理分开,实现解耦,提高系统的灵活性
简化了对象,使对象不需要知道链的结构
性能会受到影响,特别是在链比较长的时候,因此需控制链中最大节点数量,一般通过在Handler 中设置一个
调试不方便。采用了类似递归的方式,调试时逻辑可能比较复杂
最佳应用场景:有多个对象可以处理同一个请求时,比如:多级请求、请假/加薪等审批流程、Java Web 中Tomcat对Encoding的处理、拦截器